Table of Contents 1 Before You Begin ............................................ 2 2 Installing the DA-7169 Monitor ....................... 4 3 Parts Overview ................................................. 8 4 Operating the DA-7169 Monitor ................... 11 5 Specifications ................................................ 16 6 Appendix ........................................................
1 Before You Begin Welcome to the In-Dash DA-7169 Operating Guide. Before you begin, read the following warnings and notes carefully. Warning! To avoid serious harm or injury to you, others, the vehicle, or the remote control unit, follow the instructions below. To avoid short-circuiting the electrical system: • When replacing a blown fuse, disconnect all power supplies and power off the unit. Be sure to use the correct replacement fuse.
1 Before You Begin • Do not drop metal or foreign objects between the display screen and enclosure. Doing so may impede the motorized tray and cause an electrical short. Important Notes • When using the unit with a radio/TV tuner (model DA-2301), reception quality will vary with geographical location and climatic conditions. • For safety, this unit can only be activated when the vehicles hand break is engaged. See your dealer for details. • Do not install the screen where it may distract the driver.
2 Installing the DA-7169 Monitor Precautions 1 This unit should be installed by a qualified service technician. 2 This product is designed to operate with a 12-Volt, negative ground battery. 3 Disconnect the ground wire from the battery terminal before connecting this unit to the electrical system. 4 Other products or accessories may have wires that are color-coded similarly to those for this unit.
2 Installing the DA-7169 Monitor Electrical Connections Color Code Function Black Red Yellow Blue Ground ACC +12 V +12 V Out (Max 1 Amp) Page 5
2 Installing the DA-7169 Monitor Signal Connections Color Code Function Grey /Yellow Video 1 In Black /Yellow Video 2 In Black/Black Video Out Orange/Brown Rear View Camera/Night Switch Signal Signal & Control Signal & Control Page 6
2 Installing the DA-7169 Monitor Typical Wiring Diagram The following is a typical wiring diagram for an In-Dash DA7169 connected to model DVA-310x and a radio receiver with a 40-Watt, 4-channel power amplifier.
3 Parts Overview Front Panel 1 2 3 4 5 6 7 8 9 7/8/9 10 11 12 13 14 15 16 Mute (MUTE) Remote sensor Signal Source select (SRCE and CH / AV1 / AV2) Player select and Play/Pause (DISC & PLAY / PAUSE) AM/FM Radio select (BAND & AM/FM; when interfaced with DA-2301) OPEN / CLOSE Disc select +/- (DISC) Audio select (AUDIO) Repeat function (REP) Memory location (1 / 2 / 3 / 4 / 5 / 6) Forward (>) Up volume control Backward (<) Function mode (SEL) Down volume control Degree of tilt (ANGLE) Display mode (WIDE) P
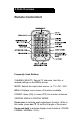
3 Parts Overview Remote Control Unit Frequently Used Buttons CHANNEL SELECT: Selects TV channels, disc title, or desired settings on the MENU screen. MODE: Selects the input video source. i.e. TV / AV1 / AV2. MENU: Displays menu screen of functions available. POWER: Open (ON) or close (OFF) the monitor enclosure. VIEWING ANGLE & DISPLAY MODE: Press once to activate angle adjustment function. While in this mode, press por q to set the tilt angle of the screen.
3 Parts Overview Replacing the Battery 1 Use a small coin to remove battery container from the unit. 2 Remove old battery and insert new one. The positive sign (+) should face upward. 3 Insert battery container into unit until it is securely in place. Precautions 1 Properly dispose of used battery. 2 Overheating the battery may cause an explosion or create a fire hazard. 3 Remove used batteries from the battery container to prevent leakage. 4 Prevent children from playing with the battery.
4 Operating the DA-7169 Monitor Operating the In-Dash DA-7169 Color Display Monitor To take full advantage of the In-Dash DA-7169s features, read these operating instructions before using the monitor. Note: The color and brightness of the LCD display screen is factory preset. To adjust picture quality, follow the instructions in this guide. Ejecting and Opening the Display Monitor • To eject/open the display monitor, press the OPEN / CLOSE button (#6 on the Front Panel Overview on page 7) once.
4 Operating the DA-7169 Monitor Note: To prevent damage to the gear train, do not use force to adjust the display screen. • The display monitor returns to the preset position whenever the system is turned ON. Selecting the Screen Size • Press the WIDE button (#16) to change the screen size. There are four options: ZOOM: Picture is stretched vertically and horizontally. CINEMA: Picture is displayed with uniform enlargement horizontally.
4 Operating the DA-7169 Monitor to factory defaults. Note: The SEL button will have different functions when the monitor is connected to model DA-2301. Refer to the user manual for details. • Once the correct option is visible, press the forward/ backward keys (< and >) to confirm your selection. If no key is pressed, then the SEL mode will turn off in about five seconds.
4 Operating the DA-7169 Monitor Selecting the Video Source • Press the SRCE button (#3) to choose between AV1 and AV2. Note: Refer to Choosing NTSC or PAL Display System on previous page. Note: The SRCE button activates TV (CH) mode when the monitor is connected to model DA-2301. Selecting the Audio Channel • Use the AUDIO button (#8) to select the desired channel when the monitor is connected to a DVD player or VCD/ CD changer (model DA-2301).
4 Operating the DA-7169 Monitor Selecting Preprogrammed Radio Stations • When the monitor is connected to model DA-2301, Use buttons 1 / 2 / 3 / 4 / 5 / 6 (buttons #7-9 on the Front Panel Overview on page 7) to select preprogrammed radio stations. Note: Refer to the DA-2301 user manual for details. Selecting a Disc to Play • When the monitor is connected to a DVD or VCD/CD multidisc player via model DA-2301, press the disc selection key (#4) to select the disk you wish to play.
5 Specifications Specifications • Monitor Display System: 7 in. (18 cm) Active Matrix Color LCD Display; NTSC/PAL selectable • Display Format: 112,320 pixels • Resolution: 336,960 dots / 1,440 (W) x 234 (H) dots • Aspect Ratio: 16:9 • Active Area: 155.5 mm (W) x 87.