EN User Manual Oven ROP37902
Contents Safety information Safety instructions Product description Before first use Daily use Clock functions 2 3 5 5 6 8 Additional functions Hints and tips Care and cleaning Troubleshooting Installation Energy efficiency 9 9 17 20 21 23 Subject to change without notice. Safety information Before the installation and use of the appliance, carefully read the supplied instructions. The manufacturer is not responsible if an incorrect installation and use causes injuries and damages.
• • • • • • Ensure that the appliance is switched off before replacing the lamp to avoid the possibility of electric shock. Do not use a steam cleaner to clean the appliance. Do not use harsh abrasive cleaners or sharp metal scrapers to clean the glass door since they can scratch the surface, which may result in shattering of the glass. If the supply cord is damaged, it must be replaced by the manufacturer, its Authorised Service Centre or similarly qualified persons in order to avoid a hazard.
• • • • • • • • • • • • • • • • • Use this appliance in a household only. Do not change the specification of this appliance. Make sure that the ventilation openings are not blocked. Do not let the appliance stay unattended during operation. Deactivate the appliance after each use. Be careful when you open the appliance door while the appliance is in operation. Hot air can release. Do not operate the appliance with wet hands or when it has contact with water. Do not apply pressure on the open door.
• and can be also a source for low level harmful fumes. Fumes released from all Pyrolytic Ovens / Cooking Residues as described are not harmful to humans, including infants or persons with medical conditions. • • Disposal Warning! Risk of injury or suffocation. Internal light • Before replacing the lamp, disconnect the appliance from the power supply. Only use lamps with the same specifications. The type of light bulb or halogen lamp used for this appliance is only for household appliances.
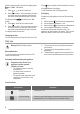
After the software version goes off, the display shows and "12:00". "12" flashes. 1. Press Press to confirm. This is necessary only when you set the time for the first time. Later the new time will be saved automatically after 5 seconds. The display shows flashes. 3. Press or again and again until the indicator for the time of day flashes in the display. To set a new time, refer to "Setting the time". 2. or Press to set the current hour. and the set hour.
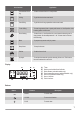
Oven function Application Conventional Cooking To bake and roast food on 1 shelf position. Grilling To grill flat food and to toast bread. Fast Grilling To grill flat food in large quantities and to toast bread. Turbo Grilling To roast larger meat joints or poultry with bones on 1 shelf position. Also to make gratins and to brown. Pizza Setting To bake food on 1 shelf position for a more intensive browning and a crispy bottom. Set the temperature 20 - 40 °C lower than for Conventional Cooking.
Heat-up indicator When you activate an oven function, the bars in the display come on one by one. The bars show that the oven temperature increases or decreases. Clock functions Clock functions table Clock function Application TIME OF DAY To set, change or check the time of day. Refer to "Setting the time". MINUTE MINDER Use to set a countdown time (maximum 23 h 59 min). This function has no effect on the operation of the appliance.
If you set the MINUTE MINDER when the DURATION or END function operates, the symbol on in the display. To reset the Count Up Timer, press and hold and . The timer starts to count up again. comes The Count Up Timer cannot be used with the functions: Duration , End . Count Up Timer Use the Count Up Timer to monitor how long the oven operates. It is on immediately when the oven starts to heat. Additional functions Using the Child Lock The Child Lock prevents an accidental operation of the appliance.
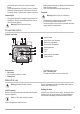
General information • • • • • • The appliance has five shelf positions. Count the shelf positions from the bottom of the appliance floor. The appliance has a special system which circulates the air and constantly recycles the steam. With this system you can cook in a steamy environment and keep the food soft inside and crusty outside. It decreases the cooking time and energy consumption to a minimum. Moisture can condense in the appliance or on the door glass panels. This is normal.
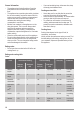
Food Conventional Cooking Temperature (°C) Shelf position True Fan Cooking Temperature (°C) Time (min) Comments Shelf position Sponge cake 170 2 150 2 40 - 50 In a 26 cm cake mould Christmas cake / Rich fruit cake1) 160 2 150 2 90 - 120 In a 20 cm cake mould Plum cake1) 175 1 160 2 50 - 60 In a bread tin Small cakes - one level1) 170 3 150 - 160 3 20 - 30 In a baking tray Small cakes - two levels1) - - 140 - 150 2 and 4 25 - 35 In a baking tray Small cakes - three l
Food Conventional Cooking Temperature (°C) Shelf position True Fan Cooking Temperature (°C) Time (min) Comments Shelf position Eclairs - two levels - - 170 2 and 4 35 - 45 In a baking tray Plate tarts 180 2 170 2 45 - 70 In a 20 cm cake mould Rich fruit cake 160 1 150 2 110 - 120 In a 24 cm cake mould Victoria 170 1 160 2 (left and right) 30 - 50 In a 20 cm cake mould sandwich1) 1) Preheat the oven for 10 minutes.
Food Conventional Cooking Temperature (°C) Shelf position True Fan Cooking Temperature (°C) Time (min) Comments Shelf position Vegetable flan 200 2 175 2 45 - 60 In a mould Quiches1) 180 1 180 1 50 - 60 In a mould Lasagne1) 180 - 190 2 180 - 190 2 25 - 40 In a mould Cannelloni1) 180 - 190 2 180 - 190 2 25 - 40 In a mould 1) Preheat the oven for 10 minutes.
Food Conventional Cooking Temperature (°C) Shelf position True Fan Cooking Temperature (°C) Time (min) Comments Shelf position Goose 175 2 160 1 150 - 200 Whole Rabbit 190 2 175 2 60 - 80 Cut in pieces Hare 190 2 175 2 150 - 200 Cut in pieces Pheasant 190 2 175 2 90 - 120 Whole Fish Food Conventional Cooking Temperature (°C) Shelf position True Fan Cooking Temperature (°C) Time (min) Comments Shelf position Trout / Sea bream 190 2 175 2 40 - 55 3 - 4 fish Tun
Food Quantity Pieces Temperature (°C) (g) Time (min) 1st side 2nd side Shelf position Fish fillet 4 400 max. 12 - 14 10 - 12 4 Toasted sandwiches 4-6 - max. 5-7 - 4 Toast 4-6 - max.
Lamb Food Quantity (kg) Temperature (°C) Time (min) Shelf position Leg of lamb, roast lamb 1 - 1.5 150 - 170 100 - 120 1 or 2 Saddle of lamb 1 - 1.5 160 - 180 40 - 60 1 or 2 Poultry Food Quantity (kg) Temperature (°C) Time (min) Shelf position Poultry portions 0.2 - 0.25 each 200 - 220 30 - 50 1 or 2 Chicken, half 0.4 - 0.5 each 190 - 210 35 - 50 1 or 2 Chicken, poulard 1 - 1.5 190 - 210 50 - 70 1 or 2 Duck 1.5 - 2 180 - 200 80 - 100 1 or 2 Goose 3.
Drying - True Fan Cooking • • Cover trays with grease proof paper or baking parchment. For a better result, stop the oven halfway through the drying time, open the door and let it cool down for one night to complete the drying.
1 You can use the End function to delay the start of the cleaning procedure. During the Pyrolysis the oven lamp is off. 5. When the oven is at its set temperature, the door 2 1 locks. The display shows the symbol and the bars of the heat indicator until the door unlocks. To stop Pyrolysis before it is completed, turn the knob for the oven functions to the off position. When Pyrolysis is completed, the display shows the time of day. The oven door stays locked.
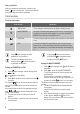
3 4 A B C 3 Close the oven door 4 Put the door on a soft halfway to the first cloth on a stable surface. opening position. Then pull forward and remove the door from its seat. 5 6 90° 5 Release the locking system to remove the glass panels. Make sure that you install the middle panel of glass in the seats correctly. 6 Turn the two fasteners by 90° and remove them from their seats. 7 1 2 7 First lift carefully and then remove the glass panels one by one. Start from the top panel.
The back lamp 1. Turn the lamp glass cover counterclockwise to remove it. 2. 3. 4. Clean the glass cover. Replace the lamp with a suitable 300 °C heatresistant lamp. Install the glass cover. Troubleshooting Warning! Refer to Safety chapters. What to do if... Problem Possible cause Remedy The oven does not heat up. The oven is deactivated. Activate the oven. The oven does not heat up. The clock is not set. Set the clock. The oven does not heat up. The necessary settings are not set.
Problem Possible cause The display shows an error code that is not in this table. There is an electrical fault. Remedy • • The appliance is activated and does not heat up. The fan does not operate. The display shows "Demo". The demo mode is activated. Deactivate the oven with the house fuse or the safety switch in the fuse box and activate it again. If the display shows the error code again, contact the Customer Care Department. 1. Deactivate the oven. 2. 3. Press and hold the button .
Securing the appliance to the cabinet Building In 548 A 114 16 20 600 21 558 min. 550 min. 560 B 589 594 573 594 5 3 Electrical installation 548 min. 550 558 114 16 20 590 The manufacturer is not responsible if you do not follow the safety precautions from the Safety chapters. 21 min. 560 589 594 573 This appliance is supplied with a main plug and a main cable.
Energy efficiency Product Fiche and information according to EU 65-66/2014 Supplier's name Rosenlew Model identification ROP37902XK Energy Efficiency Index 100.0 Energy efficiency class A Energy consumption with a standard load, conventional mode 0.93 kWh/cycle Energy consumption with a standard load, fan-forced mode 0.85 kWh/cycle Number of cavities 1 Heat source Electricity Volume 72 l Type of oven Built-In Oven Mass 36.
www.electrolux.