RADEON™ SERIES User’s Manual G03-ATI9000 Rev: 2.0 Copyright © 2002, ATI Technologies Inc. All rights reserved. ATI and all ATI product and product feature names are trademarks and/or registered trademarks of ATI Technologies Inc. All other company and/or product names are trademarks and/or registered trademarks of their respective owners. Features, performance and specifications are subject to change without notice. Product may not be exactly as shown in the diagrams.
Table of contents Introduction ............................................................................................................. 1 Features AT A Glance............................................................................................... 1 ATI’s CATALYST Software Suite........................................................................... 1 Multiple Displays and 3D Gaming Experience .................................................... 1 Direct 3D and OpenGL .........................
Introduction The RADEON Series graphic accelerators delivers ground breaking 3D graphics performance. • Designed and built by ATI Technologies Inc. • Powered by the RADEON Series Visual Processing Unit (VPU). • Awesome 3D gaming performance. • Support for OpenGL® applications. • Support for Direct 3D® applications. • High resolution in 3D up to 2048x1536. • Best performance for today’s and tomorrow’s applications. • Supports TV-out to connect your PC to your TV or VCR.
HydraVision™ In addition to the multiple display functionality available with ATI’s Catalyst Software Suite, you can also use HydraVision for advanced multi-monitor management. For more information on HydraVision, please refer to the page 25. Preparing Your Computer READ ME FIRST ! Turn off the power to your system and discharge your body’s static electric charge by touching a grounded surface—for example, the metal surface of the power supply—before performing any hardware procedure.
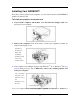
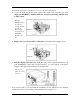
Installing Your RADEON™ Now that you have prepared your computer, you are ready to install your RADEON™ graphics accelerator card. To install your graphics accelerator card 1. Power off the computer and monitor, then disconnect the display cable from the back of your computer. 2. Remove the computer cover. If necessary, consult your computer’s manual for help in removing the cover. Remember to discharge your body’s static electricity by touching the metal surface of the computer chassis. 3.
the motherboard. For more information, see your computer documentation. 4. Locate the AGP slot. If necessary, remove the metal cover from this slot; then align your RADEON™ with the AGP slot, and press it in firmly until the card is fully seated. Grasp the RADEON™ by the top edge and carefully seat it into the AGP slot. Ensure that the RADEON CARD metal contacts are Completely pushed into the slot. 5. Replace the screw to fasten the card in place, and replace the computer cover. RADEON CARD 6.
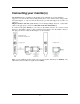
Connecting your monitor(s) The RADEON Series, depending on the graphic card configuration, provides hardware support for one VGA monitor and one flat panel monitor, or two VGA monitors using a DVII-to-VGA adapter*, or only one VGA monitor. It also provides TV Output via a S-Video out connector. Plug the monitor cable into your card (if you are running multiple monitors, connect their cables to the appropriate connectors), then turn on the PC and monitor(s).
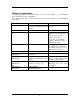
Display Configurations The following table lists the different ways you can connect displays to your RADEON Series with multi-monitor configuration The following table lists the different ways you can connect displays to your RADEON Series with Display Configuration One CRT display One DFP display One TV Connector(s) Used VGA connector OR DVI-I Connector with DIV-I-to-VGA adapter DVI-I connector TV Output CRT display + TV VGA connector + TV Output DFP display + TV CRT display + DFP display CRT display
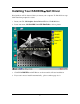
Installing Your RADEON™ Soft Driver New hardware will be detected after you restart your computer. To finish below steps click Yes when prompted to restart. 1. Insert your CD, 3D Graphics Series Driver CD, into CD-ROM drive. 2. It auto run menu, 3D GRAPHICS ACCELERATOR, as below picture: 3. Click VGA DRIVER, and ATi Driver are shown and it will auto installation. 4. If you can’t success install it automatically , please conduct page 8 to 9.
Windows® “New Hardware Found” To identify new hardware in Windows® 98 or Windows® Me 1. Windows® 98 or Windows® Me may launch the “Update Device Driver Wizard” to install the Standard VGA Driver. If it does, follow the step-by-step instructions below to allow Windows® to correctly identify your new hardware. If the Wizard does not appear, proceed directly to Installing the ATI Driver for Windows® 98, Windows® Me. 2. Click Next. 3. Click Finish. 4.
To install the ATI driver for Windows® 98 or Windows® Me 1. Insert the ATI INSTALLATION CD into your CD-ROM drive. 2. 3. 4. 5. 6. 7. 8. 9. If Windows® runs the CD automatically, proceed to step 6. Click Start. Select Run. Type the following: D:\ATISETUP (If D is not your CD-ROM drive, substitute D with the correct drive letter.) Click OK. Click on ATI Easy Install to begin the Installation Wizard. Click Next. Click Yes. Follow the Wizard’s on-screen instructions to complete the installation.
Multiple Display Support: Windows® 98, Windows® Me Windows® 98 and Windows® Me support the simultaneous use of more than one display device. You simply install a separate PCI card for each additional display you intend to use. With multiple displays, you can extend your desktop, run different programs on separate displays, even play some newer games with multiple views.
Catalyst™ Software Suite The following section provides an explanation of each ATI tab available after installing the Catalyst™ Software Suite. ATI Displays Tab The ATI Displays tab provides the multi monitor features. Here you can enable/disable display devices and swap the assignment of Primary and Secondary displays. Features presented in the following pages may not be supported in all operating systems and/or may appear differently.
3 Click on the ATI Displays tab. In Windows® XP, Windows® Me The ATI Displays tab shows you the display(s) that are active. The Primary display has the button depressed. To change the display assignment, you can click the Primary display’s button or you can click the button of the other display device. In Windows® 2000 Clicking on the button will reassign the Primary and Secondary monitors. Clicking on the button creates a clone or mirror image of the Primary display onto the Secondary display.
ATI Color Tab The ATI Color tab is used to adjust the color settings. You can change the red, green and blue display colors. Desktop brightness and Game Gamma (brightness) can also be changed. ATI Color Tab Desktop Brightness This increases or decreases the brightness of your desktop. The higher the gamma value, the higher the brightness of your display. Color Curve This adjusts the selected color (red, green or blue check button) by moving the color curve with your mouse.
ATI Options Tab The ATI Options tab provides detailed driver information and access to the card’s specifications. You can also enable or disable the ATI taskbar icon. ATI Options Tab Version Information Provides the Catalyst version number, 2D version number and the driver build information. Details button Provides access to the Details tab which lists the card’s hardware details and driver information. Reactivate all warning messages This allows you to reactivate any disabled graphics warning messages.
Show ATI icon on taskbar Unchecking this allows you to remove the ATI icon from your system tray without disabling the ATI icon applications. Disable quick resolution feature Quick resolution feature is accessible by left clicking the ATI icon in the system tray. Checking this option disables the feature. Reduce DVI frequency on high resolution Resolves display corruption or no image at high resolutions (for example 1280x1024 @75Hz) using a digital DVI display.
Clone Mode Settings Clone Mode Options Standard Video content is displayed on your Primary display only. Theater Mode Video content is displayed on your Primary and Secondary displays. Video content is displayed on your Secondary display(s) is always in full screen mode. Note: your computer must be set for 16-bit color depth or higher to use this mode. Same on all Video content is displayed on your Primary and Secondary display is exactly the same manner.
Direct 3D® Control Panel Using this tab, gamers can fine-tune the settings for Direct 3D® games. Main and Custom Settings In the Main Settings you can maximize overall performance by moving the slider to the left, or you can enhance overall image quality by moving the slider to the right. Main Settings slider This allows you to emphasize what kind of application experience you’d like to have.
Texture Preference slider Selecting this decides whether your application should use high quality or high performance textures. Moving the slider to the right delivers the highest quality experience. Moving the slider to the left emphasizes a high performance solution while still providing good visuals. Mipmap Detail Level slider This will allow you to choose the texture quality of the mipmaps the application will use. Mipmaps are a collection of different sized textures of the same image.
OpenGL® Control Panel Using this tab, gamers can fine-tune the settings for OpenGL® games. Main and Custom Settings In the Main Settings you can maximize overall performance by moving the slider to the left, or you can enhance overall image quality by moving the slider to the right. Main Settings slider This allows you to emphasize what kind of application experience you’d like to have.
Mipmap Detail Level slider This will allow you to choose the texture quality of the mipmaps the application will use. Mipmaps are a collection of different sized textures of the same image. As the user moves closer to a 3D object the image quality should increase, requiring a higher quality texture of the same image. The base mipmap is the highest quality texture, and all subsequent mipmaps are smaller sized textures of the same image. Moving the slider to the right selects a higher quality base mipmap.
SMARTGART™ SMARTGART is a suite of testing and diagnostics tools that perform a variety of bus tests to determine the optimal settings for your ATI graphics accelerator installed in your computer. SMARTGART automatically configures your graphics device to the optimal settings. SMARTGART does not actually disable any AGP functionality in your computer’s hardware.
View your PC’s display on a TV Your RADEON Series has TV Out capability. You can attach your card to a TV and monitor at the same time. Or you can connect it to your VCR and record your monitor’s display. TV display is ideal for playing games, giving presentations, watching movies, and browsing the Internet. The following tips will help you get the most out of your TV Out feature. IMPORTANT INFORMATION for European Customers Some PC monitors in Europe cannot be used simultaneously with TV display.
1 Access the Windows® Control Panel. Double-click Display. 2 Click on the Settings tab and then the Advanced... button. 3 Click on the ATI Displays tab. Click on the TV button. 4 Click the enable/disable button. 5 Click OK or Apply to save the changes. Using and Adjusting TV Out For information about how to use TV display, right click the ATI taskbar icon, point to Help, then point to ATI Television Display.
When using a TV for your PC’s display, you may see some edge distortion on the left and right side of your TV screen. This effect depends on your TV and the PC application you are running. To reduce edge distortion, you can increase the TV display’s horizontal size. To Increase the Horizontal Size 1 Access the Windows® Control Panel. Double-click Display. 2 Click on the Settings tab and then the Advanced... button. 3 Click on the ATI Displays tab. 4 Click on the TV button. 5 Click the Adjustments tab.
HydraVision™ software is specifically designed for use with Windows ® 98SE/ME/2000/XP/NT4.0 and installation enables the Desktop Manager and creates a Windows ® program group for HydraVision™ display management software. HydraVision™ and the Desktop Manager are activated whenever Windows ® starts. Installing HydraVision™ adds menu options to the ATI Icon. Click on the ATI icon to access the application’s features and help, or to unload the HydraVision™ Desktop Manager.
The Desktop Management Dialog The Desktop Management dialog lets you determine the behavior of pop-up windows and dialog boxes in a multiple monitor environment. Dialog control: Enable dialog repositioning—Toggles dialog control on and off. When it is checked, you can choose to have dialog boxes appear on the parent application’s monitor. (The parent application is the application that generated the dialog box.
Application position memory—Check this box to “remember” the size and location of application windows when they are closed and reapply those settings when the application is reopened. Automatically align monitors—Under Windows ® 98SE and Windows ® Me, you can manually define monitor placement from the Settings dialog in the Display Properties dialog box. When this box is checked, HydraVision™ will override user-defined monitor placement if the monitors are not evenly aligned.
HydraVision™ allows you to specify hot key shortcuts for common operations such as starting applications, snapping applications to designated monitors, and changing display resolution. NOTE: Hot Keys only work if HydraVision HydraVision™ is installed and loaded. The Hot Keys Dialog Create/Remove Hot Keys To create custom hot key sequences, select a Modifier key (Shift, Alt, etc.), a Hot key, and the Hot key function you want this key combination to perform.
HydraVision™ software supports multiple desktops. With MultiDesk, one active desktop will always be visible, while up to eight active desktops can reside in the background. When MultiDesk is running, the MultiDesk icon in the system tray displays the number assigned to the current desktop. Note:MultiDesk is installed with HydraVision™. However, multiple desktop support and HydraVision™ can be loaded/unloaded and operated independently of each other. Right-click on this icon to access MultiDesk controls.
The following troubleshooting tips may help if you experience problems. Contact your dealer or ATI for more advanced troubleshooting information. • Check that the card is seated properly in the AGP slot. • Ensure the display cable is securely fastened to the card’s display connector. • Make sure that the monitor and computer are plugged in and receiving power. • If necessary, disable any built-in graphics capabilities on your motherboard.