User Manual
contents Section 1 : Introductions 1 Section 2 : Ports and function introduction 2 Section 3 : Installation Guide 4 Section 4 : OSD Function Operation 5 Section 5 : Monitor Specification 10 Section 6 : Pre-Set Display Mode 11 Section 7 : Troubleshooting 12
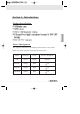
Section 1 : Introductions Product Specification Power Management The computer controls the Power Management Function of the monitor. Please choose the computer which supports this function.
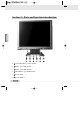
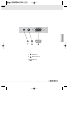
Section 2 : Ports and function introduction 1. AUTO BUTTON AUTO & Enter. 2. Button For OSD function. 3. Button For OSD function. 4. Menu Button For OSD function. 5. Power Switch. 6.
7. Audio in. 8. DC Power in. 9. VGA in.
Section 3 : Installation Guide Check parts before installing Each monitor should enclose the following parts. Any assistance please contact the shop where you bought. 1. Monitor 2. AC/DC Power Adapter 3. AC Power Cable 4. Audio Cable 5. VGA Cable 6. User Manual How to install Power cable? 1. Plug the AC/DC adapter cable connector into the back of Monitor. ( DC-IN input ) 2. Connect the AC power cable and adapter. 3. Connect the VGA Cable to the D-Sub connector in the back of the monitor. 4.
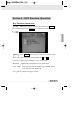
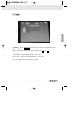
Section 4 : OSD Function Operation Key Function instruction AUTO : If the screen image is not in the best status. Press AUTO key for better image or use MENU key to adjust by yourself. MENU : Press MENU button. Then you will see main menu screen. Press again. Then choose the item and adjust by + and . Contrast Adjusts foreground white level of screen image. Brightness Adjusts background black level of screen image. Color Adjust Color Temp selection (9300KO degree,6500KO degree.
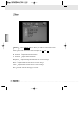
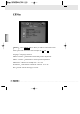
MENU : Press MENU button. Then you will see main menu screen. Press again. Then choose the item and adjust by + and H . Position Adjust Horizontal Position. V . Position Adjust Vertical Position. Sharpness Phase Adjusts background black level of screen image. Adjust DOT CLOCK level of screen image. Clock Adjust DOT CLOCK level of screen image. Exit . Exit the current menu page or made.
MENU : Press MENU button. Then you will see main menu screen. Press again. Then choose the item and adjust by + and Auto Adjust Auto Color Auto adjust function. Yes or No. Color auto adjust function. Yes or No. Exit Exit the current menu page or made. .
MENU : Press MENU button. Then you will see main menu screen. Press again. Then choose the item and adjust by + and . Language Language selection. OSD H . Position OSD window horizontal position adjustment. OSD V . Position OSD window vertical position adjustment. OSD Timer OSD screen standby time. on or off. Translucent OSD window translucent selection. on or off. Exit Exit the current menu page or made.
MENU : Press MENU button. Then you will see main menu screen. Press again. Then choose the item and adjust by + and Signal Source Mode Select Select signal sources. Resolution select. Reset Recall factory setting. Volume Volume adjust. Exit Exit the current menu page or made. .
Section 5 : Monitor Specification
Section 6 : Pre-Set Display Mode Mode Resolution 1 2 3 4 5 6 7 8 9 10 11 12 13 14 15 16 17 18 19 20 21 22 23 24 640*350 720*400 720*400 640*480 640*480 640*480 640*480 640*480 800*600 800*600 800*600 800*600 800*600 832-624 1024*768 1024*768 1024*768 1024*768 1152*900 1152*900 1280*1024 1280*1024 1280*1024 1280*1024 Horizontal Frequency (KHz) 31.5 KHz / 70.1 Hz 31.5 KHz / 70.1 Hz 37.9 KHz / 85.1 Hz (note2) 31.5 KHz / 60.0 Hz 35.0 KHz / 66.7 Hz (Macintosh) 37.9 KHz / 72.8 Hz 37.5 KHz / 75.0 Hz 43.
Section 7 : Troubleshooting No Picture 1. Check if the video signal cable is properly connected with the output of the monitor. 2. Check POWER SWITCH. 3. Adjust the brightness and contrast. 4. Check if the LCD monitor is no data status. if it is the LED will appear orange. 5. When signal is from notebook, please check if it changes the signal to external mode. Indistinct Picture 1. Check if the display signal cable is connected correctly. 2. Press Auto-Setup key to improve grapheic quality.
whether the display signal cable is properly connected.the loseness of the pin within the plug of cable will lead to connective failure. 2. Connect the monitor to another PC. SYNC. Problem With The Monitor 1. Check if the display input signal is within the specified range (56~75Hz). 2. Connect display signal cable properly. How To Clean The Monitor 1. Shut down the monitor 2. No liquid to be spread directly onto the screen or plastic case. When You Clean The Screen 1.