e-SATA 4 Port PCI Adaptor with RAID RC-209-EX User Manual
SATA 4 Port PCI Adaptor with RAID RC209 Content • Feature highlights .............................................................................. 01 • Package contents .............................................................................. 01 • System requirement .......................................................................... 01 • Hardware Description ...................................................................... 02 • Step by step photo installation of Magic Switch .............
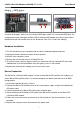
e-SATA 4 Port PCI Adaptor with RAID RC-209-EX SiI 3114 SATA PCI Card Feature • • • • Silicon Image SiI3114 SATA controller chip Compliant with PCI Specification, Rev. 2.
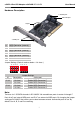
e-SATA 4 Port PCI Adaptor with RAID RC-209-EX User Manual Hardware Description C.D SATA port A.
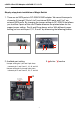
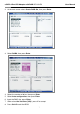
User Manual e-SATA 4 Port PCI Adaptor with RAID RC-209-EX Step by step photo installation of Magic Switch 1. There are six SATA ports in RC-209-EX RAID adapter. We named these ports character A through F. Ports A to D are internal SATA ports and E to F are external SATA ports. By changing the jumper setting on RC-209-EX that allows you to utilize 4 ports of this card. Please reference our photos below for the proper jumper setting. Port A and B are always active.
User Manual e-SATA 4 Port PCI Adaptor with RAID RC-209-EX Mode 1 (Default) - ABCD Active 2 & 3 PIN close 2 & 3 PIN close D C E F B A Mode 2 - ABDF Active 2 & 3 PIN close & 2 PIN close D C E F B A Mode 3 - ABEF Active & 2 PIN close & 2 PIN close D C E F B A
User Manual e-SATA 4 Port PCI Adaptor with RAID RC-209-EX Mode 4 - ABCE Active & 2 PIN close 2 & 3 PIN close D C E F B A Note: There are six SATA ports in Serial ATA 4-Channel RAID adapter. We named these ports character A through F. Ports A to D are internal SATA ports and E & F are external SATA ports. By changing the jumper setting on the Serial ATA 4-Channel RAID adapter that allows you to select between external and internal ports to use. By default, Port A, B, C and D are working.
e-SATA 4 Port PCI Adaptor with RAID RC-209-EX User Manual Important message for user 1. Backup all your data in HD before setting any RAID. 2. New HD connecting to RC-209-EX is recommended to “initial” and “format” before setting a RAID. Otherwise, PC might find nothing in the system. 3. If you want to boot from correct HD either from motherboard HD or RC-209-EX HD, please change from BIOS “booting sequence”. 4.
e-SATA 4 Port PCI Adaptor with RAID RC-209-EX 2. At the next screen select Create RAID Set, then press Enter. 3. Select RAID0, then press Enter. 4. 5. 6. 7. 8. Select the number of drives then press Enter. Select Auto configuration, then press Enter. Input the RAID size, press Enter. When asked Are You Sure (Y/N)?, press Y to accept. Press Ctrl+E to exit the BIOS.
e-SATA 4 Port PCI Adaptor with RAID RC-209-EX User Manual 9. When asked Are you sure to exit (Y/N)?, press Y to exit and reboot. 10. Continue with FDISK and FORMAT steps as if you were installing a conventional hard drive. Manual configuration 1. As the BIOS boots press Ctrl+S or F4 when prompted to enter the RAID BIOS. 2. At the next screen select Create RAID Set, then press Enter. 3. Select RAID0, then press Enter. 4. Select the number of drives then press Enter. 5.
e-SATA 4 Port PCI Adaptor with RAID RC-209-EX User Manual 6. Select the Target drive, press Enter. 7. Select Create with data copy, then press Enter. 8. Select online copy, then press Enter. Note : Selcting Online Copy builds the mirror while in Windows. Selecting Offline Copy builds the mirror before exiting the RAID BIOS. 9. Input the RAID size, press Enter. 10. Press Ctrl+E to exit the BIOS. 11. When asked Are you sure to exit(Y/N)?, press Y to exit and reboot.
e-SATA 4 Port PCI Adaptor with RAID RC-209-EX 4. 5. 6. 7. 8. User Manual Select SPARE DRIVE then press Enter. Select the replacement drive then press Enter. When asked Are You Sure(Y/N)?, press Y to confirm. Press Ctrl+E to exit. When asked Are you sure to exit(Y/N)?, press Y to exit. RAID 0+1 (Mirroring+Striping) This RAID array to be used on New/Blank hard drives, do not use existing hard drive(s) with data. To create a RAID 0+1 set at least four hard drives are required.
e-SATA 4 Port PCI Adaptor with RAID RC-209-EX User Manual RAID 5 (Parity) This RAID array to be used on New/Blank hard drives. Striping will destroy existing data on the hard drive. Auto Configuration is recommended. For applications that require custom chunk size, Manual Configuration is offered. Auto configuration (recommended) The default chunk size is 64k when selecting Auto configuration. 1. As the BIOS boots press Ctrl+S or F4 when prompted to enter the RAID BIOS 2.
e-SATA 4 Port PCI Adaptor with RAID RC-209-EX User Manual CONCATENATION This RAID array allows you to use one, two, three or four hard drives to a array. It does not provide any data protection or performance improvement but can be useful for utilizing leftover space on disks. 1. As the BIOS boots press Ctrl+S or F4 when prompted to enter the RAID BIOS. 2. At the next screen select Create RAID Set, then press Enter. 3. Select CONCATENATION, then press Enter. 4.
e-SATA 4 Port PCI Adaptor with RAID RC-209-EX User Manual Logical Drive Info This menu item allows the display of the assignment of physical drives within a logical set(RAID0, RAID1, etc.). This is display only function. BIOS Configuration The Serial ATA 4-Channel RAID adapter BIOS will appear every time your system starts up. If the BIOS doesn’t show, please try your controller in another PCI slot. During this (POST) process, the BIOS will show up and indicate the devices attached to it.
e-SATA 4 Port PCI Adaptor with RAID RC-209-EX User Manual This will let PC boot from a HDD controller instead of motherboard HDD. e. Keep the floppy in floppy drive and follow the installation. Press “S” when the screen shows as the following picture. Choose the correct OS which you are going to install when system asks you.
e-SATA 4 Port PCI Adaptor with RAID RC-209-EX User Manual If below screen happens, please choose “Standard PC with C-Step i486”. Keep the floppy disk in floppy drive. PC will notice you as below if you take them off from the drive.
e-SATA 4 Port PCI Adaptor with RAID RC-209-EX User Manual The installation of RC-209-EX by floppy drive will be completed and the system will detect the HD which now plug on the card. After you install RC-209-EX successfully by floppy disk, installation will lead you back to the same screen as below and then press “enter” to left the setting. f. Once the system can find the HD connecting to RC-209-EX, you can follow the normal steps to complete the Windows installation.
e-SATA 4 Port PCI Adaptor with RAID RC-209-EX User Manual 3. If you want to create a mirror with a HDD with existing OS and a fresh HDD, the data on existing HDD will copy to fresh HDD and boot as RAID 1. In addition, based on the above situation, if a bootable HDD on the RC-209-EX is desired. It means in this case you will boot our computer from RC-209-EX instead of motherboard. Please follow the following instructions. a. Install RC-209-EX to an existing OS HD connecting to motherboard. b.
e-SATA 4 Port PCI Adaptor with RAID RC-209-EX User Manual 4. Insert the driver CD, check CD-ROM drives, uncheck the other boxes, click Next, then click Next again. 5. If the Digital Signature Not Found message appears, click Yes. Our driver has been thoroughly tested for stability and compatibility. 6. Click Finish. 7. Repeat steps 2-6. For Windows® XP/Server 2003 For A New Installation A new installation requires a floppy disk for the driver installation.
e-SATA 4 Port PCI Adaptor with RAID RC-209-EX User Manual For Windows® XP-x64/Server 2003-x64 For New Installation A new installation requires a floppy disk for the driver installation. To make this floppy disk, copy the contents of the “RC-209\64-bit Windows\RAID5” folder, found on the driver CD, onto a blank floppy disk then follow the directions below. 1. Setup the RAID Array prior to Windows installation. 2. Follow Microsoft’s Windows installation procedure. 3.
e-SATA 4 Port PCI Adaptor with RAID RC-209-EX User Manual 4. At the Windows Setup screen, press Load Driver to install the RAID driver. 5. Insert the floppy disk, please select Silicon Image SiI 3114 Soft Raid 5 Controller (A:\si3114r5.inf), then press Next. (Change A:\ to match your floppy drive letter) 6. Follow the on-screen instructions to complete the Windows installation. For An Existing Installation 1. Setup the RAID Array prior to driver installation and boot up to Windows. 2.
e-SATA 4 Port PCI Adaptor with RAID RC-209-EX User Manual To Verify Windows® Installation 1. Right click My Computer and click Manage. 2. Select Device Manager. 3. Double click SCSI and RAID Controller, then double click Silicon Image SiI 3114 Soft Raid 5 Controller to display driver properties. A message this device is working properly is displayed in the dialog box, the driver has been correctly installed. SATARAID5 Management Software Installation For Windows® 2000/XP/Server 2003/Vista 1.
www.rosewill.