ULTRA ATA/133 PCI RAID Card RC200 User Manual
ULTRA ATA/133 PCI RAID Card RC200 User Manual Contents Feature and benefits 3 System requirement 3 Package contents 3 Hardware installation 4 Device connection 5 Important message for user 7 RAID introduction RAID 0 7 RAID 1 9 RAID 0+1 12 Driver installation 13 Quick guide 14 Detail guide 21 2
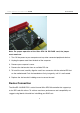
ULTRA ATA/133 PCI RAID Card RC200 User Manual Features and Benefits Silicon Image SiI 0680 Compliant with UltraDMA6 ATA/133 specifications Compliant with PCI v2.
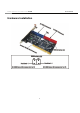
ULTRA ATA/133 PCI RAID Card RC200 User Manual Hardware Installation 4
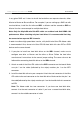
ULTRA ATA/133 PCI RAID Card RC200 User Manual Note: For proper operation of the Ultra ATA 133 PCI RAID card, the jumper must remain on. 1. Turn Off the power to your computer and any other connected peripheral devices. 2. Unplug the power cord from the back of the computer. 3. Remove your computer’s cover. 4. Remove the slot bracket from an available PCI slot. 5. To install the card, carefully align the card’s bus connector with the selected PCI slot on the motherboard.
ULTRA ATA/133 PCI RAID Card RC200 User Manual In any given RAID set, it’s best to install the hard drives on separate channels, either Master to Master or Slave to Slave. For example, if you are setting up a RAID set with two hard drives, install the first drive on IDE1 as Master and the second on IDE2 as Master. Use the same concept for multiple hard drives. Note: Only the 40-pin/80-wire UltraATA cable can achieve hard disk UDMA 133 performance.
ULTRA ATA/133 PCI RAID Card RC200 User Manual 4. Reconnect the system power and other peripherals to your computer. Important message for user 1. Backup all your data in HD before setting any RAID. 2. New HD connecting to RC-200 is recommended to “initial” and “format” before setting a RAID. Otherwise, PC might find nothing in the system. 3. Please read the PDF file of “SATARAID5-UserGuide_v1.40” for basic RAID knowledge. 4.
ULTRA ATA/133 PCI RAID Card RC200 User Manual For Manual Setup 1. As the BIOS boots press F3 when prompted to enter the RAID BIOS. 2. At the next screen press F2 to form a RAID set. 3. Press F1 to create RAID 0. 4. Choose the chunk size to be used in the RAID set(64 is recommended). 5. Choose the number of hard drives in your stripe set. 6. Assign the hard drives to be used. For optimal performance, alternate hard drives from separate IDE channels. 7.
ULTRA ATA/133 PCI RAID Card RC200 User Manual RAID 1 (Mirror ) For Manual Setup *For New/Blank Hard Drives Recommended for all fresh HD without data. 1. As the BIOS boots press F3 when prompted to enter the RAID BIOS. 2. At the next screen press F2 to from a RAID set. 3. Press F2 to create RAID 1. In a Mirror set the source drive needs to be equal to or smaller than the destination drive. For optimal performance the source drive and destination drive should be on separate IDE channels. 4.
ULTRA ATA/133 PCI RAID Card RC200 User Manual 5. Assign Source drive, then assign Destination drive. 6. Press Y to copy from Source to Destination drive. 7. Press N to Offline copy. 8. Answer Y to enable Auto-Rebuild. 9. When asked Are You Sure?, press Y to accept. 10. Press ESC to exit the RAID BIOS. For Auto Setup *Use this setup on New/Blank hard drives only. 1. As the BIOS boots press F3 when prompted to enter the RAID BIOS. 2. Press F2 to create a RAID Set. 3. Press F2 to create Mirror Set. 4.
ULTRA ATA/133 PCI RAID Card RC200 User Manual 4. Press Y to confirm your choice. The spare drive will be created and listed as the last set. 5. Press ESC to exit the RAID BIOS. 6. The SPARE drive will not be seen by Windows, however, it remains in the background waiting to rebuild the mirror in the event of a hard drive failure. Rebuilding a Failed Mirror Set If a SPARE drive was not configured, the steps below will guide you in rebuilding a failed mirror set. 1.
ULTRA ATA/133 PCI RAID Card RC200 User Manual 15. Answer Y to enable Auto-rebuild. 16. When asked Are You Sure?, Press Y to accept. 17. Press ESC to exit the RAID BIOS and reboot the computer. RAID 0+1 (Mirror+Striping) This RAID array to be used on New/Blank hard drives only, striping destroys existing data on the hard drive. RAID 0+1 requires at least four hard drives. For Manual Setup 1. As the BIOS boots press F3 when prompted to enter the RAID BIOS. 2.
ULTRA ATA/133 PCI RAID Card RC200 User Manual For Auto Setup 1. As the BIOS boots press F3 when prompted to enter the RAID BIOS. 2. Press F2 to create a RAID set. 3. Press F3 to create a Mirrored-Striped set. 4. Press A to Auto configure. 5. Press Y to accept the configuration. 6. Press ESC to reboot. 7. Continue with FDISK and FORMAT steps as if you were installing a conventional hard drive. Rebuilding a Failed RAID 0+1 Set The steps below will guide you in rebuilding a failed Mirror-Stripe set. 1.
ULTRA ATA/133 PCI RAID Card RC200 User Manual Deleting RAID Arrays 1. As the BIOS boots press F3 when prompted to enter the RAID BIOS. 2. Press F1 to dissolve a RAID set. 3. Enter the number of the RAID set to be deleted. 4. Answer Y to remove the RAID set. 5. Press ESC when finished to reboot.
ULTRA ATA/133 PCI RAID Card RC200 User Manual HD connecting to RC-200 instead of motherboard. Please follow below steps a~f to complete the installation. a. Put the driver (the driver must fit the OS you want to install to the HD) into a floppy disk and keep it in the floppy drive. b. Plug the HD. Turn on PC and press F3 to complete the RAID set. After you complete, save and left the setting. c. Inset Windows installation disk and start the windows installation. d.
ULTRA ATA/133 PCI RAID Card RC200 User Manual shows as the following picture. C Choose the correct OS for your future system.
ULTRA ATA/133 PCI RAID Card RC200 User Manual If below screen happens, please choose “Standard PC with C-Step i486”.
ULTRA ATA/133 PCI RAID Card RC200 User Manual Keep the floppy disk in floppy drive. PC will notice you as below if you take it off from the drive.
ULTRA ATA/133 PCI RAID Card RC200 User Manual The installation of RC-200 by floppy drive will be completed and the system will detect the HD which now plug on the card. After you install RC-200 successfully by floppy disk, installation will lead you back to the same screen as below and then press “enter” to left the setting.
ULTRA ATA/133 PCI RAID Card RC200 User Manual f. Once the system can find the HD connecting to RC-200, you can follow the normal steps to complete the Windows installation. 3. If you want to create a mirror with a HD with existing OS and a fresh HD, the data on existing HD will copy to fresh HD and boot as RAID 1. In addition, based on the above situation, if a bootable HD on the RC200 is desired. It means in this case you will boot our computer from RC200 instead of motherboard.
ULTRA ATA/133 PCI RAID Card RC200 User Manual for setting mirror. c. Turn on PC and enter RAID BIOS to set mirror. Choose “Manual” and then select the original HD as the data source to complete mirror. The copy will take a long time depending on your HD capability. After data copy complete, save and left RAID BIOS. Important message: If you choose the wrong HD source at the step of “manual”, all your data will be lost. d. Reboot your PC and now you can enter your OS with RAID 1.
ULTRA ATA/133 PCI RAID Card RC200 User Manual 7. D:\RC-200\raid (Note: “D:\” represents the drive letter assigned to the CD-ROM drive you are using. If D is not letter of your CD-ROM drive, substitute D with the correct drive letter), then click Next. 8. Click Next again, then Finish. 9. Restart Windows to complete driver installation. *For Existing Windows® 98SE Installation 1. Setup the RAID Array prior to driver installation. 2. Install the board and boot up Windows® 98SE. 3.
ULTRA ATA/133 PCI RAID Card RC200 User Manual 3. Once Windows has been installed, right click My Computer and click Properties. Select Device Manager tab. 4. Double click PCI RAID Controller listed under Other Devices. 5. Select Driver tab, then click Update Driver button. 6. Insert the driver CD into the CD-ROM Drive and click Next. 7. Select Search for the best driver for your device(Recommended) from the following dialog box and type 8.
ULTRA ATA/133 PCI RAID Card RC200 User Manual 8. Click Next again, then Finish. 9. Restart Windows to complete driver installation. *To Verify Windows® 98SE/ME Installation 1. Right-click My Computer, then click Properties, Select Device Manager tab. 2. Double click SCSI Controllers, Silicon Image SiI 0680 ultra-133 Medley ATA Raid Controller should be listed. 3. Highlight Silicon Image SiI 0680 ultra-133 Medley ATA Raid Controller and click Properties.
ULTRA ATA/133 PCI RAID Card RC200 User Manual 7. Press Enter to continue and follow on-screen instructions to complete Windows NT 4.0 installation. *For Existing Windows® NT 4.0 Installation 1. Setup the RAID Array prior to driver installation. 2. Install the board and boot up Windows® NT 4.0 3. Double click My Computer/Control Panel/SCSI Adapters, then click Drivers tab. 4. Click Add… then Have Disk… 5.
ULTRA ATA/133 PCI RAID Card RC200 User Manual copy the contents of the “RC-200\raid” folder, found on the driver CD, onto a blank floppy disk then follow the directions below. 1. Setup the RAID Array prior to Windows installation. 2. Install the board and follow Microsoft procedures to install Windows ®2000 accordingly. 3. Restart your system when prompted during Windows’ installation. 4. At the Windows 2000 screen, press F6 to install the driver. 5. Insert the driver diskette. Press S, then press Enter.
ULTRA ATA/133 PCI RAID Card RC200 User Manual For Windows® XP/Server 2003 *For New Windows® XP/Server 2003 Installation A new installation requires a floppy disk for the driver installation. To make this floppy disk, copy the contents of the “RC-200\raid” folder, found on the driver CD, onto a blank floppy disk then follow the directions below. 1. Setup the RAID Array prior to Windows installation. 2. Install the board and follow Microsoft procedures to install Windows ®XP/Server 2003 accordingly. 3.
ULTRA ATA/133 PCI RAID Card RC200 User Manual 6. Inset the driver CD into CD ROM Drive, and they type D:\RC-200\raid (Note: “D:\” represents the drive letter assigned to the CD-ROM drive you are using. If D is not letter of your CD-ROM drive, substitute D with the correct drive letter), then click OK. 7. The Hardware Installation window pops up, click Continue Anyway, the Finish. 8. Click Next again, then Finish. 9. Restart Windows to complete driver installation.