Modem RNX-56AG User Manual
Modem RNX-56AG User Manual Contents Introduction Features …………………………………………………….…………………………..3 Minimum System Requirements ………………………………………….…………..3 Package Checklist ……………………………….………….…………..…….………..3 Installation Hardware Installation …………………………………………………….…………….3 Line Connection ……… ……………………………………………………….……….4 Software Installation for Windows 98SE/ME/2000/XP/Vista..………………….…..4 Modem Dialing Location For WIN 98SE/ME ………………………………………………………………………5 For WIN 2000/XP ……………….
Modem RNX-56CX User Manual Introduction Features This modem card supports following communication standards. Data ITU-T V.92 ITU-T V.90, V.34, V.32bis, V.32, V.22bis, V.21, V.22 Bell 103 & 212A ITU-T V.44, V.42bis & MNP 5 (Data compression) ITU-TV.42 & MNP2-4 (Error correction) Fax ITU-T V.17 (14400bps) ITU-T V.29 (9600bps) ITU-T V.
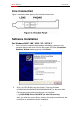
Modem RNX-56CX User Manual Line Connection Figure I: shows the back panel of the internal modem card. Software Installation For Windows 98SE / ME / 2000 / XP / VISTA/ 7 1. 2. Once you have completed the hardware installation, power on your computer and put the driver CD into the proper CD-ROM. Found New Hardware Wizard window pops up, click Cancel. Click your DVD ROM to see the folders. There are 6 folders (Vista32/Vista 64/Win2KXP/Win98/WinMe/WinNT) in the driver disk.
Modem RNX-56CX User Manual Modem Dialing Location If you want to change your dialing location, please follow the instruction as below: For WIN 98SE/ME/ Click Control Panel -> Modems -> Under General click Dialing Properties, and then you can change your location. For WIN 2000/XP Click Control Panel -> Phone And Modem Options -> Under Dialing Rules click Edit, and then you can change your location.
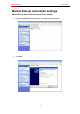
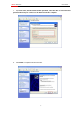
Modem RNX-56CX User Manual Manual Dial-up connection settings Manual Dial-up Connection Settings (XP for example) 1. On Control Panel/Network Connections, click Create a new connection. 2. Click Next.
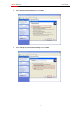
Modem RNX-56CX User Manual 3. Select Connect to the Internet and click Next. 4. Select Set up my connection manually and click Next.
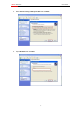
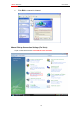
Modem RNX-56CX User Manual 5. Select Connect using a dial-up modem and click Next. 6. Input ISP Name and click Next.
Modem RNX-56CX User Manual 7. Input User name, Password and Confirm password, select Use this account name and password when anyone connects to the Internet from this computer. 8. Click Finish to complete manual connection.
Modem RNX-56CX 9. User Manual Click Dial to connect to Internet. Manual Dial-up Connection Settings (For Vista) 1.
Modem RNX-56CX User Manual 2. click Set up a connection or network 3.
Modem RNX-56CX User Manual 4. Input Dial-up phone number, User name, Password then click Connect 5. Waiting for Dial-up Connection. System will complete the other steps automatically.
Modem RNX-56CX User Manual 13
Modem RNX-56CX User Manual 14
Modem RNX-56CX User Manual 6. Once this screen pops out, the internet is connected successfully. Manual Dial-up Connection Settings (For 7) 1.
Modem RNX-56CX User Manual 2. Click Set up a connection or network 3.
Modem RNX-56CX User Manual 4. Input Dial-up phone number, User name, Password then click Connect 5. Waiting for Dial-up Connection. System will complete the other steps automatically.
Modem RNX-56CX User Manual 18
Modem RNX-56CX User Manual 19
Modem RNX-56CX User Manual 6. Once this screen pops out, the internet is connected successfully. Thank you for purchasing a quality Rosewill Product. Please register your product at: www.rosewill.com for complete warranty information and future support for your product.