
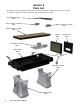
Operator`s manual


Super Shuffle Operating Manual 9
2. Go to the Instruction menu.
This will turn on the lasers for about 3
minutes.
If you do not get the lasers adjusted in that
amount of time, just go back into Instructions.
3. Insert the same allen wrench you used in step 1 into the
hole provided on the laser adjustment ball.
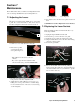
4. Adjust the lasers. They will have to be done by “eye
balling” the correct position. There is a subtle change
in color when the laser is on the sensor verses it being
on the metal plate.
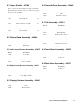
Laser
Adjustment
Ball
Good Alignment
Poor Alignment
5. Once adjusted, close the laser access plate and screw it
down.
CAUTION: Do Not Over Tighten The Laser Brackets.
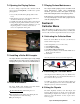
7.2 Replacing the Laser Sockets
The Laser Mount Sockets are what hold the laser “eye”
in the Super Shuffle.
1. Unplug the Super Shuffle from the wall.
2. Unscrew the top screw to the laser cover plate.
3. Unplug the green ground wire and the laser cable.
4. Using a 5/16 nut driver, remove the three nuts holding
the laser sockets together.
5. Unscrew the ground tab.
Ground Cable
Ground Tab
Laser Cable
Laser
Ball
Laser
Socket
You will need a 1/8” Allen Wrench for this task.
1. Remove the top allen
screw and let the laser
access plate hang loose.
Section 7
Maintenance
There will be times when you will need to manipulate the hard-
ware on the Super Shuffle. This section will explain how.
7.1 Adjusting the Lasers
The lasers are what the Super Shuffle uses to sense when
a puck has scored. From time to time, these may be
knocked out alignment. Follow the instructions below:
Laser
Sensor
6. Remove the first half of the bracket by pulling it
toward you. The laser will come out with it. Take note
of how the bracket came out, you will have to put the
new one in the same way.
Laser
Socket
Laser
Ball