Wireless N Adapter RNX-N150PCx User Manual
Wireless N Adapter RNX-N150PCx User Manual FCC STATEMENT This equipment has been tested and found to comply with the limits for a Class B digital device, pursuant to part 15 of the FCC Rules. These limits are designed to pro-vide reasonable protection against harmful interference in a residential installation. This equipment generates, uses and can radiate radio frequency energy and, if not in-stalled and used in accordance with the instructions, may cause harmful interference to radio communications.
Wireless N Adapter RNX-N150PCx User Manual National Restrictions 2400.0-2483.5 MHz Country Restriction Bulgaria France Reason/remark General authorization required for outdoor use and public service Outdoor use limited to 10 mW Military Radiolocation use. Refarming of the 2.4 GHz band has e.i.r.p. within the band 2454-2483.5 been ongoing in recent years to allow current relaxed regulation.
Wireless N Adapter RNX-N150PCx User Manual Before We Begin Thank you for purchasing this product, we would like to use this manual to help you know more about your RNX-N150PCx. COPYRIGHT & TRADEMARKS Specifications are subject to change without notice. is a registered trademark of ROSEWILL INC. Other brands and product names are trademarks or registered trademarks of their respective holders.
Wireless N Adapter RNX-N150PCx User Manual Table of Contents Chapter 1 Product Overview ........................................................................................................................................................................... - 8 1.1 Package Content ............................................................................................................................................................................ - 8 1.2 Overview of the Product......................
Wireless N Adapter RNX-N150PCx User Manual 5.1.3 Advance.............................................................................................................................................................................. - 27 5.1.4 Statistics ............................................................................................................................................................................. - 27 5.1.5 WMM ....................................................................
Wireless N Adapter RNX-N150PCx User Manual Chapter 8 Troubleshooting............................................................................................................................................................................
Wireless N Adapter RNX-N150PCx User Manual Chapter 1 Product Overview Thank you for choosing Rosewill’s 802.11n Wireless PIC adapter – 1.2 Overview of the Product RNX-N150PCx. This chapter is to introduce you more about this PCI Adapter connects you with IEEE802.11n (Draft 2.0) networks at Wireless Adapter. receiving rate up to an incredible 150Mbps! By using the reflection signal, 802.11n technology increases the range and reduces “dead 1.1 Package Content spots” in the wireless coverage area.
Wireless N Adapter RNX-N150PCx 1.3 User Manual Product Features Complies with IEEE 802.11n (Draft 2.0), IEEE 802.11g, IEEE 802.11b standards Supports Soft AP to establish your wireless LAN networking with lowest cost Provides 32-bit PCI interface Provides 150Mbps receiving rate and 150Mbps encryption methods and 802.
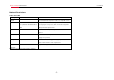
Wireless N Adapter RNX-N150PCx 1.4 User Manual Product Specification Standard RF Output Power(Typical) Driver Support IEEE 802.11n Draft 2.0 and IEEE802.11g/b 802.11b: up to 17 ± 1 dBm Windows® 2000, XP 32/64, Vista 32/64, Win7 32/64 802.11g: up to 15 ± 1 dBm 802.11n: up to 16 ± 1 dBm Frequency Band Interface Security 2.400GHz ~ 2.484GHz PCI interface 2.2 64/128-bit WEP (Hex & ASCII), WPA(TKIP with IEEE 802.1x), WPA2(AES with IEEE 802.1x) Data Rate Antenna Dimension: 802.
Wireless N Adapter RNX-N150PCx 1.6 User Manual PCI Adapter LED Status The status LED indicators of the PCI Adapter are described in the following. Figure 1-1 Wireless PCI Card LED Lnk/Act ON (Green): Indicates a valid connection.
Wireless N Adapter RNX-N150PCx User Manual Chapter 2 Security Check List before Installation Wireless Networks are very convenient, however, since it uses radio waves to send information. It can be vulnerable from those who intended to do harm. So we recommend you take additional steps to secure your wireless network. Change the default wireless network name or SSID on your wireless router Change the default password on your wireless router Enable encryption.
Wireless N Adapter RNX-N150PCx User Manual Chapter 3 Installation Guide 3.1 Hardware Installation 4. Reconnect your PC’s power and turn on your desktop PC. To install the adapter, follow these steps listed below: 1. Turn off your desktop PC and disconnect the power. 2. Remove your PC case and locate an available PCI slot on the motherboard. Remove the metal slot cover on the back of the PC. Note: Select Cancel when “Found New Hardware” window appears.
Wireless N Adapter RNX-N150PCx 3.2 User Manual Software Installation Note: The following driver installation guide uses Windows® XP as 2. Insert the CD-Rom that came with this product to your CD-Rom drive. the presumed operation system. The procedures and screens in The menu window pops up automatically as Figure 3-3. Please click Windows® 2000 and Vista are familiar with Windows® XP. the “Driver” button of this product.
Wireless N Adapter RNX-N150PCx User Manual 3. Select if you are going to configure your wireless network with this 4. Click the “Install” button to start installing. Rosewill Utility or with Microsoft Zero Configuration tool.
Wireless N Adapter RNX-N150PCx User Manual 5. Click the “Finish” button to complete installation. Figure 3-6 6. You may be prompt to restart your computer for the driver to take effect.
Wireless N Adapter RNX-N150PCx User Manual Chapter 4 Connection Guide This chapter will help you understand the management interface of the device and how to manage the device. 4.1 Configures a Basic Network Connection Figure 4-1 4.2 4.1.1 Selecting configuration tool Windows XP includes a wireless configuration utility named Connecting with Microsoft Zero Configuration "Windows Zero configuration" (WZC) which provides basic 1.
Wireless N Adapter RNX-N150PCx User Manual 2. The tool shows the available wireless networks. Select your network SSID to connect with like Figure 4-3. Figure 4-4 4. If your wireless Network does not contains encryption, select the intended access point and click "Connect". Figure 4-3 Then click "Connect Anyway" like Figure 4-5. 3. If your wireless Network has encryption enable, you will be ask to enter the password like Figure 4-4.
Wireless N Adapter RNX-N150PCx User Manual Figure 4-6 6. You should see the pop-up window on your low right Figure 4-5 hand corner indicate the connected status. As shown in 5. Once completed, you should see like Figure 4-6 as your Figure 4-7. computer is now “Connected” with your wireless Network.
Wireless N Adapter RNX-N150PCx 4.3 User Manual Connecting through Rosewill Utility We provide this utility for users to connect to a wireless network easily. It provides more information and configuration for this adapter. As default, the utility is started automatically upon starting your computer and connects to a connectable wireless network with best signal strength. Please refer to the following chapters to get information regarding to the functions of this utility.
Wireless N Adapter RNX-N150PCx User Manual 4.3.1 Steps to add wireless signal with Rosewill Utility for one time use This section will lead you to link your wireless signal with your RNX-N150PCx. Please follow the Figure 4-9 in adding the signal. 1. Click“Rescan": Click on Rescan to search for all wireless signals near you. 2. Select your desire SSID: Click to select your wireless signal, in this example, you can see next to AP1; meaning we have select AP1 as our desired SSID. 3.
Wireless N Adapter RNX-N150PCx User Manual 4.3.2 Steps to add wireless signal into Profile and keep for future record Add to profile will help to store your wireless signal’s information with your RNX-N150PCx. Please follow the Figure 4-10 to add the signal into your profile so you don’t have to enter them in the future. There are two ways to “Add to Profile”. You can add through Network tab or add through tab. Adding to Profile through Network Tab. (Figure 4-10): 1.
Wireless N Adapter RNX-N150PCx User Manual Adding to Profile through Profile Tab. (Figure 4-12): 1. First select “Add” 2. Key in your desired Profile Name, eg, HOME. 3. Choose the SSID by selecting the pull-down window. 4. Figure 4-11 When complete, please select “Auth.\ Encry” to enter your password. Note: you could also add a new profile quickly by selecting an available network in the “Network” function then press the “Add to Profile” button.
Wireless N Adapter RNX-N150PCx User Manual 5. In Auth.\Encry. Like Figure 4-13. 6. First select Authentication of your wireless signal. This should automatically provided to you when select your desired SSID. 7. Enter your password. 8. Click OK to complete the process.
Wireless N Adapter RNX-N150PCx User Manual Chapter 5 Utility Detailed Definition Guide 2 The Rosewill Utility consisted of three parts: Network Section: Provides you with information on the wireless signals around you. You have options to setup wireless network here with “Rescan”, “Add to Profile”, and “Connect” 3 Status Section: bottom of the utility window. It shows the connection status and system information. 5.
Wireless N Adapter RNX-N150PCx User Manual RTS Threshold: Users can adjust the RTS threshold number by sliding the bar or keying in the value directly. Fragment Threshold: The user can adjust the Fragment threshold number by sliding the bar or key in the value directly. 5.1.2 Network Network Tab lists the available wireless networks. The utility connects to a wireless network with best signal strength Figure 5-4 automatically.
Wireless N Adapter RNX-N150PCx User Manual Definition of Each Fields in Advance: Definition of Each Fields in Network: SSID, Channel and Signal buttons: Click each button to sort Wireless mode: Click the drop list to select a wireless mode. the listing networks by SSID, Channel and Signal strength. Enable TX Burst: Select to enable connecting to a TX Burst supported device. Show dBm: Mark the checkbox to show the signal strength in dBm.
Wireless N Adapter RNX-N150PCx User Manual Figure 5-11 Figure 5-10 Definition of Each Fields in Statistics - Receive: Definition of Each Fields in Statistics - Transmit: Frames Transmitted Successfully: Frames successfully sent.
Wireless N Adapter RNX-N150PCx 5.1.5 User Manual WMM 5.1.6 WPS This function allows users to activate the WMM function for The primary goal of Wi-Fi Protected Setup (Wi-Fi Simple this device. Please note that this function only works while Configuration) is to simplify the security setup and management connecting to a WMM compatible device. of Wi-Fi networks.
Wireless N Adapter RNX-N150PCx User Manual Rescan: Click to rescan the wireless networks. Disconnect: Stop WPS action and disconnect this active link. And then select the last profile at the Profile Page of RaUI if Information: Display the information about WPS IE on the selected network. List information includes Authentication exist.
Wireless N Adapter RNX-N150PCx 5.1.7 User Manual 5.2 About Status Section Details Click "About" displays the wireless card and driver version The Status page displays detailed information about the current information as shown in Figure 5-16. connection as shown in Figure 5-18. Figure 5-16 Figure 5-18 Definition of Each Fields in Status: Figure 5-17 Status: Current connection status. If no connection, if will show Disconnected. Otherwise, the SSID and BSSID will show here.
Wireless N Adapter RNX-N150PCx User Manual Sub Mask: Sub mask about current connection. Default Gateway: Default gateway about current connection. Link Speed: Show current transmit rate and receive rate. Throughout: Display transmits and receive throughput in unit of Mbps. Link Quality: Display connection quality based on signal strength and TX/RX packet error rate. Signal Strength 1: Receive signal strength 1, user can choose to display as percentage or dBm format.
Wireless N Adapter RNX-N150PCx User Manual Chapter 6 Security Description 6.1 Auth. \ Encry. Setting - WEP/TKIP/AES WEP Key: Only valid when using WEP encryption algorithm. The key must match the AP's key. There are several formats to enter the keys. Hexadecimal - 40bits: 10 Hex characters. Hexadecimal - 128bits: 32Hex characters. ASCII - 40bits: 5 ASCII characters. ASCII - 128bits: 13 ASCII characters. Figure 6-1 Definition of Each Fields in Auth. \ Encry.: 6.2 802.1x Setup Details 802.
Wireless N Adapter RNX-N150PCx User Manual 6.2.1 Method and Authentication Definition of Each Fields in 802.1X Method and Authentication: provides for certificate-based, mutual authentication of the client and network through an encrypted channel. Unlike EAP-TLS, EAP-TTLS requires only server-side certificates. EAP-FAST: Flexible Authentication via Secure Tunneling. It was developed by Cisco.
Wireless N Adapter RNX-N150PCx User Manual "EAP-MSCHAP v2", "EAPTLS/Smart card", "Generic Token Card", "CHAP", "MS-CHAP", "MS-CHAP-V2", "PAP" and "EAP-MD5". Tunnel Identity: Identity for tunnel. Tunnel Password: Password for tunnel. Session Resumption: The user can choose "Disable" and "Enable".
Wireless N Adapter RNX-N150PCx 6.2.2 User Manual ID\Password Definition of Each Fields in 802.1X ID\Password: Figure 6-5 Use Client certificate: Client certificate for server authentication. Figure 6-4 ID \ PASSWORD 6.2.4 EAP Method: EAP Fast Authentication ID/Password: The identity, password and domain name for server. Only "EAP-FAST" and "LEAP" authentication can key in domain name. Domain names can be keyed in the blank space. Tunnel ID/Password: Identity and Password for the server. 6.2.
Wireless N Adapter RNX-N150PCx User Manual Allow unauthenticated provision mode: During the PAC can Server name: Enter an authentication sever root. be provisioned (distributed one time) to the client automatically. It only supported "Allow unauthenticated provision mode" and use "EAP-MSCHAP v2" authentication to authenticate now. It causes to continue with the establishment of the inner tunnel even though it is made with an unknown server.
Wireless N Adapter RNX-N150PCx User Manual Chapter 7 Setup Examples Guide 7.1 WMM Setup Examples 7.1.1 Example to configure to Enable DLS (Direct Link Setup) 1. Click "WMM Enable" to enable this function 2. Click the "Direct Link Setup Enable" checkbox 5. Figure 7-2 The Timeout Value indicates the time in seconds before it disconnects automatically. The value is an integer. The integer must be between 0~65535. A zero value specifies that it stays connected. The default Timeout Value is 60 seconds.
Wireless N Adapter RNX-N150PCx 6. User Manual 7.1.2 Example to Enable WMM – Power Save Click "Apply". This Station will now be store in the Enable list like Figure7-4. You can also remove the stored data by select and click “Tear Down” like Figure 7-5. 1. Click "WMM-Power Save Enable" to enable this option 2. Select the AC type you want to enable: AC_BK: High throughput. Bulk data that requires maximum throughput and is not time-sensitive is sent to this queue (FTP data, for example).
Wireless N Adapter RNX-N150PCx 7.2 User Manual WPS Setup Examples 7.2.1 3. Select the AP that you want to join to. Example to Add to WPS Using PIN Method WPS connection through PIN Method requires you enter the PIN Code into the Wireless Router that you want to connect to. 1. Select "Enrollee" from the Config Mode drop-down list. Figure 7-9 4. Click “PIN” to start the PIN entering process Figure 7-7 2. Click “Rescan” to update the available AP that supports WPS.
Wireless N Adapter RNX-N150PCx 5. User Manual You should enter the PIN number provided here to your AP. Note: If you use Microsoft Window Connection Now as an External Registrar, you must start PIN connection at STA first. After that, search out your WPS Device name and MAC address at Microsoft Registrar. Add a new device and enter PIN Code of STA at Microsoft Registrar when prompted. 7.2.2 WPS connection through PBC Method requires you to press Figure 7-11 6.
Wireless N Adapter RNX-N150PCx 2. User Manual Click PBC to start the PBC connection 4. You should see the Status bar indicating searching for AP. Please allow some process time. Figure 7-14 3. Figure 7-15 Push the PBC button on AP which should look like 5. this Once the right AP found, the utility will start process.
Wireless N Adapter RNX-N150PCx 6. User Manual When connect successfully. The result will be 7.3 Security Settings: WEP/WPA/WPA2 7.3.1 Example to Configure Connection with WEP displayed as it is in the figure below. 1. Select an AP with WEP encryption and click "Connect". Figure 7-18 Figure 7-17 2. The Auth.\Encry. function will appear as below, select with WEP encryption.
Wireless N Adapter RNX-N150PCx User Manual 7.3.2 Example to Configure Connection with WPA-PSK 1. Select an AP with WPA-PSK authentication mode and click "Connect". 2. The Auth.\Encry. function will appear as below select WPA-PSK as the Authentication Type, then select TKIP or AES for encryption. Enter the WPA Figure 7-19 3. Pre-Shared Key. The WPA Pre-Shared Key here is Enter your password in the Key#1 Hexadecimal use your intended AP’s setting. (12345678 here is field.
Wireless N Adapter RNX-N150PCx User Manual Chapter 8 Troubleshooting This chapter provides solutions to problems that may occur during the installation and operation of PCI Adapter. Read the descriptions below to solve your problems. 1. The PCI Adapter does not work properly. Reinsert PCI Adapter into your PC’s PCI slot. Right click on My Computer and select Properties. Select the device manager and click on the Network Adapter. You will find PCI Adapter if it is installed successfully.
Wireless N Adapter RNX-N150PCx User Manual clients and access points. In Ad-Hoc mode, both wireless clients will need to have the same SSID. Please note that it might be necessary to set up one client to establish a BSS (Basic Service Set) and wait briefly before setting up other clients. This prevents several clients from trying to establish a BSS at the same time, which can result in multiple singular BSSs being established, rather than a single BSS with multiple clients associated to it.