300M Wireless N Router RNX-N300RT Quick Installation Guide 7109504181
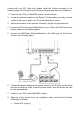
1. Package Contents The following items should be found in your package: z RNX-N300RT 300M Wireless N Router z Power Adapter for RNX-N300RT 300M Wireless N Router z Quick Installation Guide z Resource CD for RNX-N300RT 300M Wireless N Router, including: ¾ This Guide ¾ Other Helpful Information ) Note: Make sure that the package contains the above items. If any of the listed items are damaged or missing, please contact with your distributor. 2. Connecting the Router 2.
contact with your ISP. After that, please install the Router according to the following steps. Don't forget to pull out the power plug and keep your hands dry. 1. Power off your PC(s), Cable/DSL modem, and the Router. 2. Locate an optimum location for the Router. The best place is usually near the center of the area in which your PC(s) will wirelessly connect. 3. Adjust the direction of the antenna. Normally, upright is a good direction. 4.
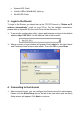
• System LED: Flash • Link/Act LEDs (WAN&LAN): Light up • WLAN LED: Flash 3. Login to the Router To login to the Router, you should set up the TCP/IP Protocol in "Obtain an IP address automatically" mode on your PC(s). For the detailed instructions, please refer to Appendix B in the User Guide on the Resource CD. 1. To access the configuration utility, open a web-browser and type in the default address http://192.168.1.1 in the address field of the browser. 2.
2. The WAN Connection Type screen will appear as shown below. The Router provides Auto-Detect function and supports three popular ways PPPoE, Dynamic IP and Static IP to connect to the Internet. It’s recommended that you make use of the Auto-Detect function. If you are sure of what kind of connection type your ISP provides, you can select the very type and click Next to go on configuring. 3. If you select Auto-Detect, the Router will automatically detect the connection type your ISP provides.
¾ If the connection type detected is Dynamic IP, the Router will automatically get IP parameter from your ISP without entering any parameters. ¾ If the connection type detected is Static IP, the next screen will appear as shown below. Fill the blanks with the parameters provided by your ISP, and then click Next. 4. After you complete the above, the Wireless settings screen will appear as the following: ¾ Wireless Radio: Keep the default setting: Enable.
¾ Region: Select your region from the drop-down list. ¾ Wireless Security: Recommend to choose WPA-PSK/WPA2-PSK and enter a Security Key using ASCII characters between 8 and 63 characters or 64 hexadecimal characters in the PSK Password filed. 5. Click the Next button. You will then see the Finish page. If you don’t make any changes on the Wireless page, you will see the Finish page as shown below. Click the Finish button to finish the Quick Setup.
) Note: When press and hold the WPS/Reset button for more than 5 seconds, you will reset the Router. Step2: Press and hold the WPS button on the Adapter for 2 or 3 seconds. Or: select Push the button on my access point in the configuration utility of the WPS as below, and click Next. II. PIN Method If the wireless adapter supports the PIN method: 1. Enter the PIN code of wireless adapter into the router.
For the router, click the Add device button on the WPS screen and then select Enter the new device’s PIN and enter the PIN code of the adapter on the screen displayed as shown below. Then click Connect. 2. Enter the PIN code of the Router into the wireless adapter. For the Router, please get the Current PIN code on the WPS screen.
Click the Add device button on the screen from which you got the PIN code, you will see the following screen which indicates the connection status. Once it shows “Connect successfully !”, the WPS connection is finished. ) Note: 1. For the Router, please keep the default WPS Status as Enabled all the time. 2. The status LED on the Router will light green all the time if the device has been successfully added to the network.
Thank you for purchasing a quality Rosewill Product. Please register your product at: www.rosewill.com for complete warranty information and future support for your product. Rosewill Customer Service Hotline: 1-800-575-9885 Rosewill Customer Service Support: techsupport@rosewill.
11