Wired Internet Camera RXS-3323 Wireless Internet Camera RXS-4324 User Manual
Internet Camera RXS-3323/RXS-4324 User Manual FCC STATEMENT This equipment has been tested and found to comply with the limits for a Class B digital device, pursuant to part 15 of the FCC Rules. These limits are designed to pro-vide reasonable protection against harmful interference in a residential installation. This equipment generates, uses and can radiate radio frequency energy and, if not in-stalled and used in accordance with the instructions, may cause harmful interference to radio communications.
Internet Camera RXS-3323/RXS-4324 User Manual Table of Content Chapter 1. Product Overview......................................................................5 Package Contents ...................................................................................................5 System Requirements.............................................................................................6 Product Features....................................................................................................
Internet Camera RXS-3323/RXS-4324 User Manual - System ...............................................................................................................40 System:.........................................................................................................40 Date & Time:................................................................................................41 Maintenance.................................................................................................
Internet Camera RXS-3323/RXS-4324 User Manual Chapter 1. Product Overview Package Contents Item Descriptions 1. RXS-3323 or RXS-432 Camera 2. Manual and Software Package CD 3. Quick Installation Guide 4. Detachable Wireless LAN Antenna (optional, only comes with Wireless Camera) 5. RJ 45 Cable 6. 12V/1A Power Adapter 7. Camera Mount Kit Please contact your reseller, if any of the above items are missing.
Internet Camera RXS-3323/RXS-4324 User Manual System Requirements z Windows 2000, XP, Vista, or Windows 7. z At least 256 MB of memory (512MB recommended) z A wireless (802.11n or 802.11g) or Ethernet network. z Internet Explorer 6.x or higher, Firefox 2.0 or later/ Safari Internet Web Browser z VGA card resolution: 800 x 600 or above z CPU: 1.
Internet Camera RXS-3323/RXS-4324 User Manual ensuring seamless protection. z Optimal Viewing With the pan/tile functions, the camera can monitor everywhere from the left/right (0~355 degrees) or up/down (-10~90 degrees). In addition, there is 128 preset points and 16 camera tours can be assigning to move the camera lens to cover the desired area quickly.
Internet Camera RXS-3323/RXS-4324 User Manual easily z Covers wider area than Wide and fast Pan range: 355 degree and 180 degree/sec Wide and fast Tilt range: 100 degree and 120 degree/sec z H.264, MPEG4 and JPEG triple compression simultaneously z Mega-pixel resolution up to 1280x1024 z Up to 11-profile encoder simultaneously z Mega-pixel or VGA mode selectable z UDP / TCP / HTTP protocols selectable z Supports video/audio multi-casting z IEEE 802.
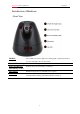
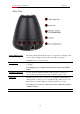
Internet Camera RXS-3323/RXS-4324 User Manual Introduction of Hardware - Front View IR LEDs: These LEDs are used for night vision during night or dark environment to provide extra light source for the camera. Lens and Focus Ring: User can use this ring to make minor focus adjustment. Power and Wireless LED (Orange Color): Indicates the power and wireless connection. Microphone: Built-in microphone for sound and voice reception. LAN LED: This LED is used to indicate whether DC power is on or not.
Internet Camera RXS-3323/RXS-4324 User Manual - Rear View Audio Output Jack: The Audio Output Jack allows the camera to output audio or alerting sound. Connect with a 3.5Ø phone jack speaker or headphone (speaker or headphone don’t come with camera) Power Jack: The input power is 12VDC which is provided by the power adapter included in package Note: Improper power adapter may damage the camera and result in danger.
Internet Camera RXS-3323/RXS-4324 User Manual Chapter 2. Installation Hardware Installation: - Camera LAN and Power Installation: 1. Please use cable connection for the first time setup. Using the RXS-4324 as example, please connect an Ethernet cable to the LAN socket located on the camera’s rear and attach it to the network. 2. Connect the attached power adapter to the DC power jack of the camera. Note: Use the power adapter, 12VDC, included in the package and connect it to wall outlet for AC power.
Internet Camera RXS-3323/RXS-4324 User Manual - Wall Mount: 1. Fix the L-type bracket to the wall using 2. two wall anchors and screws Fix the camera to L-type bracket with the two supplied screws Software Installation: When you installed the Camera on a LAN environment, there are two easy ways to search your Cameras by IPWizard or UPnP discovery.
Internet Camera RXS-3323/RXS-4324 User Manual 2. A browser should automatically open up with “Software Package” info. 3. Please click on “IPWizard” under “Software & Tools” to continue 4. Click on “Run” to continue. 5. You may be prompt to this window depending on your Internet Browser’s security level, please click “Run” to continue.
Internet Camera RXS-3323/RXS-4324 User Manual 6. Click on “Next” to continue 7. Click on “Finish” to finish the installation. 8.
Internet Camera RXS-3323/RXS-4324 User Manual Chapter 3. Connecting to the Camera Using IPWizard II: After the installation of the IPWizard II, double click on the icon, you will see this window popup as the basic management of the IPWizard II. Once it popup, the wizard will perform an auto search to see if you have any camera in the Network. The window below is an example of what this may look like: 1. Device Title This part shows the Device name found in the network 2.
Internet Camera RXS-3323/RXS-4324 User Manual (One click to view the video from the IPWizardII directly) could see the video from camera directly. 8. LAN In case you want to change the IP related parameters of wired interface, select the device you want to view and click the View button. Then you please select the device you want to configure and click the LAN button. Further description will be show at below. 9.
Internet Camera RXS-3323/RXS-4324 User Manual If you do not want to change username and/or password, then just click “Submit” button to perform your setting accordingly. Click “<<” button will go back to previous page. If you like to change username and/or password of the device, just click the check button. Then, you will be able to change the username and password as below. After type in the new username and password, click “Submit” button to perform your setting accordingly.
Internet Camera RXS-3323/RXS-4324 User Manual Click on the SSID to select your wireless AP or router. We use WEP as an example here. Enter your SSID’s WEP key, then click “>>” Double check your WLAN setting (Default using DHCP IP as your wireless router provides IP address for the Camera) then click “Submit”.
Internet Camera RXS-3323/RXS-4324 User Manual You should see the confirmation Status Window popup as below. Please select “OK” to confirm these settings. The IPWizard II will start to configure this camera with your updated information.
Internet Camera RXS-3323/RXS-4324 User Manual Once this step finished, IPWizard II will prompt you to unplug the Ethernet cable to activate wireless access. Then IPWizard II will prompt you to test wireless setting or finish wireless procedure as below.
Internet Camera RXS-3323/RXS-4324 User Manual Managing the Camera Access the device using IE for the first time: IPWizard II provides a very easy access for you in finding out your Camera’s IP address within your Network. You can start up the IPWizard II program by double click on this icon. - Three ways to access the Camera for the first time. 1.
Internet Camera RXS-3323/RXS-4324 User Manual z Double click on the icon to open up the UPnP device window z Make sure that the UPnP icons are not hidden. If they're hidden, from the Network Tasks pane in My Network Places, click Show icons for UPnP networked devices, and click Yes to open Windows Firewall. Windows XP will automatically make the needed configuration changes. z For Window XP: To discover your device, go to your Desktop and click My Network Places.
Internet Camera RXS-3323/RXS-4324 User Manual z Click on View Network Computers and devices z z Once opened, you should see the Rosewill Camera model under the Other Device. Please double click this to start the web browser for management. 3. Type in the IP address provided by the IPWizard II into the Internet Explorer directly.
Internet Camera RXS-3323/RXS-4324 User Manual - Entering into Camera’s Management page via IE 1. You may be asking to enter the username and password when entering into the web browser on the computer. 2. If you are prompt to ask entering the username and password. Please type in “admin” and leave the Password blank as the default username and password.
Internet Camera RXS-3323/RXS-4324 User Manual z You may also be ask to install the Rosewill Media Control to load the video properly. Please click on the highlighted bar and select “Install This Add-on for All User on This Computer” z Upon selecting the “Install This Add-on for All User on This Computer”, you will see an Security Warning Window asking your permission to install the Rosewill Media Control. Please click “Install” to continute.
Internet Camera RXS-3323/RXS-4324 User Manual Management Page: When you first entering into the management page, you should see your IE as below: 1. Video Profile RXS-3323 and RXS-4323 provide 13 Video Profiles. The default Profile is H.264 / VGA (640 x 480). Please refer to Appendix for more detail comparison of the video profiles. 2. Streaming There are three types of streaming. User can adjust to the streaming protocol based on the network environment. 3.
Internet Camera RXS-3323/RXS-4324 6. Advance PTZ User Manual This will opens up PTZ advance control. You can adjust the speed, add preset points, or Camera tours, and etc. 7. Digital Zoom User can drag or scale the box over the video to adjust zoom ratio and position. 8. Snapshot Press Snapshot button to take a picture. The image file is saved as JPEG format into your local PC. Select Browser, the pop-up window to select the save path and file name prefix, select OK to continue. 9.
Internet Camera RXS-3323/RXS-4324 User Manual Chapter 4. Managing the Device There are many functions of the Camera can help to make you rlife easier! However, they also require a careful setting to meet your needs. Please see the following section as we will introduce in detail on what these setups are and how they can help you. Setting Note: Setting will only be avaiable when user is login as an administrator. When click on “Setting”, you should see below window as entering into the Setting page.
Internet Camera RXS-3323/RXS-4324 User Manual 1. MAC address: Displays the Ethernet MAC address of the device. Note that user can not change it. 2. Obtain IP address automatically (DHCP): DHCP: Dynamic Host Configuration Protocol. Enable this checked box when a DHCP server is installed on the network to issue IP address assignment. With this setting, the IP address is assigned automatically.
Internet Camera RXS-3323/RXS-4324 User Manual could assign the second port number of http protocol, and the WAN users should follow the port number to login. If the http port is not assigned as 80, users have to add the port number in back of IP address. For example: http://192.168.0.100:8080. Therefore, the user can access the device by either http://xx.xx.xx.xx/, or http://xx.xx.xx.xx:xxxx/ to access the device.
Internet Camera RXS-3323/RXS-4324 6. SSID: User Manual This is the name of the wireless network the device is configured for. The field accepts up to 32 alphanumeric characters. The name must be exactly the same as that used in the wireless access point, or the connection will not be established. Leaving this field blank means the device will attempt to access the nearest open network. 7. BSSID: This is the MAC address of the wireless AP detected. 8.
Internet Camera RXS-3323/RXS-4324 User Manual DDNS: DDNS: Stands for Dynamic Domain Name Server Your Internet Service Provider (ISP) provides you at least one IP address which you use to connect to the Internet. The address you get may be static, meaning it never changes, or dynamic, meaning it’s likely to change periodically. Just how often it changes, depends on your ISP.
Internet Camera RXS-3323/RXS-4324 User Manual PPPoE: PPPoE: Stands for Point to Point Protocol over Ethernet A standard builds on Ethernet and Point-to-Point network protocol. It allows your device with xDSL or cable connects with broadband network directly, then your device can dial up and get a dynamic IP address. For more PPPoE and Internet configuration, please consult your dealer or ISP.
Internet Camera RXS-3323/RXS-4324 1. RTSP Port: User Manual Choose the RTSP port. The RTSP protocol allows a connecting client to start a video stream. Enter the RTSP port number to use. The default value is 554. 2. RTP Port: Specify the range of transmission port number of video stream. The default range is 50000 to 50999. User can specify a number between 1024 and 65535.
Internet Camera RXS-3323/RXS-4324 User Manual 1. UPnP: To enable or disable the UPnP service here. 2. Friendly Name: Shows the friendly name of this device here. 3. UPnP NAT Traversal: When enabled, the device will attempt to configure port mapping in a NAT router on 4. Port Range: The port range will open in NAT router. 5. External IP address: Show the IP address and port for WAN access through Internet. If NAT traversal is your network, using UPnP™.
Internet Camera RXS-3323/RXS-4324 User Manual IP Notification: In case the IP address is changed, system is able to send out an email to alert someone if the function is enabled. 1. SMTP Notification (e-mail): If enable this function, then the “Send to“ and “Subject” fields need to be filled. You will also need to set the “E-Mail“ function in the Management Page such as “SMTP Server“ in order to send email successfully. 2. Send To: Type the receiver’s e-mail address.
Internet Camera RXS-3323/RXS-4324 4. TCP Notification: User Manual If enable this function, then the “TCP Server“, “TCP Port”, and “Message” fields need to be filled. 5. TCP Server: Type the server name or the IP address of the TCP server. 6. TCP Port: Set port number of TCP server. 7. Message: Type the Message for the TCP Server. 8.
Internet Camera RXS-3323/RXS-4324 2. White Balance: User Manual Auto: will adjust the white balance automatically. Hold: will hold the white balance. 3. Exposure Control: Auto: will adjust the internal gain automatically. Hold: will hold the internal gain. 4. Color Level: Larger value will increase the colorfulness of the video. 5. Brightness: Larger value will increase the brightness of the video. 6. Sharpness: Larger value will sharpen the video. 7.
Internet Camera RXS-3323/RXS-4324 User Manual reference to set LED ON/OFF Threshold. 10. De-Noise: De-Noise can remove or lower unwanted noise and preserve fine details and edges. Preset Setting: This page provides the edit tool to modify or delete the Preset points where you set under Advanced PTZ. Tour Setting: Up to 128 positions can be preset, and the camera can be programming to move to the preset position sequentially.
Internet Camera RXS-3323/RXS-4324 1. Tour Name: User Manual The group name of the sequence of camera tour. The maximum number of camera tour is 16. 2. Running: Enable or disable this camera tour. 3. Preset: Set the sequence of the tour. Maximum 16 points can be assigned. The selected preset position is added in the Sequence list from 1 to 16. 4. Wait Time: Type a period of time during which the camera is to stay at each preset point, between 0 to 36000 seconds.
Internet Camera RXS-3323/RXS-4324 User Manual 1. Enable DIPS function of the device 2. Check your Device ID from this page. This is a unique number for each device. 3. If your device is behind a NAT router, please configure your device properly. You could refer to section “Install the Camera behind a NAT Router” above. You only need to do this job one time. 4. Visiting our company’s web site, you can find DIPS service page as below: Enter your Device Number and press “OK” button.
Internet Camera RXS-3323/RXS-4324 4. NTP Server: User Manual Type the host name or IP address or domain name of the NTP server. 5. NTP Sync. Interval: Select an interval between 1 and 23 hours at which you want to adjust the device’s time referring to NTP server 6. Time zone: Set the time difference from Greenwich Mean Time in the area where the device is installed. 7. Daylight Saving: Disable or enable the daylight saving adjustment. Maintenance 1.
Internet Camera RXS-3323/RXS-4324 5. Firmware Upgrade procedure: User Manual The device supports new firmware upgrade (the software that controls the operation in the device). Please contact your dealer for the latest version if necessary. Download the latest firmware file from our website or your dealer. Unzip this firmware file to binary file and store it into your PC. Then follow the steps as bellows carefully: 1. Close all other application programs which are not necessary for firmware update. 2.
Internet Camera RXS-3323/RXS-4324 User Manual - Video This device provides 2 modes of video profile. The first one is Mega-pixel mode which supports video resolution up to Mega-pixel. However the maximum frame rate of this mode is up to 15fps only. The second one is VGA mode which supports video resolution up to VGA but frame rate can be up to 30fps. User only can select either Mega-pixel or VGA mode to operate the camera. Switching Mega-pixel and VGA, the device will take time to reboot system.
Internet Camera RXS-3323/RXS-4324 User Manual fps, then the image will be updated for 15 frames per second as possible. User need to set reasonable max frame rate versus video quality under the limited bandwidth. 4. GOP Control: This defines the Intra/Inter-frame (I/P) ratio of this profile. For example, set the GOP to 30, then the video stream will have one Intra-frame every 30 frames. ROI: ROI stands for Region of Interest.
Internet Camera RXS-3323/RXS-4324 User Manual Once set ROI, you can select ROI in the Video Profile; you can then see the focus image of the ROI area: ROI 0: The area size of ROI 0 is H.264 / VGA, 640 x 480. ROI 1: The area size of ROI 1 is H.264 / QVGA, 320 x 240.
Internet Camera RXS-3323/RXS-4324 User Manual - Audio 1. Audio: To enable or disable audio function 2. Audio Mode: To select Simplex or Full duplex (2-way audio) mode 3. Input Gain: To adjust gain of input audio 4. Output Gain: To adjust gain of output audio - User Use this menu to add, update, or remove the usernames and passwords of the Administrator and viewer. You can allow 20 simultaneous unicast users login at the same time. 1.
Internet Camera RXS-3323/RXS-4324 3. Add, update, and remove of Users account: User Manual Manage the user’s account of viewer user. - E-Mail You may setup SMTP mail parameters for further operation of Event Schedule. That’s, if users want to send the alarm message out, it will need to configure parameters here and also add at least one event schedule to enable event triggering. 1. SMTP Server: Type the SMTP server name or the IP address of the SMTP server. 2.
Internet Camera RXS-3323/RXS-4324 Authentication: User Manual Disable: if no authentication is required when an e-mail is sent. Enable: if authentication is required when an e-mail is sent. 5. Authentication User Type the user name for the SMTP server if Authentication is Enable. name: 6. Authentication Password: Type the password for the SMTP server if Authentication is Enable. 7. E-mail To: Type the receiver’s e-mail address. 8. E-mail From: Type the sender’s E-mail address.
Internet Camera RXS-3323/RXS-4324 User Manual objects trigger motion detection. The lower object size will even small objects trigger motion detection too. Generally speaking, the smaller size will be easier to trigger event. 5. Sensitivity: Defines the sensitivity value of motion detection. The higher value will be more sensitivity. - Event Server FTP Server You may setup FTP parameters for further operation of Event Schedule.
Internet Camera RXS-3323/RXS-4324 1. Name: User Manual User can specify multiple TCP servers as wish. Therefore, user needs to specify a name for each TCP server setting. 2. TCP Server: Type the server name or the IP address of the TCP server. 3. TCP Port: Set port number of TCP server. HTTP Server The device also can send event message to specified HTTP server. 1. Name: User can specify multiple HTTP servers as wish.
Internet Camera RXS-3323/RXS-4324 User Manual for each HTTP server setting. 2. URL: Type the server name or the IP address of the HTTP server. 3. Test: Check the HTTP server whether it is available or not. 4. HTTP Login name: Type the user name for the HTTP server. 5. HTTP Login Password: Type the password for the HTTP server. 6. Proxy Address: Type the server name or the IP address of the HTTP Proxy. 7. Proxy Login name: Type the user name for the HTTP Proxy. 8.
Internet Camera RXS-3323/RXS-4324 User Manual Password: 6. SAMBA Path: Set working directory path of SAMBA server. - Event Schedule Setting This menu is used to specify the schedule of Event or Schedule Trigger and activate the some actions provided by this device. Where the Schedule Trigger will be activated by user-define interval without event happened. 1. Name: Name of the Event or the Schedule. 2. Enable: Enable or disable this Event or Schedule. 3. Type: Event trigger or Schedule trigger.
Internet Camera RXS-3323/RXS-4324 User Manual Example 2: Send file to E-Mail server by motion triggered from Friday 18:00 to Saturday 06:00 1. Select event trigger. 2. Enable time: start from Friday 18:00 and keep work in 12 hous, so it will stop on Saturday 06:00. 3. Trigger by: Motion Area (Added in Object Detection page) 4. Action: Send e-mail (Add in E-Mail page) i. To email address: You need to input the receiver email address. ii. Subject: You could specify the email subject. iii.
Internet Camera RXS-3323/RXS-4324 User Manual Advance PTZ Advance PTZ allows you to set the Camera movement and speed. You can also set Preset points and enable Tour (combine by different Preset Points) here. 1. Live View: Returns to the main viewing page 2. PTZ Control camera up/down/left/right and home position. 3. Speed: Choose the speed of Pan and Tilt. 4. Preset: Add/Update the preset positions or go to one of these positions. 5. Tour: Select one of the camera tours.
Internet Camera RXS-3323/RXS-4324 User Manual 2. Please right click on it and select “Temporarily Allow Scripted Windows” 3. Click the arrow until your desired area appear, then click “Add”. You will be asking to enter the name of the Preset point you want to call. Please enter your desired name, and then click “OK”.
Internet Camera RXS-3323/RXS-4324 User Manual 4. Whenever you move your camera to, you can always return to your Preset point by selecting it and then click “Go”. - Selecting Tour: 1. You will need to set Tour under Setting -> Camera -> Tour Setting. 2. You will also need to set at least One Preset point to enable the Tour movement. Note: Due to preserving the camera life cycle, the tour will run only once and does not support repeat. Digital Zoom Click Digital Zoom to active this function as above.
Internet Camera RXS-3323/RXS-4324 User Manual selecting Browse, the pop-up window allows you to select the save path and file name, select OK to continue. If you like to retrieve the saved image, select the file to display the saved image by using any one of graph editing tools. Record Click Record to activate this function. Press Record button to start recording. The video file is saved as ASF format into your local PC. While you want to stop it, press Stop Record to stop recording.
Internet Camera RXS-3323/RXS-4324 User Manual Appendix A: Restore Factory Default Settings There is a button hidden in the pinhole near to the RJ-45 connector. This button is used to restore the all factory default settings. Sometimes restarting the device will make the system back to a normal state. However, if the system still got problems after restart, user can restore the factory default settings and install it again. Restore the device: 1.
Internet Camera RXS-3323/RXS-4324 User Manual Appendix B: Troubleshooting & FAQ Question Answer Features The video and audio The device utilizes H.264, MPEG4 and JPEG triple compression to providing high codec is adopted in the quality images. Where H.264 and MPEG4 are standards for video compression and device. JPEG is a standard for image compression. The audio codec is defined as AMR for 3GPP and G.711/G.726 for RTSP streaming.
Internet Camera RXS-3323/RXS-4324 User Manual the device. IPWizard II program • Re-power the device if cannot find the unit within 1 minutes. cannot find the device. • Do not connect device over a router. IPWizard II program cannot detect device over a router. • If IP address is not assigned to the PC which running IPWizard II program, then IPWizard II program cannot find device. Make sure that IP address is assigned to the PC properly.
Internet Camera RXS-3323/RXS-4324 User Manual Network Camera’s private IP address. • The port number assigned in your Network Camera might not be available via Internet. Check your ISP for available port. • The proxy server may prevent you from connecting directly to the Network Camera, set up not to use the proxy server. • Confirm that Default Gateway address is correct. • The router needs Port Forwarding feature. Refer to your router's manual for details.
Internet Camera RXS-3323/RXS-4324 User Manual changed in order for the device to be accessible outside your LAN. • Make sure that the device isn’t conflicting with any other web server running on your LAN. • Check the configuration of the router settings allow the device to be accessed outside your local LAN. • Check the bandwidth of Internet connection. If the Internet bandwidth is lower than target bit rate, the video streaming will not work correctly.
Internet Camera RXS-3323/RXS-4324 User Manual •The configuration on the device image display is incorrect. You need to adjust the image related parameters such as brightness, contrast, hue and sharpness properly. Image flickers. • Wrong power line frequency makes images flicker. Make sure the 50 or 60Hz format of your device. • If the object is dark, the image will flicker. Make the condition around the Camera brighter. Noisy images occur.
Internet Camera RXS-3323/RXS-4324 User Manual Appendix C: Ping IP Address The PING (stands for Packet Internet Groper) command is used to detect whether a specific IP address is accessible by sending a packet to the specific address and waiting for a reply. It’s also a very useful tool to confirm the device installed or if the IP address conflicts with any other devices over the network. If you want to make sure the IP address of the device, utilize the PING command as follows: z Start a DOS window.
Internet Camera RXS-3323/RXS-4324 User Manual Appendix D: Bandwidth Estimation The frame rate of video transmitted from the device depends on connection bandwidth between client and server, video resolution, codec type, and quality setting of server. Here is a guideline to help you roughly estimate the bandwidth requirements form your device. The required bandwidth depends on content of video source.
Internet Camera RXS-3323/RXS-4324 User Manual Appendix E: Specifications Camera Specifications Camera Image Device 1.3 Mega-pixel image sensor Max Resolution 1280 x 1024 pixels Lens f:4.3mm / F:1.8 Sensitivity 1.0V/lux-sec (550nm) Video / Image / Audio Video Format H.264, MPEG4 and Motion JPEG simultaneously Image Frame Rate Mega-pixel mode: Up to 15fps for all profiles VGA mode: Up to 30fps for all VGA or less profiles Resolution SXGA (1280 x 1024; H.
Internet Camera RXS-3323/RXS-4324 User Manual Pan Range / Speed 0° ~ 355°; 180°/ second (MAX) Tilt Range / Speed -10° ~ +90°; 120°/ second (MAX) Preset Positions 128 preset points Camera Tour 16 tours Communication Network LAN: 10/100Mbps Auto-MDIX (RXS-3323) Wireless LAN: B/G/N (RXS-4324) Connection Protocol TCP, UDP, HTTP, SMTP, FTP, NTP, DNS, DDNS, DHCP, ARP, Bonjour, UPnP, RTSP, RTP, RTCP, PPPoE, 3GPP, ICMP, Samba System Requirement (via Web Configuration) CPU Pentium III 350MHz or above Mem
Internet Camera RXS-3323/RXS-4324 User Manual Appendix F: Configure Port Forwarding Manually If you want to access the Camera over the internet, you will need to use it together with a router / wireless router. The Camera’s IP address needs to be setup as fixed IP address. You will also need to set up the port forwarding or Virtual Server function of router.
Internet Camera RXS-3323/RXS-4324 User Manual Your WAN IP will be listed here Note: Because a dynamic WAN IP can change from time to time depending on your ISP, you may want to obtain a Static IP address from your ISP. A Static IP address is a fixed IP address that will not change over time and will be more convenient for you to use to access your camera from a remote location. If you could not get a Static IP address from your ISP, the DIPS™ or DDNS is a solution alternatively.
Internet Camera RXS-3323/RXS-4324 User Manual Port section, click Apply. z Scheduling should be set to Always so that the camera images can be accessed at any time. A check mark appearing before the entry name will indicate that the ports are enabled. Important: Some ISPs block access to port 80. Be sure to check with your ISP so that you can open the appropriate ports accordingly.
Internet Camera RXS-3323/RXS-4324 User Manual Appendix G: DDNS Configuration If you have a Cable modem or xDSL, this is a great way to host your own Networked Device or other TCP/IP Service. Get your own domain like www.yourname.com, www.yourname.org etc. Your domain name's dynamic IP address is automatically tracked by a DDNS server.
Internet Camera RXS-3323/RXS-4324 User Manual (3). After the columns show up at the left side, click “Create Account”. (4). Fill the application agreement and necessary information. a. Username b. E-mail address and confirmation c. Password and confirmation d.
Internet Camera RXS-3323/RXS-4324 User Manual (5). Check your e-mail mailbox. There will be an e-mail with a title “Your DynDNS Account Information“. Click the hyperlink address to confirm the DDNS service that you just applied. Then DDNS you applied activated.
Internet Camera RXS-3323/RXS-4324 User Manual (6). Enter the web page http://www.dyndns.org/ again. Input your username and password that you just applied to login administration interface of DDNS server. (7). If the correct username and password are input, you can see the following picture at the top-right of the login page. (8). Click the “Services”. (9). Click the “ Dynamic DNS ”.
Internet Camera RXS-3323/RXS-4324 User Manual (10). Click the “Get Started”. (11). We could create a domain name without any charge at this step. First, we input the host name. (Pink No.1) Then we pick a domain that is easy to remember. (Pink No.2) The 3rd step is to click “Offline Hostname” from Service Type. (Pink No.3) Finally, click the “Create Host” to submit the domain name information and finish DDNS application. (Pink No.
Internet Camera RXS-3323/RXS-4324 User Manual Appendix H: 3GPP and iPhone To use the 3GPP function, in addition to previous section, you might need more information or configuration to make this function work. Note: that to use the 3GPP function, it strongly recommends to install the Networked Device with a public and fixed IP address without any firewall protection. RTSP Port: Port 554 is the default for RTSP service. However, sometimes, some service providers change this port number for some reasons.