Form 2104 GROOV BOX USER’S GUIDE FOR GROOV-AR1
GROOV BOX USER’S GUIDE for GROOV-AR1-BASE Form 2104-150518—May 2015 43044 Business Park Drive • Temecula • CA 92590-3614 Phone: 800-321-OPTO (6786) or 951-695-3000 Fax: 800-832-OPTO (6786) or 951-695-2712 www.opto22.com Product Support Services 800-TEK-OPTO (835-6786) or 951-695-3080 Fax: 951-695-3017 Email: support@opto22.com Web: support.opto22.
groov Box User’s Guide Form 2104-150518—May 2015 Copyright © 2015 Opto 22. All rights reserved. Printed in the United States of America. The information in this manual has been checked carefully and is believed to be accurate; however, Opto 22 assumes no responsibility for possible inaccuracies or omissions. Specifications are subject to change without notice. Opto 22 warrants all of its products to be free from defects in material or workmanship for 30 months from the manufacturing date code.
Table of Contents Chapter 1: Welcome . . . . . . . . . . . . . . . . . . . . . . . . . . . . . . . . . . . . . . . . . . . . . . . . . . . . . . . . . . . 1 Choose Your groov . . . . . . . . . . . . . . . . . . . . . . . . . . . . . . . . . . . . . . . . . . . . . . . . . . . . . . . . . . . . . . . . . . . . . . 2 About this Guide. . . . . . . . . . . . . . . . . . . . . . . . . . . . . . . . . . . . . . . . . . . . . . . . . . . . . . . . . . . . . . . . . . . . . . . . . 3 Other groov Resources . . . . .
Opening Admin . . . . . . . . . . . . . . . . . . . . . . . . . . . . . . . . . . . . . . . . . . . . . . . . . . . . . . . . . . . . . . . . . . . . . . . . . Logging into Admin . . . . . . . . . . . . . . . . . . . . . . . . . . . . . . . . . . . . . . . . . . . . . . . . . . . . . . . . . . . . . . . . . . . . . Accepting the Security Warning. . . . . . . . . . . . . . . . . . . . . . . . . . . . . . . . . . . . . . . . . . . . . . . . . . . . . . . . . . For Chrome . . . . . . . . . . . . . . . . . . .
Basic Troubleshooting. . . . . . . . . . . . . . . . . . . . . . . . . . . . . . . . . . . . . . . . . . . . . . . . . . . . . . . . . . . . . . . . . . . 63 The groov Box is not receiving power . . . . . . . . . . . . . . . . . . . . . . . . . . . . . . . . . . . . . . . . . . . . 63 The groov Box is connected to the Ethernet network, but nothing is working . . . . . . 63 Troubleshooting Q&A . . . . . . . . . . . . . . . . . . . . . . . . . . . . . . . . . . . . . . . . . . . . . . . . . . . . . . . . . .
vi groov Box User’s Guide
1: Chapter 1 1: Welcome groov is Opto 22’s web-based operator interface system that is simple, mobile, and connects easily to almost everything. Simple: groov requires only a web browser to build mobile interfaces. Because it puts ready-made gadgets at your fingertips and requires zero programming, it’s simple to build, deploy, and view effective and 100% scalable operator interfaces. Using tags from a built-in Data Simulator you can test project ideas without connecting to a live machine or system.
CHOOSE YOUR GROOV Allen-Bradley ControlLogix and CompactLogix, Siemens SIMATIC S7, Schneider Electric Modicon, GE PACSystems, and many more. In addition you can use groov with databases, SNMP devices, weather stations, OPC-DA servers, or any device or system supported by your OPC UA server. groov gets important data from process control, OEM machines, and manufacturing systems into operators’ hands. (For more information about OPC UA, go to opcfoundation.org/UA.
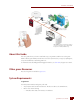
CHAPTER 1: WELCOME Internet Assets Modbus/TCP device Opto 22 SNAP PAC groov Box Another company’s automation system groov Server for Windows groov Build groov View OPC UA server (Only needed if using another company’s automation system. Not needed for Opto 22 or Modbus/TCP devices.) About this Guide This user’s guide shows you how to install and set up your groov Box, and how to use the groov Admin software.
GROOV BOX COMMUNICATIONS – An Opto 22 SNAP PAC System (SNAP PAC S-series, R-series, with firmware R9.2a or newer or SoftPAC, running a PAC Control strategy) – Another manufacturer’s automation system with tags accessible by your OPC UA server, plus the appropriate drivers for your system installed on the server computer. A Note on Browsers Thanks to technologies such as HTML5, SVG, and CSS3, modern browsers are now more similar than they are different.
CHAPTER 1: WELCOME System Architecture When you first set up groov, the PC you use must reside on the same network (broadcast domain) as the groov Box. In a quick and easy setup, the development PC and smartphone or tablet running View all reside within the same domain as groov. The controller can also be on the same network, or it can be on a separate control network as shown here. For more information, see form 1796, the Guide to Networking Opto 22 Products.
WHAT’S IN THIS GUIDE What’s In This Guide Here’s what is in this user’s guide: Chapter 1: Welcome introduces this user’s guide and groov. Chapter 2: Getting Started describes how to get groov up and running quickly. Chapter 3: Powering On, Logging In details how to log in to groov Build and groov Admin and how to manage SSL certificates. Chapter 4: Using groov Admin describes how to use groov Admin to back up and restore groov, manage the network connections, access system information, and more.
CHAPTER 1: WELCOME Product Support If you have any questions about groov, you can call, fax, or e-mail Opto 22 Product Support. Phone: 800-TEK-OPTO (800-835-6786) 951-695-3080 (Hours are Monday through Friday, 7 a.m. to 5 p.m. Pacific Time) Fax: 951-695-3017 Email: support@opto22.com Opto 22 website: www.opto22.com NOTE: Email messages and phone calls to Opto 22 Product Support are grouped together and answered in the order received.
PRODUCT SUPPORT 8 groov Box User’s Guide
2: Chapter 2 2: Getting Started In this chapter you’ll find instructions on how to install the groov Box and set up the groov Admin software. In this chapter: What You Will Need.................................................................................9 In the Box .....................................................................................................9 Step 1. Get To Know the groov Box............................................... 10 Step 2. Choose a Location ..........................
STEP 1.
CHAPTER 2: GETTING STARTED Step 2. Choose a Location When deciding where to place the groov Box, make sure there is room around the front, top, and sides of the groov Box to allow air to flow freely around the device. You need to be able to see the information on the bottom. Also see page 65. Step 3. Mount the groov Box Mounting brackets are provided for you to attach the groov Box to a flat surface or a DIN rail.
STEP 4. CONNECT TO THE NETWORK For mounting on a DIN rail: a. Using the screws provided, install the DIN rail clip on the back of the groov Box. DIN rail clip b. Attach the groov Box to the DIN rail. Step 4. Connect to the Network ETH1 to control network (if on a separate subnet) ETH0 to computer network a. Connect an Ethernet cable from ETH0 to your computer’s network. NOTE: Opto 22 recommends connecting ETH0 to a network with DHCP and DNS services.
CHAPTER 2: GETTING STARTED controller, OPC UA server, or Modbus device is on a different network than your computer, connect ETH0 to your computer's network and ETH1 to the other network. If you are using both ETH0 and ETH1, make sure they have IP addresses on different subnets. In some situations, this may require configuring a static IP address. Otherwise there may be communication errors. For more information, see “Assigning a Static IP Address” on page 29.
STEP 6. TURN ON THE GROOV BOX b. Connect the COM wire from the power supply (normally black) to the – (negative) terminal on the power connector. c. Plug the power supply into a standard 120 or 240 VAC outlet. Step 6. Turn on the groov Box Firmly press the On/Off button until the SYS LED lights up (in about one second), then release. Take a look at the LNK ACT light for ETH0; if the cable is properly connected, the LNK ACT light should be on or blinking.
CHAPTER 2: GETTING STARTED c. Follow the on-screen instructions to activate your groov Box and download the license file. The activation key is printed on the activation key certificate included with the groov Box. When asked to enter the serial number, you’ll find it on the label on the bottom of the device. Serial number d. After activating the groov Box and downloading the license file, return to this guide and continue with step 8. Step 8. Open groov You can open groov using just your web browser.
STEP 8. OPEN GROOV NOTE: If you’ve assigned a static IP address to the groov Box, or if your network doesn’t provide DHCP and DNS services, use the IP address instead of the hostname to open groov. d. Accept the security warning as described below. For more information, see “Accepting the Security Warning” on page 23. For Chrome: – Click “Advanced” to expand the initial screen. – Click “Proceed to (unsafe).” For Firefox: – – – – Expand “I Understand the Risks.
CHAPTER 2: GETTING STARTED Serial number d. Locate the matching serial number in Find. Serial number Link If you do not see the serial number right away, wait 60 seconds and click Search for Devices again. e. Click the link “Click to start groov.” When your browser connects to groov for the first time, the browser will display a security warning. This is normal behavior for groov. f. Accept the security warning as described below. For more information, see “Accepting the Security Warning” on page 23.
STEP 9. CREATE A GROOV ADMIN ACCOUNT For Internet Explorer 10 or newer: Click “Continue to this website (not recommended).” For Safari: Click Continue. The Welcome to groov window opens in your web browser. Step 9. Create a groov Admin Account Follow the on-screen instructions to create a username and password for groov Admin. The Admin account is for administrative tasks such as changing or editing the network connections and updating the groov Box.
3: Chapter 3 3: Powering On, Logging In In this chapter: Using the On/Off Button...........................................................20 Opening Admin.............................................................................20 Logging into Admin ....................................................................23 Accepting the Security Warning............................................23 Opening groov App (groov Build and View)....................
OPENING ADMIN Turning On the groov Box 1. Check to make sure that the groov Box is plugged in and receiving power. 2. Firmly press the On/Off button until the SYS LED lights up (in about one second), then release. Take a look at the LNK ACT light for ETH0; if the cable is properly connected, the LNK ACT light should be on or blinking. NOTE: Always wait until the SYS LED has stopped blinking before you try to log into groov. Otherwise, you may not be able to use the hostname to log in.
CHAPTER 3: POWERING ON, LOGGING IN To open groov Admin, you need to know the default hostname, which is printed on the bottom of the groov Box. If you want to change the hostname, see “Changing the Hostname, DNS Servers, or IPv4 Gateway” on page 30. To use Admin, see Chapter 4: Using groov Admin.
OPENING ADMIN NOTE: Clicking Yes permits Find to have temporary administrative privileges to create an additional temporary link-local IP address for each network interface on the computer. This enables Find to locate a groov Box on a network that does not have DNS and DHCP. If the network does not have DNS and DHCP, you will need to assign a static IP address to the groov Box in order to maintain communication. (See “Assigning a Static IP Address” on page 29.
CHAPTER 3: POWERING ON, LOGGING IN If you have already created a new user and password in groov Admin, the groov Admin and groov View links will be available instead. In that case, click groov Admin. Next see “Logging into Admin” (below). Logging into Admin CAUTION: There is no password recovery option. Write down your Username and Password, and keep it in a safe place. You will need this information each time you log in.
ACCEPTING THE SECURITY WARNING For Chrome – Click “Advanced” to expand the initial screen. – Click “Proceed to (unsafe).” For Firefox 1. 2. 3. 4. Expand “I Understand the Risks.” Click Add Exception to open the Add Security Exception dialog box. Select Permanently store this exception. Click Confirm Security Exception.
CHAPTER 3: POWERING ON, LOGGING IN For Safari Click Continue. Click here For Internet Explorer Click “Continue to this website (not recommended).” Click here Opening groov App (groov Build and View) Click groov App in the menu tree on the left side of the screen. For information on how to use groov Build and View, see form 2027, the groov User’s Guide.
OPENING GROOV APP (GROOV BUILD AND VIEW) 26 groov Box User’s Guide
2104_Using_Admin.fm: Chapter 4 4: Using groov Admin Using groov Admin you can back up and restore your projects and project settings, update firmware, set up wired and wireless networking, and more. In this chapter: Using Admin’s Quick Start ......................................................... 28 Configuring Network Connections........................................ 28 Updating groov App (Build and View)................................. 36 Backing Up groov ...........................................
USING ADMIN’S QUICK START To open groov Admin: In your web browser, enter https://hostname:10000 For example: https://opto-00-d2-dc:10000/ hostname port 10000 To open groov Admin using groov Find: In groov Find, locate the your groov Box’s serial number, and click the groov Admin link. Using Admin’s Quick Start Admin’s Quick Start links to system settings that may need configuration out of the box. You can access Quick Start by clicking on Quick Start in the Admin menu tree.
CHAPTER 4: USING GROOV ADMIN • “Configuring ETH1 for the Control Network” on page 31 • “Configuring Wireless Communications” on page 32 • “Using an AR1 as a Wireless Access Point” on page 35 If you need information on how to set up your network, see form 1796, the Guide to Networking Opto 22 Products. This guide provides detailed information on how to make your groov network more secure by separating control network traffic from the computer network.
CONFIGURING NETWORK CONNECTIONS Static IP address 3. Select Static configuration and enter a static IP address and Netmask. 4. Click Save. Changing the Hostname, DNS Servers, or IPv4 Gateway In order to identify the groov Box more easily on the network, you might want to change the hostname from the default. And, depending on your network setup, you might need to change the DNS Servers or IPv4 Gateway.
CHAPTER 4: USING GROOV ADMIN 2. In the Client Options dialog box, change the hostname, DNS servers, or IPv4 Gateway as necessary. NOTE 1: A hostname cannot have spaces or special characters. NOTE 2: Any changes to this interface may make your system inaccessible via your current wired or wireless connection. Be sure to write down the new hostname or any other changes. 3. Click Save.
CONFIGURING NETWORK CONNECTIONS 2. Click ETH1. 3. If the network has DNS and DHCP, select “From DHCP.” If it doesn’t, enter a static IP address and Netmask. NOTE: If you are using static addresses, ETH1 must be on a different subnet than ETH0. 4. Click Save. Configuring Wireless Communications If you want to use your groov Box on a wireless network, you must purchase and install a USB WiFi adapter that has been tested and approved by Opto 22. See Appendix D: Installing an Approved USB WiFi Adapter.
CHAPTER 4: USING GROOV ADMIN 2. Click WLAN0. 3. Enter the Network Name (SSID) The SSID is a text string from 1 to 32 characters used to uniquely identify the wireless network. This should match the SSID of the access point you want to connect to. NOTE: If the SSID contains one or more spaces, enclose the SSID with quotation marks. For example, enter “Opto 22” instead of Opto 22. 4. Select the Encryption Type.
CONFIGURING NETWORK CONNECTIONS 7. In the Boot Time Interface Parameters, select From DHCP. Normally, the DHCP server assigns an IP address. However, if no DHCP server is present, a static IP address may be used. 8. Click Save. Wait till you see the following message. Congratulations. You’re connected! 9. If ETH0 and WLAN are on the same subnet, disconnect the cable from ETH0.
CHAPTER 4: USING GROOV ADMIN Using an AR1 as a Wireless Access Point groov’s SoftAP (Software Access Point) feature allows you to use your groov Box as an access point in order to create a private wireless network with WPA2-PSK security. This is particularly useful for connecting a phone or tablet to the groov App when there is no other wireless network available. SoftAP can be used by any WiFi-capable device. Your groov Box can be connected to either a wireless or Ethernet network.
UPDATING GROOV APP (BUILD AND VIEW) – Network Name (SSID)—Enter a name between 1 and 32 characters. – Network Key—Enter a key between 8 and 63 characters. – Channel—The WiFi Channel should be between 1 and 14, depending on the geographic region. Click Execute WiFi Sight Survey to display a table of detectable WiFi access points and populate the Channel field with the quietest channel available. 7. Click Save.
CHAPTER 4: USING GROOV ADMIN Backing Up groov During backup, project components are saved to a file on your computer or a USB flash drive. You should back up groov frequently. There is no automatic backup. To restore groov from the backup file, see “Restoring groov” on page 39. IMPORTANT: Your groov project files are not encrypted or obfuscated in any way.
BACKING UP GROOV groov (Build, View, projects) saves your groov App (Build and View) and your project. Ethernet/Wireless Settings saves any settings configured for ETH0, ETH1, and the wireless network. This includes IP, Subnet, Gateway, Hostname, SSID, Wireless Network Key, etc. 4. Do one of the following: – Select Download to PC. – Insert a USB drive into a USB slot on the front of the groov Box. Then select Save to USB Flash Drive. USB connectors for backing up and restoring 5. Click Backup. 6.
CHAPTER 4: USING GROOV ADMIN If saving to a USB flash drive, the file downloads to your USB drive. Restoring groov Use the following instructions to restore groov components from a backup file saved on a computer or USB flash drive. 1. In the menu tree, click System, and then click Backup and Restore. 2. Select the Restore tab. Restore tab 3. Select the components you want to restore. Please note, if a selection you make below isn't included in the backup file, then it won't have any affect.
UPDATING GROOV ADMIN – To restore from USB, insert a USB drive that has the backup file into a slot on the front of the groov Box. Select Load from USB Flash Drive, then click the browse button and select your backup file. USB connectors for backing up and restoring 5. Click Restore, and then wait while the files are uploaded. Updating groov Admin You can update your entire groov Admin from an application update file downloaded from the Opto 22 website. All of your configuration settings will be kept.
CHAPTER 4: USING GROOV ADMIN 4. Highlight the file, and click Open. 5. Click Update. The application file is downloaded, and the neccessary components are installed. 6. After the groov Box is done updating, click “Click here to restart now.” Your groov Box must be restarted for the update to take effect. (Other ways to restart the groov Box are described in the next section, “Restarting the groov Box.”) During the restart, you’ll notice the LED lights on the groov Box go off and then come back on.
CHANGING THE USERNAME AND PASSWORD • Select System > Restart groov Admin. • Click System Information, then click “Click here to restart now” • Press the On/Off button and wait for the groov Box the to turn off. Then press the On/Off button again to power it back up. During restart, you’ll notice the LED lights on the groov Box go off and then come back on. While the groov Box is restarting you cannot continue working in groov. All users will be disconnected.
CHAPTER 4: USING GROOV ADMIN 2. Enter the new Username or password in both boxes, and then click Save. CAUTION: Write down your Username and Password, and keep it in a safe place. You will need this information each time you log in. If you lose your login information, you will have to restore the groov Box back to factory defaults which will erase your project. There is no password recovery option. The login dialog box appears. 3. Log in using the new username and password.
CHECKING HARDWARE STATUS The following information is provided. Checking Hardware Status To check the status of the internal components in groov Box, click Hardware Status in the menu tree under System. The following information is provided. If any value is out of range, it will be displayed in red and a message will appear.
CHAPTER 4: USING GROOV ADMIN Changing the Hardware Status Temperature Units You can change the temperature units for Hardware Status. 1. Under System in the menu tree, click Hardware Status. 2. Click Module Config under Help on the right-hand side. 3. Select either Fahrenheit or Celsius, then click Save. Setting the System Time You can set the time used by the groov Box. 1. Under System in the menu tree, select System Time. 2. Set the time and date and then click Apply.
SETTING THE SYSTEM TIME Changing the Time Zone The default timezone is set to UTC (Coordinated Universal Time). 1. Under System in the menu tree, select System Time. 2. Click the Change timezone tab. 3. In the drop-down list, select a time zone, then click Save. Time Server Use the Time Server dialog box to configure the system to automatically synchronize the time with a remote server. Synchronization will be done using the Unix time protocol or NTP, depending on what the remote system supports. 1.
CHAPTER 4: USING GROOV ADMIN 3. Enter the hostnames or addresses of the time servers. 4. Select Yes next to “Synchronize once per day.” 5. Click Sync and Apply.
SETTING THE SYSTEM TIME 48 groov Box User’s Guide
2104_Using_SSL_Certificate.fm: Chapter 5 5: Using an SSL Certificate groov uses an SSL certificate to encrypt communications and prove groov’s identity to client browsers. An SSL certificate contains the server name, the name of the organization that controls the server, and digital signatures of organizations that vouch for the authenticity of the certificate. The certificate is digitally signed either by a certificate authority (CA) or it is self-signed.
USING A SELF-SIGNED CERTIFICATE Using a Self-Signed Certificate A self-signed certificate encrypts communications, but does not include a digital signature from a commercial CA. It is free and easy to configure, but if you want to avoid having your users see an untrusted site warning every time they use groov, you must install the self-signed certificate in the browser certificate store for every browser that will access groov.
CHAPTER 5: USING AN SSL CERTIFICATE server name may contain letters a–z (case insensitive), digits 0–9, or a hyphen (-). No other characters are allowed. The server name must not start with a hyphen. For example, if the URL client browsers will use to access this groov Box is: https://process1.acme.com, enter process1.acme.
USING A SELF-SIGNED CERTIFICATE groov Admin displays all of these together. At this point, the new certificate is installed on the groov Box and network services restarts. 5. Copy the private key portion of text and paste it to a file named -key.pem (where is replaced by the server name value you entered on the Create SSL key form.) This is the private key that was installed on the groov Box in the previous step. NOTE: Do not lose the private key.
CHAPTER 5: USING AN SSL CERTIFICATE It might take some time, but eventually you should see the security warning. (The security warning appears because the new certificate that was just installed on the groov Box is not trusted by the browser.) 7. Accept the security warning as described below. For more information, see “Accepting the Security Warning” on page 23. For Chrome: Click “Proceed anyway.” For Firefox: – – – – Expand “I Understand the Risks.
USING A SELF-SIGNED CERTIFICATE 10. Copy the certificate text and paste it to a file named .cer (where is replaced by the server name value you entered on the Create SSL key form.) Step 2: Add the Self-Signed Certificate to a Browser Trust Store on a Computer To prevent the untrusted site warning in browsers, the self-signed certificate must be added to the trust store for each browser used to access groov.
CHAPTER 5: USING AN SSL CERTIFICATE Windows 7 Windows 8 3. (Windows 8 only) If you are administrator of local machine, choose the Local Machine certificate store so this certificate will be trusted by all user accounts. Otherwise it will only be trusted by the current user account. 4. Click Next. 5. Select “Place all certificates in the following store.” 6. Click Browse to open the Select Certificate Store dialog box. 7. Select Trusted Root Certification Authorities, and then click OK. 8. Click Next. 9.
USING A SELF-SIGNED CERTIFICATE 5. Click Confirm Security Exception. Expand this Click here Click here 6. To verify the certificate was installed correctly, open Firefox and enter the hostname specified on the certificate. If the browser does not generate an untrusted site warning, the certificate was installed correctly. OS X Safari and Chrome 1. Open Safari and enter https:// to open this dialog box: 2.
CHAPTER 5: USING AN SSL CERTIFICATE 3. If the certificate looks good to you, check the “Always trust when connecting to ” and click Continue. You will be asked to provide your password to authorize the addition of this certificate to your keychain, after which the browser and the Hosted Projects window will accept the SSL certificate as valid. 4. To verify the certificate was installed correctly, open a browser and enter the hostname specified on the certificate.
USING A CA-SIGNED CERTIFICATE ON GROOV BOX Android Devices 1. Email the .cer file you created previously (see “Step 1: Create a Self-Signed Certificate and Private Key” on page 50) to an email account accessible from Android. 2. On the Android device, open the email and click the .cer file to install the certificate. 3. When prompted for a certificate name, type in a name. Make sure “Credential use:” is set to “VPN and apps.” 4. Click OK. 5.
CHAPTER 5: USING AN SSL CERTIFICATE See also, “Changing the Hostname, DNS Servers, or IPv4 Gateway” on page 30. Email address: (optional) Enter the email address of the person responsible for administering this certificate. Department: Use this field to differentiate between divisions within an organization. For example, you might enter “Engineering” or “Manufacturing.” If applicable, you can enter the DBA (doing business as) name in this field. Organization: The legally registered name of your business.
USING A CA-SIGNED CERTIFICATE ON GROOV BOX 6. Copy and paste the entire text to a file named .csr (where is replaced by the server name value you entered on the Create SSL key form in step 3.) Step 2: Obtain a CA-Signed Certificate A CA-signed certificate contains identification information, the public key, and a digital signature. Identification information includes the server name and the name of the organization that controls the server.
CHAPTER 5: USING AN SSL CERTIFICATE 3. Finish the transaction with the certificate authority and receive your new SSL certificate. Step 3: Install the CA-Signed Certificate on groov Box 1. In groov Admin, select Networking > SSL Configuration, then click SSL Encryption. 2. Click the Upload certificate tab on the SSL Encryption page.
USING A CA-SIGNED CERTIFICATE ON GROOV BOX 3. Under “Private key text” click Browse and specify the .key file created previously. See “Step 1: Create a Self-Signed Certificate and Private Key” on page 50. NOTE: The Private Key should be kept private. If it gets compromised, security is no longer guaranteed. 4. Under “Certificate text” click “Entered below,” then click Browse and specify the file containing the signed certificate that was obtained from the CA. 5.
6: Chapter 6 6: Troubleshooting and Q&A Basic Troubleshooting The groov Box is not receiving power • Make sure you are using either the power supply that came with groov Box or else a power supply with the appropriate specifications. See "Appendix A: Specifications and Dimensions” on page 67. • Check that the power supply is securely attached to the groov Box and the power supply is receiving power.
TROUBLESHOOTING Q&A Troubleshooting Q&A Q: What's a DHCP (dynamic host configuration protocol) server? A: A DHCP server automatically assigns IP addresses to devices on the network, which is what the groov Box expects. If you have no DHCP, work with your IT Department to choose a static IPv4 address for the groov Box.
CHAPTER 6: TROUBLESHOOTING AND Q&A 1. Plug the control network into ETH1 on the groov Box. (Remember, your computer network is plugged into ETH0. The two Ethernet network interfaces on the Box are independent, so that keeps the two network subnets separate.) 2. Follow the steps in “Configuring ETH1 for the Control Network” on page 31 to configure the ETH1 connection. 3. Now try configuring your tag server or controller again. This time groov should be able to find it.
ADDITIONAL QUESTIONS AND ANSWERS The Box can be mounted on a DIN rail or on a wall or equipment using one of the mounting brackets provided. Make sure there’s space on both sides of the box so air can flow freely around the device. If you’re a machine builder or OEM and including groov in your machine, the same basic ideas apply: check specs, check security, and mount where there’s room for the Box to breathe. Also, make sure you have network access to the Box for updates.
Appendix A A: Specifications and Dimensions Specifications Ethernet Communication (wired) Two independent 10/100/1000 Mbps RJ-45 connectors, each with a separate IP address (separate subnets) Ethernet Comm (wireless) (Optional) 802.
DIMENSIONS Dimensions 68 groov Box User’s Guide
Appendix B B: Connectors and LEDs Connectors and Indicators USB connectors for backing up and restoring Independent 10/100/1000 Mbps Ethernet interfaces (RJ-45 connectors) Bottom Top USB connector for WiFi adapter* Power connector * For more information, see Appendix D: Installing an Approved USB WiFi Adapter on page 73.
LEDS LEDs The groov Box’s LEDs use color and blinking to show status information.
B: A: AppTitleAppendix C C: Replacing the Battery The battery maintains the Date and Time. If the power LED blinks red, input power is outside normal range or the battery is low and should be checked. Check the battery if the power LED blinks red. 1. On the top of the groov Box, unscrew the captive screw, and pull out the battery holder.
2. Using your fingers, pop out the old battery. 3. Put in a new battery, push in the holder, and secure the captive screw.
C: A: AppTitleAppendix D D: Installing an Approved USB WiFi Adapter If you want to use the groov Box on a wireless network, you must purchase and install one of the following USB WiFi adapters Opto 22 has tested and approved for use with GROOV-AR1. Unapproved WiFi adapters should not be used. • Netis WF2119S • Netis WF2116 • Rosewill RNX-N150UBE • Patriot Memory PCUSBW1150 Install the WiFi adapter and restart the groov Box as follows: 1.
74 groov Box User’s Guide
Index A access point, wireless, 32 architecture, system, 5 B back up groov, 37 browsers, 4, 9, 15, 23 Firefox, 4, 24 G groov Admin update, 28 groov Find, 16, 21 H CCMP, 33 Chrome, 4, 24 Client Options dialog, 31 communications, 4 control network, 5 CSS3, 4 hardware status, 44 HDTV, 4 help Opto 22 Product Support, 7 Product Support, 7 hostname groov Box changing, 31 HTML5, 4 D I C default network settings, 20 DHCP, 20, 28, 64 DIN rail clip, 12 DNS, 15, 28, 64 servers, 31 Internet Explorer, 25 IPv4
N network configure, 28 control, 5 enterprise, 5 interface card (NIC), 63 key, 33 O On/Off button, 19 operating temperature, 67 Opto 22 Product Support contacting, 7 P password groov Admin, 42 power requirements, 13, 67 private key, 62 processor, 67 PWR LED, 20 Q quick start, Admin, 28 R reset groov Box, 20 restart groov Box, 41 restore groov, 39 S Safari, 25 security warning, 16, 23 session timer, 23 SoftAP, 35 specifications, 67 SSID, 33 76 groov Box User’s Guide SSL certificate buy, 60 static IP