
User manual

VCDS - Getting Started - Section 1-A
Thank you for purchasing VCDS, which allows you to turn a Windows PC into a powerful
diagnostic tool for VW/Audi/SEAT/Skoda vehicles from 1990 through the latest models.
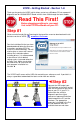
Read This First!
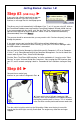
Before plugging anything in, you must
first install VCDS software on your PC.
Step #1
Go to our website and click on Download at the top of the screen to download and install
the latest version of VCDS: www.Ross-Tech.com
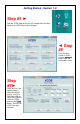
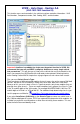
Run the installation file that you have
downloaded and follow the onscreen
instructions and allow VCDS to
install in its default directory. You will
also be given a screen with several
choices for installation options
including drivers, it is recommended
to leave these in their default
settings unless instructed otherwise
by Ross-Tech. Make sure to allow
the USB drivers to install after the
main program installation has
finished. ►
The VCDS Pro-Kit comes with a USB stick containing our software as well. If possible it is
always a good idea to download the latest version from our website.
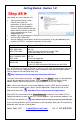
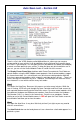
◄Step #2
Connect the USB end of your
USB Interface or the Serial end of
your Serial Interface to the correct
port on your PC. If your PC is
further from the vehicle’s
diagnostic port than 6 feet,
connect an approved Extension
Cable between the PC and the
Interface. The appropriate
extension is included in the Pro-
Kit and additional ones are
available from our web store.