
User manual


2–4 • Installation ASI-310 User Manual (Iss. 03)
Installing the ASI-310
This section outlines how to install a rear module and card in a DFR-8300 series frame. Refer to
the section “Cabling for the ASI-310” on page 2-6 for cabling details.
Rear Modules
When installing the ASI-310:
• DFR-8310 series frames — The MDL-R10 Full Rear Module is required. The ASI-310
is not compatible with the DFR-8310-BNC frames.
• DFR-8321 series frames — The MDL-R20 Full Rear Module is required.
Installing a Rear Module
If the Rear Module is installed, proceed to the section “Installing the ASI-310” on page 2-5.
Use the following procedure to install a Rear Module in your DFR-8300 series frame:
1. Locate the card frame slots on the rear of the frame.
2. Remove the Blank Plate from the slot you have chosen for the ASI-310 installation.
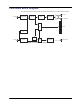
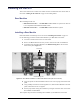
3. Install the bottom of the Rear Module in the Module Seating Slot at the base of the
frame’s back plane. (Figure 2.1)
Figure 2.1 Rear Module Installation in a DFR-8300 Series Frame (ASI-310 not shown)
4. Align the top hole of the Rear Module with the screw on the top-edge of the frame back
plane.
5. Using a Phillips screwdriver and the supplied screw, fasten the Rear Module to the back
plane of the frame. Do not over tighten.
6. Ensure proper frame cooling and ventilation by having all rear frame slots covered with
Rear Modules or Blank Plates.
This completes the procedure for installing a Rear Module in your DFR-8300 series frame.
Screw Hole
Module Seating Slot