
Operation Manual


- 20 -
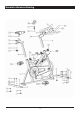
Assembly Instructions
Step 1:
Attach the front stabilizer (2) and rear stabilizer (3) onto
the main frame (1), secure with the hex bolts (8), fl at
washers (13) and spring washer (12).
Note: The adjustable Leveler foot pads (17) under
Stabilizers can adjust the balance of bike.
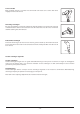
Step 2:
Attach the pedals (16R/16L) to the cranks (15R/15L) of
the main frame (1) respectively.
Note: The marks “L “and “R” on the pedal are for left and
right side of the crank. The pedal (L) should be turned
counter-clockwise to the crank (L). On the contrary, the
pedal (R) should be turned clockwise to the crank (R).
Step 3:
A. Fix the saddle (23) onto the seat slider (21),
secure in place by using the spanner.
B. Then lock the saddle slider (21) to the
saddle post (4) with knob nut (18), fl at washer (19).
C. Firstly, unscrew the spring knob (26), then insert the
saddle post (4) into the tube of main frame (1)
properly, lock spring knob (26) tightly lastly.
Note: Make sure the saddle is locked tightly before
using.