
Owners Manual


17
Troubleshooting
Most difficulties in audio systems are the result of incorrect connections, or
improper control settings. If you encounter problems, isolate the area of the
difficulty, check the control settings, determine the cause of the fault and
make the necessary changes. If you are unable to get sound from the amplifier,
refer to the suggestions for the following conditions:
Power Indicator Is Not Illuminated
The front power indication will be illuminated anytime the unit is connected to
AC power and the rear power switch is set to the ON position. The indication
will be RED for standby mode and WHITE in normal operation. If the indication
is not illuminated, test the power outlet with another electrical device, such
as a lamp. Be sure the power outlet being used is not controlled by a switch
that has been turned off. And check all AC power including the rear power
switch to ensure the unit is receiving power.
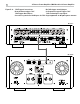
Fuse Replacement
If another electrical device works when plugged into the power outlet, but
the Power Indicator still will not illuminated when the amplifier is plugged
into the wall outlet, it indicates that the power fuse may have blown. If you
believe this has happened, use a tool to insert into the rectangular slot of the
fuse holder
-
on the rear panel then push and turn counter clockwise to take
out the blown fuse and replace with a new one. Or contact your authorized
Michi dealer to get the fuse replaced.
No Sound
If the amplifier is getting AC power, but is producing no sound, check the rear
panel BALANCED / UNBALANCED switch to ensure this is set to the proper
position matched with the analog source input. Also check if the speaker
cables are securely attached and the unit is not displaying a PROTECTION
message on the front panel TFT display.
Protection Indicator
The front panel POWER indicator is red when the amplifier protection circuits
have shut off the amplifier. Typically, this occurs only when the ventilation
openings are blocked, when there is faulty speaker wiring, or after a period
of extreme use. Turn off the system and wait for the amp to cool. Then push
the front panel power switch in and out to reset the protection devices. If the
problem is not corrected or reoccurs, there is a problem with the system or
the amplifier itself.
Function: The amplifier can be configured to display the input audio source
as either a dB Peak Power Meter or a Frequency Spectrum Analyzer. The
display can also be configured as OFF during normal operation. Select the
desired setting using the
T
/
D
arrow buttons and press the Enter
K
button to comfirm.
Options includes: VU Meter, Spectrum 8, Spectrum 12 (Default), Spectrum
16, OFF.
LED Brightness: Sets the brightness of the ON level of the front panel Power LED.
Options include: High (Default), Medium High, Medium, Medium Low, Low.
Press the SETUP
B
button on the remote control to exit the setup menu or
select “Back” on the OSD to return to the main menu.
System Configuration
Disabled
1 Hour
2 Hours
20 Mins
5 Hours
SYSTEM
SETUP
Software Version
Software Update
Factory Default
Auto Power Off
Back
This System menu in the Setup menu, provides the following options, selected
by placing the highlight on the desired line using the
T
/
D
arrow buttons
and pressing the Enter
K
button. This action displays the right side options
allowing changes. Change the options using the
T
/
D
arrow buttons and
press the Enter
K
button to confirm.
Software Version: This shows the current software version loaded into the unit.
Auto Power Off: Set the amount of time the units stays powered on when
there is no audio signal. The amplifier will automatically go to standby mode
if audio is not detected for the specified timer period. Default: 20 Mins.
Options include: Disabled, 20 Mins, 1 Hour, 2 Hours, 5 Hours, 12 Hours.
Software Update: Select the desired update method to update the unit.
Options includes: No (Default), USB, Internet.
Factory Default: This option sets the unit back to the original setting as when
it left the factory. All user settings will be erased.
NOTE Use caution when resetting the amplifier to factory defaults as
all user configured options will be erased and reset to original factory
settings.
Press the SETUP
B
button on the remote control to exit the setup menu or
select “Back” on the OSD to return to the main menu.