
User Guide


7
Save the RMB-1095 shipping carton and all
enclosed packing material for future use. Ship-
ping or moving the RMB-1095 in anything
other than the original packing material may
result in severe damage to your amplifier.
Be sure to keep the original sales receipt. It
is your best record of the date of purchase,
which you will need in the event warranty ser-
vice is ever required.
Placement
The RMB-1095 generates heat as part of its
normal operation. The heat sinks and venti-
lation openings in the amplifier are designed
to dissipate this heat. The ventilation slots in
the top cover must be open. There should be
10 cm (4 inches) of clearance around the
chassis, and reasonable airflow through the
installation location, to prevent the amplifier
from overheating.
Likewise, remember the weight of the ampli-
fier when you select an installation location.
Make sure that the shelf or cabinet can sup-
port its considerable bulk. Again, use com-
mon sense.
NOTE: The RMB-1095 has caster wheels
at the rear to help position it.
About THX Ultra™
THX is an exclusive set of standards and tech-
nologies established by the world-renowned
film production company, Lucasfilm Ltd. THX
grew from George Lucas’ personal desire to
make your experience of the film soundtrack,
in both movie theaters and in your home the-
ater, as faithful as possible to what the direc-
tor intended.
Movie sound tracks are mixed in special movie
theaters called dubbing stages and are de-
signed to be played back in movie theaters
with similar equipment and conditions. The
soundtrack created for movie theaters is then
transferred directly onto Laserdisc, VHS tape,
DVD, etc., and is not changed for playback
in a small home theater environment. THX
engineers developed patented technologies
to accurately translate the sound from the movie
theater environment into the home, correct-
ing the tonal and spatial errors that occur.
Before any home theater component can be
THX Ultra certified, it must incorporate the THX
technologies and also pass a rigorous series
of quality and performance tests. Only then
can a product feature the THX Ultra logo, which
is your guarantee that the Home Theater prod-
ucts you purchase will give you superb per-
formance for many years to come.
THX and the THX logo are trademarks of
Lucasfilm Ltd. All rights reserved.
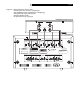
AC Power and Control
AC Power Input
Because of its high power rating, the
RMB-1095 can draw considerable current and
may tax your home’s electrical circuit. There-
fore, it should be plugged directly into a 3-
pin polarized wall outlet. Do not use an ex-
tension cord. A heavy duty multi-tap power
outlet strip may be used, but only if it (and
the wall outlet) is rated to handle the current
demanded by the RMB-1095.
NOTE: The RMB-1095 has a built-in surge
attenuator to prevent opening the electrical
circuit’s breaker or fuse at turn-on.
Be sure the POWER SWITCH on the front panel
of the RMB-1095 is turned off (in the out po-
sition). Then, connect the supplied power cord
to the
POWER CONNECTOR on the back panel
of the amplifier and to the AC power outlet.
Your RMB-1095 is configured at the factory
for the proper AC line voltage in the country
where you purchased it (either 115 volts AC
or 230 volts AC with a line frequency of ei-
ther 50 Hz or 60 Hz). The AC line configu-
ration is noted on a label on the back panel.
NOTE: Should you move your RMB-1095
to another country, it is possible to config-
ure your amplifier for use on a different
line voltage. Do not attempt to perform this
conversion yourself. Opening the enclosure
of the RMB-1095 exposes you to danger-
ous voltages. Consult a qualified technician
or the Rotel factory service department for
information.
If you are going to be away from home for
an extended period of time such as a month-
long vacation, it is a sensible precaution to
unplug your amplifier while you are away.
Power Switch and
Power Indicator
The power switch is located in the center of
the front panel of your amplifier. To turn the
amplifier on, push the switch in. The LED in-
dicator above the switch will light, indicating
that the amplifier is turned on. To turn the am-
plifier off, push the button again and return
it to the out position.
Trigger ON/OFF
Mode Selector
The Amplifier provides the option for manual
or automatic power on/off operation. These
modes are selectable using a toggle switch
on the back panel.
With the switch in the +12V TRIGGER ON
position, the amplifier is turned on automati-
cally when a 12V trigger signal is present at
the 3.5 mm Jack of TRIGGER IN on the rear
panel. The amplifier will go into standby mode
if the +12V signal is not present. The front panel
POWER SWITCH overrides this function. It must
be ON for the +12V trigger to work. Turning
the switch OFF cuts power to the amplifier,
regardless of whether or not a trigger signal
is present.
12V Trigger Input
and Output
The jack labeled IN is for connecting the 3.5mm
Plug/Cable carrying a +12 volt trigger sig-
nal to turn the amplifier on and off. To use
this feature the toggle switch must be set to
the ON position. This input accepts any con-
trol signal (AC or DC) ranging from 3 volts
to 30 volts.
The jack labeled OUT is for connecting an-
other 3.5mm plug/cable to provide a 12V
trigger signal to other components. The 12V
output signal is available whenever a +12 volt
trigger signal is applied to the IN connector.
English