
Manual

Calibration steps:
1. Unscrew the lower part (cup) of the calibration device.
2. Unscrew the probe's sensor protector and screw the calibration device
onto the probe. Proceed carefully so as not to damage the sensors!
3. Remove the 3 small screws on the probe housing and take out the
print.
4. Insert a textile pad in the cup.
5. Shake the ampoule until the entire fluid is in the thick part of the
ampoule.
6. Break off the neck of the ampoule at the fracture point (white line) and
empty the entire contents into the centre of the textile pad (you may
have to knock it a little).
7. Screw the cup immediately into the calibration device from below.
8. Place the calibration device on the insulating surface and leave it for
at least 1 hour.
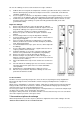
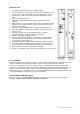
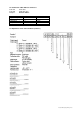
9. Check the display; if necessary readjust on the associated
potentiometer with a small screwdriver (see diagram).
10. Remove cup from the calibration device.
11. Remove the textile pad and dispose of with the household rubbish.
(The textile pads are designed for single use only and must not be
reused under any circumstances.)
12. Wash the cup out thoroughly under running water and dry it carefully.
13. According to which calibration method you have chosen, repeat the
process from item 4 to 12 with the corresponding humidity standards.
14. Push the print back into the housing and screw tight.
15. Remove the calibration device carefully and reattach the sensor protector.
Komponentenseite Lötseite
Côté composants Côté soudures
Com
p
onent side Solderin
g
side
6.3 Contamination
Contaminated filters can cause measuring errors and prolong the adjustment time. Depending upon the
degree of contamination of the filter, it must be cleaned or if necessary replaced periodically.
In order not to damage the sensors, unscrew the filter for cleaning. Clean the filter with soapy water,
alcohol or a cleaning agent suitable for removing contamination and rinse thoroughly with water. Do not
screw the filter back onto the probe until it is completely dry. Replace filters which can no longer be
cleaned with new ones. Should the sensors be severely contaminated despite of the protective filter, we
recommend having these replaced by our service department.
7. Accessories and spare parts
Please be sure to use only ROTRONIC original accessories and spare parts from our current sales
catalogue "HUMIDITY AND TEMPERATURE MEASUREMENT".
InstructionManual_ML_MP400_V2.doc