
Owner manual


1. Chock the front tires.
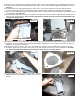
2. Before jacking up the rear of the vehicle. Remove the stock brake line bracket using a 13mm wrench, from the driver
side frame rail to allow the extension bracket to be installed. See Photo 1. The stock bolts can be accessed from the
side of the vehicle. Retain the stock hardware for reuse.
3. Install the brake line bracket to the new bracket with the supplied 5/16” x 3/4” bolts, nuts /washers. Reinstall the
assembly in the stock location with the stock hardware using a 13mm wrench. See Photo 2.
4. Remove the e-brake cable from the mount as shown in Photo 3. This will require a screw driver to bend open mounting
loop.
5. Remove the ABS wire, if equipped, from the frame rail as shown in Photo 4 to allow slack in the line.
6. Jack up the rear of the vehicle and place jack stands under the frame rails. Remove tire and wheels.
7. Lightly support the differential with a floor jack .
8. Remove the stock shock absorbers using a 21mm wrench.
Retain the hardware for reuse.
9. Remove the stock u-bolts and lower the axle to allow the
supplied block to be installed. Discard the factory block if so
equipped.
10. Install the new block on the axle. Jack up the axle and make
sure the center pin is aligned with the block. See Photo 5.
Note short side of block goes towards front of vehicle.
11. Install the supplied u-bolts and tighten using a 22mm wrench
and a crossing pattern.
12. Insert bushings into RCX 2.2 series shock eye, then install
sleeve into bushings. The use of dish soap to lubricate
bushing makes this process easier.
REAR INSTALLATION INSTRUCTIONS
Photo 1
Photo 3 Photo 4
?
Photo 2
Photo 5
Front