
Owner manual


10. Remove the sway bar & end links from the lower control arm as shown in Photo 7 using a 15mm wrench.
11. Remove the sway bar from the frame as shown in Photo 8 using a 10mm wrench. Retain all hardware for reuse.
12. Using a 15mm wrench, remove the 6 axle shaft bolts from the differential and remove from the knuckle. Repeat on op-
posite side.
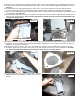
13. Remove the upper and lower ball joint from knuckle using a 18mm wrench and 24mm on the lower. Upper shown in
Photo 9. Strike the knuckle as shown to dislodge the ball joint. Separate the upper control and lower control arm from
the knuckle and remove the knuckle and the lower control arms from the vehicle.
14. Make an alignment mark to show relationship between driveshaft and differential input flange. Using a 11mm wrench,
remove the four drive shaft bolts. See Photo 10. Retain hardware for reuse.
15. Place a floor jack under the differential assembly to provide support for following steps.
16. Unplug the electrical connector on differential as shown in Photo 11.
17. Unplug the differential vent hose shown in Photo 12.
Photo 11
Photo 12
Diff Vent Hose
Photo 9
Photo 10
Photo 7
Photo 8
Electrical Plug