
Owner manual


25. After the cross member has been trimmed, grind the edges smooth using a hand grinder, and apply paint to raw metal.
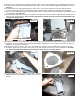
26. Install the Passenger differential drop bracket (open side to center of truck) with the supplied 12mm flange nuts. See
Photo 19.
27. Install the Driver side differential drop bracket (open side to center of truck) with the notch at the bottom to allow
clearance for the differential axle shaft flange using the supplied 12mm x 35mm bolts & washers. Do not tighten.
28. Raise the differential back into place and install on the drivers side drop brackets with the supplied 12mm flange nut and
the factory bolts. See Photo 20.
29. Install the differential to the passenger side drop brackets with the factory nuts and the supplied 12mm x 45mm bolts &
washer on the head of the bolt. The stock nuts/ large washers must be reused to make sure the differential stays
located in the drop bracket.
30. Tighten the diff drop brackets (65ft. lbs) to the frame and the differential to the diff drop brackets using a 18mm wrench .
31. Install the rear cross member in the factory location using the supplied 5/8” x 5 1/2” bolts, nuts/ washers as shown in
Photo 21. Do not tighten at this time.
32. Reinstall the lower control arms in the cross member brackets with the factory hardware. Do not tighten at this time.
33. Install the supplied 3/8” studs on the strut spacer using 9/16” wrench & 3/8” nuts to lock the stud in place. See Photo
22. The stud should clinch with about 35-45 ft/lbs of torque. Do not over torque the nut.
34. Install the strut spacer on top of the factory strut as shown in
Photo 23 with the stock hardware. Tighten using a 18mm
wrench.
Photo 19
PASSENGER SIDE SHOWN
DRIVER SIDE SHOWN
Photo 23
Photo 20
Photo 22
Photo 21