
Owner manual


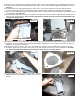


47. The brake shroud must be trimmed to allow the caliper to reinstalled, Mark the dust shroud as shown in Photo 30 and
trim. Reinstall the brake caliper on the knuckle with the factory hardware and tighten.
48. Slightly pull down on the diff vent hose and reinstall on the differential. See Photo 31. It may be necessary to loosen
the diff vent hose from the wire loom to allow for enough slack to reconnect to the axle.
49. Reconnect the electrical connection on the axle that was removed in Step 16.
50. Remove the brake line bracket from the upper control arm mount as shown in Photo 32 using a 13mm wrench.
51. Install the supplied brake line relocation bracket on the upper control arm mount with the stock hardware. Slightly pull
down on the brake line assembly and reinstall on the drop bracket with the supplied 5/16” x 3/4” bolts, nuts /washers
using a 7/16 wrench. See Photo 33. Reconnect the ABS wire that was disconnected in Step 6.
52. Remove the brake line clip from the brake line using a flat head screw driver as shown in Photo 34 and trim as shown
in Photo 35. Reinstall the modified bracket on the stock control arm with the stock hardware.
53. If the optional kicker bars were purchased with this kit, install at this time per the instructions included with that kit.
54. Reinstall the factory upper skid plate with the factory hardware.
55. Install the tires and wheels. Jack up the front of the vehicle and remove the jack stands.
56. Lower the vehicle to the ground.
Photo 30
Photo 31
Photo 33
Photo 34 Photo 35
Photo 32