
User guide

FRONT INSTALLATION INSTRUCTIONS
1. Chock the rear wheels and jack up the front of the vehicle and support the vehicle with jack stands.
2. Support the front axle with a floor jack.
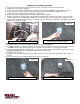
3. Remove the lower sway bar link bolt using a 15mm & 18mm wrench. See Photo 1. Retain hardware for reuse.
4. Remove the shocks using a 13mm wrench/socket for the bottom mount. Retain the hardware for reuse.
5. Lower the axle using the floor jack and remove the coil springs.
6. Remove the upper coil spring isolator and install onto the coil spring spacers.
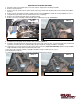
7. Starting on the Passenger Side of the vehicle install the coil spring spacer onto the frame and secure to the frame
using the supplied 1/2” self tapping bolt. Tighten using a 19mm socket. Note the position of the spring as it seats
into the lower coil spring isolator on the axle so that it is at its stop. It must be seated into the coil spring isolator. See
Photo 2, passenger side shown.
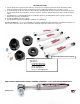
8. Reinstall the upper coil isolator as shown on the new coil spacer. See Photo 3.
9. Install the coil springs. A coil spring compressor may be needed to install the coil on the Passenger side of the vehi-
cle. NOTE: The front track bar may be disconnected from the axle to allow the coil spring to be installed.
10. Jack up the axle and install the supplied 5/16” x 1” lower shock bolts, washers and nuts that secure the new shock
(if purchased with kit) to the axle. Tighten hardware using a 13mm socket.
11. Install the front tires/wheels.
12. Lower the vehicle onto the ground and reattach the track bar to the axle if disconnected. Tighen using a 15mm
wrench.
13. Torque shock bolts, track rod and sway bar link to factory specifications.
Photo 1
Remove Lower Sway Bar Link from Axle Mount
Photo 2
Coil with isolator installed on vehicle
Photo 3 Photo 4
Reinstall the coil isolator Reinstall the coil spring