50 Ft. Dual Grease/Oil Hose Reel With Hoses Owner’s Manual WARNING: Read carefully and understand all ASSEMBLY AND OPERATION INSTRUCTIONS before operating. Failure to follow the safety rules and other basic safety precautions may result in serious personal injury.
Thank you very much for choosing a Roughneck™ product! For future reference, please complete the owner’s record below: Serial Number/Lot Date Code: ________________________________ Purchase Date: ____________________________________________ Save the receipt, warranty, and this manual. It is important that you read the entire manual to become familiar with this product before you begin using it. This hose reel is designed for certain applications only.
Table of Contents Intended Use .......................................................................................................................................... 4 Packaging Contents .............................................................................................................................. 4 Technical Specifications ...................................................................................................................... 5 Important Safety Information .................
Intended Use The Roughneck 50 Foot Dual Grease/Oil Hose Reel with Hoses incorporates metal forms to ensure strength and function equally well in both mobile and permanent-mount situations that are suitable for a variety of heavy-duty applications in the mining, construction, service, and marine industries. #58293 is designed for grease and oil. The hose reels automatically rewind, and easily install onto a wall, floor, or ceiling.
Technical Specifications Item Specification 1/2"x50ft.(oil) Max Pressu re psi Hose Max. Temperature (℉) Hose Material Hose I.D. 2320 210 S.A.E.100R 1 Braid 1/2" S.A.E.100R 2 Braid 1/4" 50’ #58293 1/4"x50ft.(grease) 5800 210 Hose Length (ft.) Important Safety Information ⚠WARNING Read and understand all instructions. Failure to follow all instructions may result in serious injury or property damage.
children to handle the product. Be aware of all power lines, electrical circuits, water pipes, and other mechanical hazards in your work area. Some of these hazards may be hidden from your view and may cause personal injury and/or property damage if contacted. ⚠WARNING PERSONAL SAFETY Stay alert, watch what you are doing, and use common sense when operating the tool. Do not use the tool while you are tired or under the influence of drugs, alcohol, or medication.
Accessories that may be suitable for one product may create a risk of injury when used with another tool. Never use an accessory that has a lower operating speed or operating pressure than the tool itself. Keep guards in place and in working order. Never operate the product without the guards in place. Do not leave the tool running unattended. Specific Operation Warnings ⚠WARNING To prevent serious injury or property damage, read and understand owner’s manual before operating.
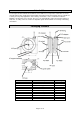
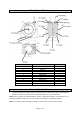
Main Parts of Product Part Number 1 2 3 4 5 6 7 8 9 10 11 Part Description Reel Swivel Stopper Base Hose Guide plate Support bracket Fitting Bolt and nut Spring Roller Quantity 2 2 2 1 2 1 2 4 12 4 8 Assembly Instructions To avoid a dangerous sudden release of pressure that can cause severe injury, ensure that the pressure source for the reel is turned off and the supply hose is not pressurized. Note: Before beginning assembly/installation, purchase appropriate hardware for mounting the reel.
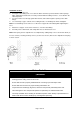
Prior to mounting the hose reel, ensure that the supply hose pressure does not exceed the maximum working pressure of the hose reel. Also check that the pressure source is turned off and the supply hose for the reel is not pressurized. Unpack the reel then check that all parts are present and inspect for damage. Check reel function for smooth rotation. Fasten the mounting base in the desired location. Reel dimensions and the pattern of the mounting holes in the base are shown below.
Installation of Hose 1. Securely stabilize the reel. 2. Facing the swivel fitting side of reel, turn the drum clockwise, by hand, until the rewind spring is tight, and drum has latched. As an extra precaution while installing new hose, secure drum in the latched position. 3. Insert end of the hose through guide roller bracket, and feed through the opening in the drum flange. 4. Use Teflon tape or pipe sealant on hose fitting threads, screw fitting into swivel and tighten.
Operating Instructions ⚠WARNING Wear the proper protective equipment including ANSI Z87.1 compliant eye protection, non-slip boots, and gloves. Never attach any tool or accessory to the hose unless it is capable of safely operating at the rated pressure. If a leak occurs in the hose or reel, remove system pressure immediately. If reel ceases to unwind or rewind, remove system pressure immediately. Do not kink the hose. Do not step on the hose or drive or drag objects over the hose.
Note: You may want to remove swivel from reel hose end, but this is not necessary unless a new swivel is being installed. 4. 5. 6. Replace the seals and reassemble swivel. Use Teflon type or thread sealant on swivel thread fitting, reconnect the swivel thread fitting with axle. Re-connect inlet supply line. Replacement of Hose 1. Turn off supply to reel. 2. Pull out all the old hose and lock the reel in this position. Make sure reel drum is securely locked and cannot rotate back. 3.
Possible Cause Corrective Action Reel is not retracting. Contact your local supplier or a qualified technician for service. Leaking from a hose connection. Tighten the leaking connection. If necessary, check whether the threads are stripped or not. If stripped, contact your local supplier or a qualified technician for service. Leaking from the hose. Check the hose for damage. If damaged, contact your local supplier or a qualified technician for replacement service.
Parts List Part Number 1 2 3 4 5 6 7 8 9 10 11 Part Description Reel Swivel Stopper Base Hose Guide plate Support bracket Fitting Bolt and nut Spring Roller Quantity 2 2 2 1 2 1 2 4 12 4 8 Replacement Parts For replacement parts and technical questions, please call Customer Service at 1-800-222-5381. Not all product components are available for replacement. The illustrations provided are a convenient reference to the location and position of parts in the assembly sequence.
Limited Warranty Northern Tool and Equipment Company, Inc. ("We'' or "Us'') warrants to the original purchaser only ("You'' or "Your") that the Roughneck product purchased will be free from material defects in both materials and workmanship, normal wear and tear excepted, for a period of one year from date of purchase. The foregoing warranty is valid only if the installation and use of the product is strictly in accordance with product instructions.
Distributed by: Northern Tool & Equipment Company, Inc. Burnsville, Minnesota 55306 www.northerntool.