
Product Manual


Page 7 of 16
④. Leave the drain valve open until you are ready to pressurize the system.
(2) Clean the obstruction in the oil system, when any of the following cases occurs:
①. Problem on control valve, flexible hose, rigid tube or manual/auto tip.
②. Pressure can not be relieved completely after above procedures are done.
③. It takes more than 5 seconds to relieve the pressure thoroughly.
2. OPERATION
WARNING: Follow the instructions in PRESSURE RELIEF PROCEDURE before each operation.
①. Check reel for correct operation by slowly pulling out the hose. A “clicking” noise will be heard every half
revolution of the drum.
②. To latch the reel, pull out the hose and allow it to retract after hearing the first second or third “click”.
③. To unlatch, slowly pull out the hose until the “clicking” noise stops, then let the hose retract until the hose
stop rests against the hose guide. Note: To avoid damage to the reel, always hold on to the hose while it is
rewinding.
. Grab the trigger (part# 1-4 of control valve) gently, and then the control valve and the pump start to work.
. Keep the trigger lock (part# 1-3 of control valve) squeezed and depress the trigger lock (part# 1-3 of
control valve) to keep the control valve on.
. Disengage the trigger lock (part# 1-3 of control valve) and release the trigger lock (part# 1-3 of control
valve) to stop dispensing.
. Place the control valve through the hook of drop tray and let the oil drip to the poly tray.
3. ADJUSTMENTS FOR HOSE REEL
(1) Adjusting spring tension
If necessary, adjust spring tension on reel by adding or removing wraps of hose from spool, one wrap at a
time, until desired tension is obtained.
①. Pull out the hose until the latch pawl is engaged.
②. Loosen the stopper (part# 46 of hose reel), then add wraps or decrease the wraps as needed. Add wraps
to increase tension. Remove wraps to decrease tension.
③. Tighten the stopper (part# 46 of hose reel), and adjust stopper position if necessary.
CAUTION: Do not exceed the winding mechanism’s spring capacity when adding wraps of hose. Add just
enough wraps of hose to achieve the desired tension. The winding mechanism will be damaged if spring is
over-tensioned.
(2) Adjusting the hose bumper
①. Pull out the hose until the latch pawl is engaged.
②. The stopper (part# 46 of hose reel) can be adjusted by loosening the slotted screws. Slide the stopper to
the desired position and tighten the screws before pulling hose to disengage the latch pawl.
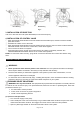
(3) Removing and positioning guide arm
According to each mounting application, recommend Guide Arm positions.
①. Pull out hose until the latch pawl is engaged.
②. Remove stopper (part# 46 of hose reel) by removing the slotted screws.
③. Disengage the latch pawl while maintaining a firm hold on spool. Turn the spool hand over hand
approximately two or three circles in the direction of the drive spring until tension is removed.
. Remove the nuts and washers holding the guide arm and shift to base.
. Rotate the guide arm and adjust it to any of the three positions hinted. See Fig. 3