
Data Sheet


Basic Setup
1) Pre-Use Setup
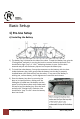
A) Installing the Battery
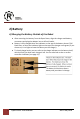
1) The battery bay is located on the side of the robot. To open the battery bay, grip the
“Closing Knob” and push in, turning the knob in counter-clockwise direction. You
should feel a slight “pop” or “click,” indicating the door is open. Pull the latch
outward and pull out the battery ejector bar to open the battery bay.
2) To install the robot battery, line up the connectors on the battery with the slots
inside the battery bay. Next, gently slide the battery into the bay. A properly
installed battery will slide entirely into the robot – if any part of the battery is
sticking out, remove battery, check alignment of connector and reinsert.
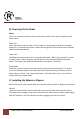
3) Close the battery bay door by returning the
door to its closed position, making sure the
folding bar is folded over the battery and the
upper lip of the battery door tucks underneath
the top strip of the battery bay. Shut the latch
and turn the “Closing Knob” clockwise. You
should feel a “pop” or click” when the battery
door has closed.
4
Open Rover User Manual Rev A 06/2018