NOT 036996 OK 30/03/04 8:36 Page 1 Brugsanvisning 036996/07-04 HC190/200/201
NOT 036996 OK 30/03/04 8:36 Page 2 12 mm H 20 mm I 25 mm 3 mm C 6 mm A 9 mm J E B G K F 1 M L N
NOT 036996 OK 30/03/04 8:36 Page 3 2 3 6 7 4 5 8 9 13 10 12 11 CLIC ! 14 20 17 15 12/20 mmm 16 12/20 6/9 mm 6/9 mm 3 mm 3 mm 21 22 23 24 25 26
NOT 036996 OK 30/03/04 8:36 27 Page 4 28 9/12 mm 29 9/12 mm A 3 mm 30 doigts/ fingers doigts/ fingers 9/12/20 mm 9/12/20 mm 3 mm 3 / 5 mm 3 / 5 mm 31 33 37 34 32 35 38 36 39 40 A A 325 mm 325 mm 41 44 45 42 43
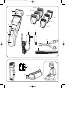
NOT 036996 OK 30/03/04 8:36 Page 14 You have chosen this clipper to make short haircuts or general trimming easy. GB Its carefully monitored production process and precise adjustments for the length of the cut make it a quality professional tool. Read the instructions before using the appliance and avoid any danger caused by improper usage. 1 - DESCRIPTION OF THE CLIPPER AND ITS ACCESSORIES Mod. HC 190 / HC 200: A. Cutting wheel with precise adjustment system for the length of the cut. B.
NOT 036996 OK 30/03/04 8:36 Page 15 IMPORTANT! In order to avoid damaging the batteries: GB • Never charge for more than 20 hours • Don't charge the batteries too prematurely: only charge them when the power of the appliance is clearly reduced or the appliance has not been used for more than 6 months 3 - GUARANTEE Your appliance is guaranteed for one year, but incorrect connection to the power supply, use of accessories from another manufacturer or abnormal use of the appliance will render the guarante
NOT 036996 OK 30/03/04 8:36 Page 16 • For any operational faults, see paragraph "in the event of a problem" or contact our customer service or your retailer. GB WIRING INSTRUCTIONS - FOR U.K. ONLY. SAFETY NOTES FOR REWIREABLE OR MOULDED PLUG. The mains lead of this appliance may be already fitted with a BS1363 13 A plug. Should the fuse need to be replaced, a 13 A ASTA approved BS 1362 fuse must be used.
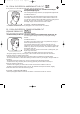
NOT 036996 OK 30/03/04 8:36 Page 17 8 - MAINTENANCE GB • The clipper needs very little maintenance. You can clean it with a slightly damp cloth • It is recommended that you clean the cutting head after each usage with the brush (Fig. 9). For this turn the cutting wheel to position 5 • To clean the comb, remove it and clear away the hair with the brush (Fig. 10). For a very detailed clean, push the cutting head back (Fig. 11). Remove the hair with the brush (Fig.
NOT 036996 OK 30/03/04 8:36 Page 18 GB Key: = easy cut = cut which requires some practice = difficult cut 13 - FOR A SUCCESSFUL ROUND CREW CUT BASIC METHOD. With this method, the cut follows the shape of the skull. • Combs necessary for this cut : 3-6-9-12-20 mm according to the required length (fig.21). • Do not forget to change the comb as you progress through the hair. 1st STAGE : THE CUT. a) Nape • Brush the hair. • Begin by cutting the hair at the nape upwards, using comb 20 mm.
NOT 036996 OK 30/03/04 8:36 Page 19 14 - FOR A SUCCESSFUL AMERICAN-STYLE CUT GB A very short cut on the sides and the nape, and very short on the top. • Combs necessary for this cut : 3-6-9-12 mm according to the required length (fig. 31). • Do not forget to change combs as you progress through the hair. 1st STAGE : THE CUT • To cut the hair on the sides and the nape, see the "Round Crew cut" chapter. At the end, use 3 mm comb to obtain a shaven cut.
NOT 036996 OK 30/03/04 8:36 Page 20 16 - FOR A SUCCESSFUL TRIM GB 1st STAGE : THE CUT To ensure a consistant and Professional result when cutting the excess hair. For this cut, work without a removable comb. a) Around the ears (fig. 37 and 38). • Comb the hair in the required style. • Place the upturned hair trimmer between the sideburns and the ear and make sure that the blade angle is placed at the roots of the hair (only use the tip of the hair trimmer).