
Installation Guide

Follow these simple steps for a standard flush-to-ceiling RowlCrown installation.
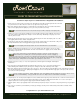
1. Hold a corner piece in its respective corner, flush to the ceiling and trace a line with a pencil along the both sides on the wall
as a point of reference. Do this in all corners of the room (or edges where using an endcap).
2. Measure the distance between the two lines on a given wall. This is the length of the base to be installed on that wall. It's
better to meaure slightly short than slightly long or else your corner pieces will not sit correctly.
This measurement doesn't have to be exact, since the base piece will be completely covered by the profile.
3. Cut base piece to size. For this part, the straightest most exact cut will be achieved by using a utility knife and T-square to
score a line, and then gently flexing the base along the score line until it snaps. Alternatively, a heavy-duty scissor or tin
snips may be also be used.
4. Gently crimp the track along the hinge to an inner angle of approximately 100°. Be aware that crimping to 90° or less will
cause gapping between the base and the ceiling and/or wall.
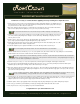
5. Position the base against the wall, equidistant from the measured marks. Push the hinge corner into the wall / ceiling corner.
The hinge will allow for the base to fit snuggly without any gaps along the wall and ceiling.
We recommend getting a friend to help hold the other end of the RowlCrown for easiest installation.
6. Attach the RowlCrown base to the wall using 1" (or 1 1/4") coarse drywall screws, driven into the corner at a 45° angle,
starting at one end and working linearly toward the other end to ensure that there is no gapping. Screws should be driven
approximately every 18 inches.
If they can be easily located, it is recommended that you drive the screws into every other wall stud for
maximum hold. If you're not driving into a stud, and your drywall screw strips or doesn't seat tightly, try
adjusting the angle of entry so the screw drives more vertically into the horizontal portion of the wall frame. Also be aware
that a screw that's inserted too tightly may cause extra pressure on the top and/or the wall side of the base, causing slight
warping. If this happens, slowly back the screw out until the top and wall pieces return to flush.
7. Install the corner pieces using 1" (or 1 1/4") coarse drywall screws, driven through the mounting tabs and through the
installed base.
8. If you are going to be running wiring behind your RowlCrown, this is the time to do so. To ensure that your wiring doesn't
interfere with the profile installation (step 10), affix long runs of wiring to the base with electrical tape or wire staples.
9. Measure the distance between the inside flat faces of the corner pieces. This is the length of the profile that will need to be cut and attached to the base.
Also remember that it's better to measure slightly long than slightly short, since a too-short profile will show gaps by the corner pieces, while a too-long
piece can be cut on the fly to fit snugly.
The more exact this measurement is, and the straighter the cut, the more tightly the profile will sit against the corner pieces. Also, be sure to
measure each wall individually -- even opposite walls of the same room. Many rooms have small variations in wall length.
10. Cut profile piece to size. For this part, the straightest most exact cut will be achieved by using a fine-toothed miter saw, or a miter box and a hacksaw. Of
course, the utility knife and T-square method mentioned above will also yield a clean cut. We do not recommend the use of scissors or tin snips for
cutting the profile, as these tools may produce sloppy edges that will make caulking a necessity!
11. Attach the profile to the base by engaging the bottom catch and then pressing the top into place. Listen for the "snap" and you'll know you've got it right in
place.
12. If necessary, you can finish off your installation by correcting any small gaps caused by uneven wall and ceiling surfaces with a small bead of white
silicone caulk.
Congratulations on your new RowlCrown room!
RowlCrown Removable Crown Molding | 331 Fairfield Rd, Bldg B, Ste 10 | Freehold NJ 07728 | 888.226.7695 | service@rowlcrown.com
FLUSH TO CEILING INSTALLATION INSTRUCTIONS