
Owner`s manual


6
Your new upright has many special features. All were designed for effortless cleaning because suction alone
does not make a vacuum cleaner clean. There must be “air movement” to have cleaning power. That’s why the
nozzle has deep, wide air vents at both ends. These vents permit air to circulate between the nozzle and carpet
at all times; the result...our special self-propelling Cushionaire Cleaning. Your new upright also has exclusive
curved fan blades which create more air volume per minute at less motor speed than straight blades. This means
more efficient carpet cleaning and less electricity consumption; thus you save time and money.
GET TO KNOW YOUR NEW VACUUM CLEANER
EASY TO ASSEMBLE
NOTE: Do not connect cleaner to electrical outlet until
it is assembled.
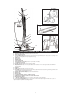
Assemble the Handle (Diagram 1)
1. Slide the upper and lower handle sections
together, aligning the square or round holes on
both handle sections.
2. From the literature pack, get the square neck
curved head bolt, curved washer and 7/16” nut.
3. Insert square neck curved head bolt through
square aligned hole opening, until curved head is flush with handle.
WARNING: DO NOT FORCE HANDLE BOLT. MAY SEVER CORD, COULD CREATE SHOCK.
4. Place curved washer over threaded end of bolt and tighten 7/16” nut with appropriate tool (tool not included).
All except models belo
w
:
Remove wing nut and bolt from fork completely. Insert handle and power cord
into the fork. Tighten.
Models with a pigtail:
Loosen the large wing nut on the handle fork located on the motor unit. Inset the
handle into the fork and tighten the large wing nut.
5. Connect the cords at the handle bottom and the motor unit. Wind the extra-long electrical cord over the
cord hooks when cleaner is not being used. The electrical cord is permanently attached to the upper part
of the handle and a short connector plug is at the other end.
Check to be sure the belt is in place.
If not, follow these easy steps:
1
Upper handle
7/16” Nut
Lower handle
Curved washer
Square neck
curved head bolt
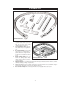
ATTACH BELT
1
2
3
1. Pry belt cover from front of cleaner with screwdriver to remove or rotate the grey rubber nozzle cover*
(Diagram 1).
2. Insert belt lifter tool through belt loop, being sure to hook belt around the lip of the belt lifter tool from
the left (Diagram 2). Using the tool as a pry bar, slip the belt onto the motor shaft until the belt lifter
base meets the shaft. Gently turn the tool to the right (clockwise) to insure proper belt placement.
Remove tool.
3. The front of the belt will be to your right when installed properly (Diagram 3). Snap belt cover or rotate
the grey rubber nozzle cover over the belt access opening.
*Feature may differ according to model
ATTACH THE BAG
Place the bag coupling over the exhaust outlet of the machine. Slide it on and twist to the right to lock.
Attach the top of the bag by snapping the hook on the bag chain into the eyelet on the upper cord hook.