5
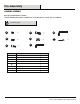
Pre-Assembly PLANN ING ASSEMBLY Read all instruction before assembly. To avoid damaging this produt, assemble it on a soft, non-abrasive surface such as cardboard. NOTE: More than one person may be required to assemble this product. AA x2 BB x1 CC x4 Part AA BB CC DD EE FF GG HH DD EE HH BB x8 FF BB x1 GG BB x4 x1 x1 Description M 6x10 bolt M 6x15 bolt M 10x22 bolt M10x30 bolt M 10 washer S5 Allen Wrench S8 Allen Wrench Wrench Quantity 2 1 4 4 8 1 1 1 3 WWW.ROYALGARDEN.
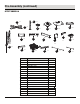
Pre-Assembly (continued) OFFSET UMBRELLA A C x1 B H BB M x2 x1 x1 D x1 I E x1 G BB x2 L BB J x2 F BB BB K BB x2 x1 N BB x2 x1 x4 x1 O BB x1 Part A B C D E F G H I J K L M N O P Q R S P BB x1 Q BB Description Upper Bracket Lower Bracket Cylinder Upper base cover KD base cover Lower base cover Sand bag Support tube rim Lock panel Side panel Base Corner Crank Sunshade Pedal Support tube Turntable Lower Pole Long Steel Hook Short Steel Hook x1 R BB Quantity 1 1 1 1 1 2 2 2
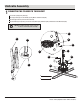
Umbrella Assembly 1 CONNECTING THE CYLINDER TO THE BRACKET Pull out lower pole (Q) from cylinder (C). Attach support tube (O) onto the turntable (P) using M6x10 combination bolts (AA). Attach the upper bracket ( A onto the lower bracket B). Attach turntable (P) and cylinder (C) onto bracket using M10x22 (CC) and M10x30 (DD) combination bolts and M10 washer (EE). NOTE: This umbrella should be set up in its desired location to avoid moving it after assembly.
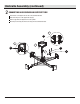
Umbrella Assembly (continued) 2 CONNECTING BASE CORNER AND SUPPORT TUBE Insert the base corner (K) into the four ends of the assembled brackets. Connect the two pieces of the support tube rings (H). Slide the support tube rim (H) down to the lower cylinder. Attach long steel hook (R) and short steel hook(S) onto the assembled breackets.
Umbrella Assembly (continued) 3 CONNECTING THE LOCK PANELS AND SEND BAGS. Slide the perforated lock panels (I) and side panels (J) downward between the base corner (K). Place the sand bags (G) in the umbrella base. Pull to open the velcro punch on the sand bag (G) and fill with sand. After filling the sand bags (G), close the ouch and ensure the velcro is sealed. Lock the two sections of the sand bags (G) togerther. I J J J 3 2 1 G 7 WWW.ROYALGARDEN.
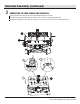
Umbrella Assembly (continued) 4 CONNECTING THE BASE COVER Ensure the locking mechanism on the lock panel (I) is in the OPEN position by using the wrench (HH) as shown in figure 1. Ensure the locking mechanism on the lower base cover (F) is in the OPEN position by using the wrench (HH) as shown in figure 2. Attach the lower base cover (F) to the side panels (J). Close the lower base cover (F) and ensure they are fully closed.
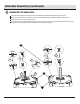
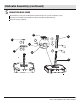
Umbrella Assembly (continued) 5 CONNECTING BASE COVER Attach the KD base cover (E) to the assembled base then attached the upper base cover (D) on the KD base cover (E). Lock pedal to the assembled support using M6x10 combination bolts (AA) and S5 Allen Wrench (FF). Attach lower pole (Q) to cylinder (C). N Q 3 D 4 2 FF 1 E 5 AA C 9 WWW.ROYALGARDEN.COM Please contact (866) 988-3300 for further assistance.
Umbrella Assembly (continued) 6 CONNECTING SUNSHADE TO THE THE CYLINDER. Insert the sunshade (M) into the cyli nder (C) then lock with M6x15 combinnation bolts (BB).
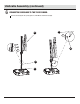
Umbrella Assembly (continued) 7 CONNECTING THE CRANK Attach the crank (L) to the handle. L 2 3 C 1 2 11 WWW.ROYALGARDEN.COM Please contact (866) 988-3300 for further assistance.
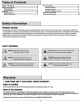
Umbrella Assembly (continued) 8 CHECKING THE SUNSHADE Tread the pedal to rotate the sunshade. 2 1 3 Care and Cleaning For best results, clean the frame and fabric with a damp cloth, and dry thoroughly. This will help prevent mildew by removing dirt particles that may accumulate. Do not clean with abrasive materials, bleach, or solvents. Store the umbrella in a dry, sheltered place when not in use. Tie the canopy closed on windy days to prevent damage to the umbrella.
Questions, problems, missing parts? Before returning to the store call Royal Garden Customer Service. 6 a.m. - 9 p.m., EST, 9 a.m. - 5 p.m., PST, Monday - Friday (866) 988-3300 WWW.ROYALGARDEN.COM Retain this manual for future use.