
Installation Guide


Para Español,
consulte al dorso
1
2 3
Brick Mould Jamb Garage Door
Thermo*Stop
®
Jamb and Brick Mould
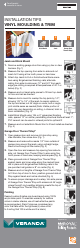
1. Remove existing garage door trim using pry bar or claw
hammer (Fig. 1)
2. Measure the top opening from side-to-side and cut
Jamb to fit using a fine tooth power or hand saw
3. Attach top Jamb to 2x4 or 2x6 structural frame mem-
bers using 8d galvanized finishing nails; alternate
nailing from side-to-side every 12" and 3/4" from each
edge (pre-drilling is required at temperatures of 40˚ F or
below) (Fig. 2)
4. Measure and cut Jamb side pieces to fit from top Jamb
to floor and nail as directed
5. Measure brick mould to overlap the top jamb by 1/2",
allowing 1/8" to 1/4" of the jamb to remain visible on
the top and sides; cut 45˚ angle on ends; butt or angle
joint middle seam as needed (Note: Visible portion of
jamb may vary depending on siding, J-channel, brick or
block installation) (Fig. 3)
6. Install Brick Mould using 10d or 3" galvanized finishing
nails, spaced 12" on center, penetrating structural frame at least 1";
PVC cement can be used in mitered joints for optimal fit
7. Measure and cut side Brick Mould trim to fit and install as directed
(Fig. 4)
Garage Door Thermo*Stop
®
1. Open garage door and remove old door stop using
claw hammer, then close door (Fig. 1)
2. Measure and make entire marks 1/2" from outside of
garage door around the jamb; using a straight edge,
draw a line through all the marks (Fig. 2)
3. Open the door and measure top opening from side-to-
side; cut Garage Door Thermo*Stop to size using fine
tooth power or hand saw, keeping ends square (Fig. 3)
4. Place grooved side of Garage Door Thermo*Stop
against Jamb and inner edge along the marked lines;
nail in place with 6d galvanized finishing nails in the
pre-punched nail guides or 8" on center (Fig. 4)
5. Measure and cut lengths of Garage Door Thermo*Stop
to fit from top of door to floor; position grooved side of
Stop against Jamb and nail as directed (Fig. 5)
6. To ensure proper drainage and overlap, trim side pieces
of Garage Door Thermo*Stop with scissors at 45˚ angle
where the soft vinyl weather stripping meets the top of
the Garage Door Thermo*Stop (Fig. 6)
Painting
Desired custom finishes can be achieved using 100%
acrylic latex paint. To maintain warranty for custom
colors in darker shades, use of heat-reflective paints
is recommended. (Dark Colors are considered any
color that falls within the lightness (L) value of 56
to 0 noting that 100 is white and 0 is black.)
1 2 3
INSTALLATION TIPS
VINYL MOULDING & TRIM
Supplied by:
Fig. 1
Fig. 2
Fig. 3
Fig. 4
Fig. 1
Fig. 2
Fig. 3
Fig. 4
Fig. 5
Fig. 6