OWNER'S MANUAL RSL- 2702S Laminator Read all instructions carefully before use. For any Customer Support needs please choose the Customer Support tab on www.royalsovereign.com Royal Sovereign International Inc. www.royalsovereign.
TOPIC TABLE OF CONTENTS PAGE 1. Introduction········································································································· 3 2. Safety Precautions······························································································· 3 3. Included with Laminator······················································································· 4 4. Product Identification··························································································· 4 5.
RSL-2702S 1. INTRODUCTION Thank you for choosing a Royal Sovereign laminator. It has been designed and manufactured to provide years of continuous service. For complete operating and maintenance information please read this manual thoroughly. Upon receipt of your laminator, please inspect the box, the machine and all other contents for shipping damage. Damage should be brought to the immediate attention of the delivering carrier (See page 3 for list of shipment elements). 2.
3. Included with Laminator PART NAME FUSE(65TS) (AC250V 10A) EA 1 REMARK PART NAME FUSE(65TS) (AC250V 20A) Power supply: 220V~240V EA 1 REMARK Power supply: 100V~120V 4.
RSL-2702S 5. Loading Film Picture 1 Picture 2 Picture 3 Picture 4 1. As shown in picture 1, insert auto grips onto the upper/lower film shaft. 2. As shown in picture 2, using the special tool, fix the auto grips on the film shaft with set-screws. 3. Set the glossy side of the upper and lower film towards the heat rollers. (Glossy side is PET film and matte side is thermal polymer laminating adhesive) 4. Center film as shown in picture 3 and 4.
. THREADING FILM 6.1. Hot film Double sided laminating UPPER ROLL FILM ADHESIVE SIDE UPPER IDLE BAR LAMINATING ROLLERS GLOSSY SIDE PULL ROLLERS ADHESIVE SIDE GLOSSY SIDE LOWER ROLL FILM SECOND IDLE BAR FIRST IDLE BAR 1. Turn the power switch on("I" position). Power switch is located in the rear of the unit on the left side. 2. Complete the "Loading Film" steps as shown on page 4. 3. Set the temperature and speed according to the Recommended Temperature and Speed section. 4.
RSL-2702S 8. Carefully pull up the laminate from the lower roll up towards the first idle bar and then around the back side of the second Idler (Caution: lower roller may be hot).(Picture 3) 9. Tack the lower film to the upper film that is resting on the hot rollers (Picture 4). 10. Reinstall the Front Table and close the Safety Cover. Picture 3 11. Adjust the nip setting to 1/4'' (6mm). 12. Insert and push the leader board into the hot rollers (Picture 5). 13.
6.2. COLD FILM TAKE UP DEVICE COLD FILM RELEASE LINER UPPER IDLE BAR LAMINATING ROLLERS PULL ROLLERS BACKING PAPER LOWER IDLE BAR 1. Follow the steps in the "Loading Film" procedure by loading the upper shaft with pressure sensitive film, e.g. (Royal Print-Pro Film) and lower shaft with mounting adhesive or release liner from pressure sensitive films or backing paper. Using sheets or strips of release liner as backing paper is recommended rather than a continuous roll. 2.
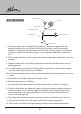
RSL-2702S 6.3. HOT FILM SINGLE - SIDED LAMINATING OPP FILM IDLE BAR LAMINATING HOT ROLLERS PULL ROLLERS IDLE BAR SHAFT-DECURLING BAR 1. Turn the power switch on("I" position). Power switch is located in the rear of the unit on the left side. 2. Follow the steps in the "Loading Film" procedure by loading the upper shaft with OPP Film. Note: OPP film is recommended for single - sided hot lamination 3.
7. CONTROL OF ROLLER PRESSURE 3 4 5 6 2 1 To set, pull the pressure lever outward and turn to one of the following positions. OPEN: For detaching and cleaning rollers. 6MM: For laminating 6mm[0.24in] thick board. 5MM: For laminating 5mm[0.2in] thick board. 3MM: For laminating 3mm[0.12in] thick board. 1.5MM: For laminating 1.5mm[0.06in] thick board. LAMINATING: For laminating 25~250micron(1~10mil) thick film and cold film.
RSL-2702S 8. CONTROL PANEL 1. UPPER: To change upper roller temperature by pressing button, then up or down arrow. (range 32~302°F or 0~150°C) 2. LOWER: To change lower roller temperature by pressing button, then up or down arrow. (range 32~302°F or 0~150°C) 3. SPEED: To change speed of the rollers by pressing button, then up or down arrow. (range 1 through 9) 4. MEMORY: To recall or change presets. To recall the settings, press MEMORY then up or down arrow.
9. LAMINATING STEPS 9.1. HOT LAMINATING 1. Turn on the power switch located on the rear of the machine. 2. Set the pressure lever to the "Laminating mode". 3. Adjust the roller temperature in accordance with the film type and thickness. If you button and already have a setting in the memory that you want to use press the then the or buttons to select your desired setting. 4. When the desired temperature is met "READY" will be displayed on the screen and you will hear a beep. 5. Press the button.
RSL-2702S — Useful Information — 1. You can preset up to 9 temperature and speed settings in the memory for faster easier use. 2. When laminating continuously "WAIT" may appear on the display, if this occurs lower the speed by 1 increment, "READY" should appear and you may continue laminating. 3. When laminating a document much smaller than the film, place the document in the center of the film for better lamination results. 4.
9.2. COLD LAMINATING 1. Thread the cold film in accordance with the illustration and instructions 6.2 on page 8. 2. Set pressure lever to the proper position according to your laminating application.. 3. Set the laminator to cold by pressing the using the 4. It is and button. button, set proper speed by when ready is dispalyed. 5. Center the document on the table. For ease and convenience set the document guides in position 6. Press the"RUN "button.
RSL-2702S 9.3. MOUNTING 1. Set the laminator to cold by pressing the c/hot button. 2. Lay the decaled image face down on a flat surface. Carefully peel back and put a crease along the edge of the release liner (Approximately 1 inch or 25mm, Figure 1). Figure 1 3. With the image facing up, align the image onto the board. Press firmly from the center out (Figure 2). Figure 2 4.
10. USING CROSS CUTTER The cross cutter is located on the rear exit table of the machine. 1. After lamination, move the cutter approximately to the center of the completed application at the desired point of detachment (Figure 1). 2. Grasp film with one hand, press the cutter downward into the application and slide it first to one end of the application, then to the other end to complete the cut (Figure 2 & 3). Figure 2 Figure 1 Figure 3 11.
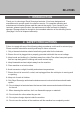
RSL-2702S 12. TROUBLESHOOTING Symptom Machine will not turn on: Cause Possible Solution a. Power switch is in "0" (Off) position a. Put the power switch to the "I" (On) position b. Tripped circuit breaker. b. Reset the circuit breaker. c. Blown main power fuse. c. Replace the fuse. a. Safety cover is not closed. a. Close the safety cover to active the safety switch. There is power, but the b. Front table is not installed b. Properly install the Front rollers are not turning after correctly.
13. Recommended Temperature and Speed Settings Film thickness Temp Remark Opp film 32 micron (1.3 mil) 110°C (230°F) 1-3 Opp film 32 micron (1.3 mil) 130°C (266°F) 4-5 Opp film 32 micron (1.3 mil) 140°C (284°F) 6-7 38 micron (1.5 mil) 110°C (230°F) 2-5 75 micron (3 mil) 110°C (230°F) 1-3 125 micron (5 mil) 120°C (248°F) 1-3 175 micron (7 mil) 130°C (266°F) 1-3 250 micron (10 mil) 140°C (284°F) 1-2 14.
RSL-2702S 15. SPECIFICATIONS Description RSL-2702S Power supply AC 110V / 60Hz Power consumption 1500W Max. laminating width 685mm / 27"w Film thickness 25~250 mic / 1~10mil / Opp film 32mic Paper thicknees Single 200~250g Double 80~250g Max. laminating Speed 2.5m/min (8.2 Ft/Min) Ready time 10min Heating method Hot roller Driving motor DC geared Max. Temperature control 150°C / 302°F Speed control 9 settings Transport type 4 Roller Film core size Auto grip (2.
16. WARRANTY Royal Sovereign International warrants the equipment sold is free from defects in material and workmanship for a period of One (1) year for Parts and Labor from the date of installation, excluding lamination rollers which are warranted for Six (6) months. This warranty is extended only to the original purchaser. This warranty is the only warranty made by Royal Sovereign International and cannot be modified or amended.