
Instructions / Assembly


Page 2 of 5
2. Remove the access panel. Move the automatic gas
valve switch to OFF. See Figure 1.
3. Disconnect the gas supply from the gas valve.
Disconnect the wiring harness at the gas valve.
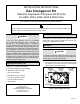
4. Remove the screw that secures the burner box front
cover and remove front cover. See Figure 2 or Figure
3.
5. Remove the four manifold securing screws. Remove
the manifold/gas valve assembly. Replace the main
burner orices with the provided orices. Torque to
approximately 35 in-lbs. See Figure 2 or Figure 3 .
NOTE: LP/Propane orices will be labeled (LP .034).
Burners
Sensor
Ignitor
Burner
Box Top
Cover
Burner Box
Front Cover
Screw
Manifold
Orifice
Figure 2. A802 & 80G2 Burner Box
IMPORTANT
DO NOT use pipe dope or any pipe sealant on gas orice
threads.
6. Gas Valve Conversion
a. Remove both high re and low re springs from
the gas valve. See Figure 4.
b. Replace both high re and low re springs with the
provided LP springs color-coded white.
c. Install the high re adjustment screw and adjust
approximately 12 turns.
d. Install the low re adjustment screw and adjust
approximately 8 turns.
e. Install both regulator screw covers.
Gas
Orifices
Sensor
Screw
Gas Valve
Ignitor
Gas
Valve
Regulator
Vent
Hose
Manifold
Securing
Screw
Figure 3. A952 & 95G2 Burner Box
High
Low
Regulator
Cover Screw
Plastic Regulator
Adjustment Screw
Regulator Spring
Figure 4.
7. A802 and 80G2 units with Nox inserts being converted
from natural to LP/Propane.
a. Remove the burner box assembly from the
vestibule panel.
b. Remove the screws which secures each of the
NOx inserts to the clamshell. Remove the NOx
inserts and reinstall the screws. See Figure 5.
c. Re-install burner box assembly.