
User Manual


Microphone Techniques
General Tips for Using the Royer SF-12
The following are good basic starting places for recording with the SF-12. These positions are
known to produce good results, but experimentation is the key to getting the most out of your
recordings! Photographs of many of the following techniques can be found on our website,
www.royerlabs.com
It is important to remember that the SF-12’s ribbon elements can be damaged by wind. When the
SF-12 is mounted on a boom stand, be sure the stand is moved slowly. When the microphone is
taken down, put it in its box immediately or, if it is to remain in its shock mount, place the mic
sock over the ribbon end of the microphone. Leaving the microphone out unprotected is inviting
a re-ribbon.
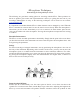
Ensemble Performances
The SF-12 records ensemble performances beautifully. Simply find the point in the room where
you hear the best blend of the instruments and room sound and place the microphone there, with
its logo facing the performers.
Strings
For stereo recordings of stringed instruments, start by positioning the microphone a few feet off
the body of the instrument. Depending on the acoustics of the room, you may want to move the
microphone closer to or further from the instrument to add or minimize ambience. For violin,
position the SF-24 horizontally, two or more feet above the instrument. For larger string sections,
try placing the microphone slightly above the instrumentalists and angled down; a distance of
three or four feet will do the job nicely.
Drum Overhead & Room
Position the SF-12 horizontally over the center point of the kit, two to three feet above the
cymbals. For a centered snare drum, aim the Royer logo at the snare. Adjusting the height of the
SF-12 by even 6-inch increments will produce dramatic variations in how the cymbals sit with
8