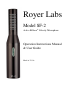
Royer Labs Model SF-2 Active Ribbon® Velocity Microphone Operation Instructions Manual & User Guide Made in U.S.A.
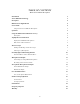
TABLE OF CONTENTS Model SF-2 Ribbon Microphone Introduction 3 Active Ribbon® Technology 3 Description 4 Ribbons in the Digital World 4 User’s Guide 4 Using the SF-2 Active Ribbon® Microphone 4 Operation 5 Using the RSM-24 Shock Mount Accessory 6 Description 6 Amplification Considerations 6 Equalization and Ribbon Microphones 7 Hum, Noise & Mic Orientation 8 The Sweet Spot 9 Finding and Working with the Sweet Spot 9 Other Types of Micropho
Introduction Congratulations on your purchase of a Royer Labs model SF-2 active ribbon® microphone. The SF-2 is a handcrafted, precision instrument capable of delivering superior sound quality and exceptional performance. Combining sophisticated technological advancements with old-world craftsmanship, the SF-2 incorporates a proprietary head amplification system which delivers sensitivity comparable to that of modern condenser microphones.
Description The Royer Labs SF-2 is a compact, bi-directional (figure-eight) velocity type ribbon microphone designed for professional applications. It is a modern ribbon design, with no audible diffraction effects or cavity resonance. The figure-eight pick-up pattern allows the SF-2 to be addressed from either side with equal sensitivity. The in-phase signal is achieved when the microphone is addressed from the front, indicated by the “ROYER” logo.
1. To ensure long service life of your SF-2 active ribbon® microphone, care should be taken when connecting the microphone. We offer the following information as a general set of good habits that apply to both active ribbon mics and solid-state condenser microphones. 2. Although it is usually safe to “hot plug” most phantom-powered microphones to a preamplifier or console with the phantom activated, we suggest deactivating the phantom power prior to plugging the microphone in when possible.
cause the microphone to become inoperative. Since the active electronics isolate the ribbon element from phantom power, a miswired cable should not cause damage to the ribbon. 5. Never attempt to “test” the SF-2 or any ribbon microphone with an ohmmeter. A blown ribbon could result. 6. Always provide adequate wind protection by using a windscreen or mic sock with your SF-2 (and any other ribbon microphone). 7.
A good preamplifier should sound natural, with no sign of edginess or excessive noise. Vacuum tube preamplifiers sound warm, yet airy and transparent. Do not expect a vacuum tube preamplifier to be as quiet as a solid-state preamp, as electron emissions from tubes tend to convey more thermal noise than transistors.
Hum, Noise & Mic Orientation All ribbon microphones are susceptible to picking up stray alternating magnetic fields, which show up in the audio signal as hum. Power transformers (such as those found in guitar amplifiers) and alternating current motors are the most likely sources of hum. In-wall wiring, solid-state light dimmers, and electrical utility transformers are other likely sources. A well designed microphone provides shielding to minimize the effects of such stray magnetic radiation.
The Sweet Spot Finding and Working with the Sweet Spot The “sweet spot” is that perfect position where you put a microphone and the instrument you are recording snaps into focus. There are only general rules as to where the sweet spot may be found for any given microphone/instrument relationship, and usually experimentation reveals it. The sweet spot can be extremely variable since it depends on the quirks of a given microphone and a given room.
Proximity Effect and Working Distance The Sound That is “More Real than Real” Ribbon microphones have long been renowned for a rich bass response.
Microphone Technique General Tips for Using Ribbon Microphones The SF-2 is highly versatile and well suited to a wide range of instruments, particularly those used in classical and scoring work where the SF-2’s lack of microphone induced “hype” captures instruments in an extremely natural sounding way. Its smooth frequency response characteristics and ability to capture minute detail make it an excellent choice for strings, woodwinds, percussion and all acoustic instruments..
Choirs and Orchestras can be picked up very well with two SF-2’s. Place the microphones at a distance of ten feet high, and a few feet behind the conductor. The microphones should be spaced apart approximately one foot and angled, one toward the left and one toward the right. Drums and Percussion instruments sound very natural when recorded with SF-2’s at a distance of two to several feet. For a drum set, placing the microphone(s) at a distance of three to five feet above the kit works very well.
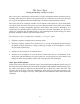
Stereophonic Microphone Technique Classic Blumlein Technique For many years, several “coincident” microphone setups have been widely used for picking up sounds in stereo as naturally as possible. The “Blumlein” technique, named for A.D. Blumlein of England, involves the use of two figure-eight microphones positioned as in the sketch (see Figure 1); so that one faces left and the other, right, at an angle of 90º (i.e. each displaced 45º from center).
SIDE MID Figure 2 Typical M-S miking technique If the outputs of the mid and side microphones are recorded on separate tracks, the electrical connections shown in Figure 3 can be made at the mixer outputs and the adjustment of the stereo separation can be done during mixdown rather than during the actual recording. This is very useful for live recording.
Care and Maintenance 1. The SF-2 is a solidly built, precision instrument. Keep the following commonsense rules in mind when using and/or storing it and it will last a lifetime. 2. Do not expose the microphone to severe shock or vibration, which could stretch the ribbon element. If the microphone is accidentally dropped, test it to see if it was damaged before returning it to service. Low output or a dull sound would indicate a stretched ribbon. 3.
Over time, some of this oil will be drawn out due to "wicking" action, the physical handling of the microphone or absorbent materials it is exposed to (like the foam padding of the microphone case). As the oils are drawn out of the microscopic surface layer, the microphone finish may develop an uneven appearance. If this happens, simply massage the microphone gently with a lint free cloth treated with a few drops of light machine oil or WD-40® (apply the oil to the cloth, not to the microphone).
Supply Current: 4 mA High grade neodymium magnet assembly Stainless steel internal baffle and dampener Weight: 448 grams (15.8 oz.) Dimensions: 142 mm x 39mm (base) x 25mm (top) Finish: Matte Black Accessories: Protective presentation case, mic sock, Shock-mount, documentation. Deluxe packaging is available. Microphone Warranty: Lifetime to original owner (repair or replace at Royer’s option).
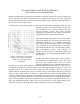
Polar Pattern Frequency Response 18
Warranty PLEASE RETAIN YOUR ORIGINAL BILL OF SALE AS YOU WILL NEED TO PRESENT IT SHOULD YOU REQUIRE SERVICE UNDER THIS WARRANTY. TO VALIDATE THIS WARRANTY, THE REGISTRATION CARD AND A PHOTOCOPY OF THE SALES RECEIPT FROM AN AUTHORIZED ROYER DEALER MUST BE ON FILE WITH ROYER LABS. Royer Labs hereby warrants all Royer SF-series microphones with the following terms and conditions.