
Manual
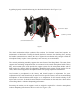
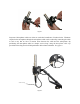

The microphone holder grips the microphone via pressure applied by adjustment of a knurled
thumbscrew. See Figure 1 (C). Turning the thumbscrew clockwise compresses the spring-steel
housing around the barrel of the microphone, securing the microphone firmly in place. Turning
the thumbscrew counter-clockwise releases the microphone. The holder is felt-lined and prevents
damage to the microphone’s finish.
!
A small drop of machine grade oil on the threads of the thumbscrew every five years will keep
the mechanism operating smoothly.
!
Using the Sling-Shock
Microphones may be inserted into the Sling-Shock before or after the shock mount is attached to
the microphone stand. To prevent accidental droppage of the shock and microphone, we
recommend attaching the Sling-Shock to the stand first, then inserting the microphone.
!
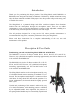
First, loosen the thumbscrew on the right side of the shock mount enough to accept the
cylindrical body of the microphone. Insert the microphone body from above the shock mount
into the felt-lined microphone holder and tighten down the thumbscrew just enough to firmly
grip the microphone. See Figure 2
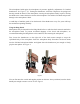
You can fine-tune the vertical and angular position at this time. Once positioned, turn the clutch
handle just enough to assure a secure fit. See Figure 3
Figure 2