
Installation Instructions

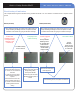


Mounting
> Use proper tools and hardware.
Separate base from Badge Reader
Hold base up against mounting
surface and mark the three
mounting holes.
Drill pilot holes and install anchors
where needed.
Place base on mounting surface so mounting holes
line up with pilot holes/anchors and secure unit with
appropriate screws.
Install batteries, observing correct polarity.
Attach front cover of Badges Reader and secure with
screws.
3
1
2
5
6
4
Recording or deleting a badge
You must read the installation manual to know how to record a new badge or delete or modify an existing one.
Each code or badge is created with an access level and each access level has specific rights
LVL3 (user) codes or badges can be recorded by the installer (LVL 4) only.
LVL3 (user) can record LVL2 (restricted User) codes or badges only.
Refer to the installation manual of the alarm panel to know how to modify the access level of an existing code or badge.
Mouting holes
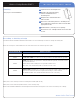
Access level on XL Definition & rights
LVL1 Stand by level
LVL2
Restricted USER level where it is only possible to arm/disarm the system.
LVL 3
USER level where it is possible to arm/disarm the system, check the event
log, test the devices.
Modification of the settings is not possible at this level.
LVL3 user can create LVL3, LVL2, or LVL1 access code.
LVL4
INSTALLER level where it is possible to modify the setup of the panel. The
approval of a LVL3 or LVL2 is required to modify a code to LVL4.
The LVL4 installer can create the first LVL3 access code only.
www.videofied.com
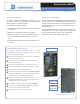
Outdoor Badge Reader BR651
INSTALLATION DATA SHEET