
User Manual

6
INSTALLATION SHEET
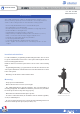
OSMV OUTDOOR STREAMING MOTION VIEWER
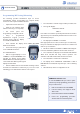
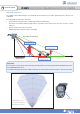
Optional lenses installation
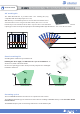
The following steps describe the OSMV lens replacing
procedure:
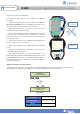
1 Carefully loosen the 4 screws of the lens frame. Do not use
an electric screwdriver. This can damage the threads. Leave
the screws on the threads in order not to lose them.
2 When the 4 screws are loose, push on each one with a
screwdriver to remove the lens frame.
3 Remove the lens frame and the lens. Wipe the new lens with
a soft dry cloth and install it. There is a fail-safe in the bottom
right corner of the lens to ensure that the new lens is installed
the right way round.
4 Replace the lens frame on the OSMV and gently tighten the
screws using a mechanic screwdriver.
5 Replace the OSMV in its case, tighten the screw and install
on site.
6 Adjust the PIR sensitivity according to the lens in the
configuration menu (see below).
7 It is essential to monitor the proper functioning of the
infrared detection using the FUNCTIONAL TEST feature in the
panel MAINTENANCE menu. A red status LED lights up when
the OSMV is detecting. Use that test to determine the pattern
of the detection field.
Lens frame
screw
Fail-safe
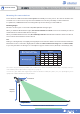
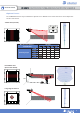
Adjust sensitivity to the optional lens
Curtain and beam lenses are more sensitive than the multipurpose lens, whereas pet-immune is less sensitive
than multipurpose. Adjusting sensitivity to the lens type is mandatory. Use the $ function.
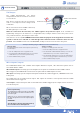
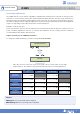
DEVICE
CONFIGURATION
CHANGE NAME
DEVICE
OK or YES
To select the OSMV
OK or YES
CURTAIN
detector_name$1
PET-IMMUNE
detector_name$8
BEAM
detector_name$2