NEO K-2 Dual Deck Multi Format Karaoke Player with Ripping & Recoding Function USER’S MANUAL
Safety Warnings CLASS 1 LASER PRODUCT KLASSE 1 LASER PRODUKT LUOKAN 1 LASER LAITE KLASS 1 LASER APRARAT PRODUCTO LASER CLASE1 CLASS 1 LASER PRODUCT This player is classified as a CLASS 1 LASER product. Use of controls, adjustments or performance of procedures other than those specified herein may result in hazardous radiation exposure. CAUTION RISK OF ELECTRIC SHOCK. DO NOT OPEN CAUTION: TO REDUCE THE RISK OF ELECTRIC SHOCK, DO NOT REMOVE REAR COVER. NO USER SERVICEABLE PARTS INSIDE.
Precautions Ensure that the AC power supply in your house complies with the identification sticker located on the back of your player. Install your player horizontally, on a suitable base(furniture), with enough space around it for ventilation(7.5~10cm). Make sure the ventilation slots are not covered. Do not stack anything on top of the player. Do not place the player on amplifiers or other equipment which may become hot. Before moving the player, ensure the disc tray is empty.
Before Use Playable Media DVD, SVCD, VCD, HDCD, Audio CD, DVD+/-R, DVD+/-RW, SVCD and CD-R/RW that contains Audio titles, , MP3, WMA, JPEG, MPEG4 or DivX files.
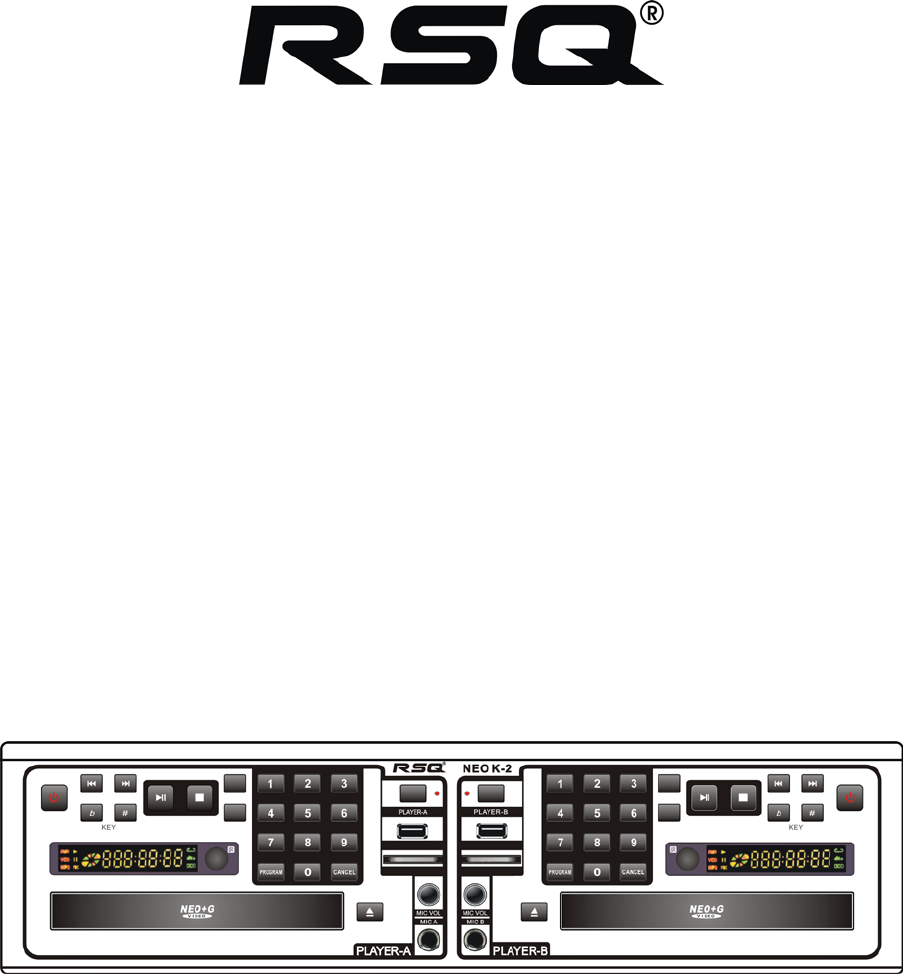
Description Front Panel 1. 2. 3. 4. 5. 6. 7. 8. 9. 10. 11. 12. 13. 14. 15. 16. 17. 18. 19. 20. POWER: Press POWER button to power the NEO K-2 on or off. KEY (b/#): Use these buttons to adjust the b/# key of music PREVIOUS/ NEXT: Use these buttons to skip to the next or previous track PLAY/PAUSE: Press this button to play or pause the current track or song. STOP: Press this button to stop playback MPX(=MULTIPLEX): Press this button to turn on/off the vocal channel.
Description Rear Panel 1. 2. 3. 4. 5. 6. 7. 5.1CH ANALOG AUDIO OUT: These jacks are for connecting to 5.1CH ready Amplifier/Receiver. 2CH AUDIO OUT: These jack for connecting to 2CH(Left/Right) ready Amplifier/Receiver COAXIAL (DIGITAL AUDIO) OUT: This digital audio output is for connecting devices with a coaxial cable.
Description Remote Control NO 1 2 Button NEO+G/ MP3+G Karaoke POWER EJECT 3 REMOTE A 4 REMOTE B 5 PLAYER-A 6 PLAYER-B 7 8 9 10 11 VOL -/+ Key b/# Control ECHO -/+ MPX(Multiplex=L/R/ST) AUDIO 12 RECORD 13 14 15 16 17 RIPPING MUTE NUMBERS(0~9) CANCEL PROGRAM 18 SONG LIST 19 20 21 22 23 24 25 26 27 NUMBER INPUT PLAY/PAUSE STOP ARROW(◀▶) ARROW(▲▼) ENTER(=PLAY) RETURN INPUT(DISC/USB/CARD) REPEAT 28 MENU(Song List Creating) 29 30 31 32 33 34 35 36 37 38 39 40 41 42 43 FR(FAST REVERSE) FF(
Connections Connecting to the Power Supply Plug the main lead (marked AC Cord on the rear of the player) into an appropriate socket Press the Power Switch ON in the rear panel of the Player to make Standby Mode. Press the Power button on the Front panel or Remote Control to switch the NEO K-2 Player on. The present product can be used under the AC 100~240V~. 50/60Hz Before plugging your player into a main socket, you must check the voltage.
Connections Connecting with Microphones MIC A: Connect the MIC A to the Mic input jack of the PLAYER-A to sing with PLAYER-A only and adjust the Mic volume level. MIC B: Connect the MIC B to PLAYER-B to sing with PLAYER-B only and adjust the Mic volume level. To avoid feedback noise, do not place your hands near the top of the microphone and do not point the microphone directly at the output speaker. If feedback occurs, lower the volume control.
Basic Operation Basic Operation (DVD/VCD/AUDIO CD/JPEG) POWER: REMOTE-A REMOTE-B PLAYER-A PLAYER-B EJECT: PLAY/PAUSE: STOP: VOLUME(+/-): NUMERIC(0~9): CANCEL: PROGRAM (MP3/VCD/ MPEG4): INPUT (DISC/USB/ CARD): MPX (MULTIPLEX =L/R/ST): AUDIO (DVD/MPEG4): MUTE : FR/ FF ( / ): PREV/ NEXT ( / ): Turn On/Off the power of the Player.
Basic Operation ARROW (▲▼◀▶): ENTER: Press ARROW keys to navigate the File/Folder RETURN: Press RETURN key to return to previous level of the Menu. MENU (DVD/MPEG4): Press MENU key to the disc menu mode on the screen. Press ARROW buttons or NUMERIC buttons (0~9) to select a play option and press ENTER button to confirm. You can play a chapter, track, title or entire disc repeatedly. Press REPEAT continuously to choose a Repeat mode during playback.
Special Operation Special MPEG4 Operation SUPPORTED VIDEO FORMATS: DivX 4.x, 5.x, XviD, DivX Pro(Excluding QPEL and GMC) Bit rate may fluctuate; Device may skip encoding the high bit rate portions and begin decoding again when Bit rate returns to normal. Maximum bit rate: 4Mbps.720*480 @30fps, 720*576 @25fps Aspect Ratio: Although default DivX resolution is 640*480 pixels (4:3), this product supports 720*480 pixels. Video resolution higher than 800 pixels will not be supported.
NEO+G Karaoke Operation PLAYING NEO+G DISC: MICTROPHONE SETTING: MIC VOLUME: SONG SEARCH Insert a Karaoke Disc(NEO+G/MP3+G) into the Tray of the player. Select a desired song with “SONG NUMBER INPUT” or with “SONG LIST MENU” Press PLAY/PAUSE or ENTER button to start playback. To stop playback, press STOP button. Connect the microphone to the MIC INPUT jack on the front panel.
NEO+G Karaoke Operation RECORDING OF SINGING: (NEO+G, MP3+G) You can record your singing sound & graphics with Neo+G & MP3+G songs into USB/SD at MP3+G format. ① Please connect a USB/SD Card and Microphone into the Player in advance and play a NEO+G or MP3+G song from Disc or USB/SD. ② After select a desired song on the all NEO+G/MP3+G SONG LIST, press “RECORD” key to start recording into USB/SD.
NEO+G Karaoke Operation CD+G DISC RIPPING SONG LIST CREATING (NEO+G/MP3+G/ AVI) You can rip the CD+G Disc with High speed (4X) into USB/SD at MP3+G format including Music and Graphics. ① After connect a USB/SD Card into the Player in advance, insert a CD+G Disc to the player. ② Press “RIPPING” key at stop or playback mode. ③ Set the ripping OPTION such as “SPEED(1X-4X)/ BITRATE/ ID3 TAG/ PLAYLIST”. ④ Then select desired TRACK of the CD+G Disc. ⑤ Then, select START and press ENTER to begin Ripping.
System Setup System Setup TV System SCREEN SAVER: HDTV Output: VIDEO: TV Type: PASSWORD: RATING: DEFAULT: RESUME: The TV setup is for switching to different TV system (NTSC, PAL60, PAL and AUTO). *If you don’t know which TV system you have, just select AUTO. Turn the screen saver ON and OFF. If the disc is HD, select the corresponding HD resolution(HD OFF/ 720P / 1080i / 1080P). If your TV is not a HDTV but with video type set on 720P or 1080P, the image will not be displayed well.
System Setup Video Setup BRIGHTNESS: CONTRAST: HUE: SATURATION: Set the brightness of the video from range 0-12. Set the contrast of the video from range 0-12 Set the hue of the video. +color to increase red color, -color to increase green color. Set the degree of the saturation of the video. Speaker Setup DOWNMIX: SUB WOOFER: CENTER DELAY: REAR DELAY: FONT: Switch the audio output from LT/RT Mono, STEREO, VSS and 5.1CH mode.
Trouble Shooting Symptom No power Play fails to start even when PLAY is pressed. Play starts but then stops immediately No Picture C O M M O N D V D No sound Distorted sound Picture is distorted during fast forward or fast reverse. Picture freezes momentarily during playback No fast forward or reverse play. No 4:3(16:9) picture No operations can be performed with the remote control. No key operation (by the unit and/or the remote control) is effective.
Specification Supported Format System Video Output (PLAYER-A/B) Audio Output (PLAYER-A/B) Mixed A/V Output Input (PLAYER-A/B) Others Supported Media: DVD, VCD, SVCD, MPEG4, DivX, Xvid, HDCD, Audio CD, DVD+R/RW, CD+R/RW, MP3, WMA, OGG and JPEG. Video Format: NEO+G, MP3+G, CD+G, MPEG1(*.dat, *.mpg), MPEG2(*.vob), MPEG4, DivX, XviD(*.avi), JPG Audio Format: PCM, Dolby Digital AC3, DTS, MP3, WMA and OGG Subtitle Format: .smi, .srt, .