For more indepthinformation, go to our Web site www.richsound.com • ••••• •••••••• 3.
Important Safety Instructions C AU T I ON RISK OF ELECTRIC SHOCK DO NOT OPEN AVI S RISQUE DE CHOC ELECTRIQUE NE PAS PUVRIR The lightning flash with arrowhead symbol, within an equilateral triangle, is intended to alert the user to the presence of uninsulated “dangerous voltage” within the product’s enclosure that may be of sufficient magnitude as to constitute a risk of electric shock to persons.
Caution: - Use of controls or adjustments or performance of procedures other than those described herein, may result in hazardous radiation exposure or other unsafe operation. - To reduce the risk of fire or electric shock, do not expose this apparatus to rain or moisture. The apparatus must not be exposed to dripping or splashing and objects filled with liquids, such as vases, must not be placed on apparatus.
Consignes de sécurité C AU T I ON RISK OF ELECTRIC SHOCK DO NOT OPEN AVI S RISQUE DE CHOC ÉLECTRIQUE NE PAS PUVRIR Le symbole éclair avec une flèche dans un triangle équilatéral est destiné à alerter l’utilisateur de la présence d’une tension dangereuse non isolée dans le capot du produit qui peut être d’une ampleur suffisante pour constituer un risque de décharge électrique pour les personnes.
Attention : - L’utilisation de dispositifs de commande ou de réglage ou l’exécution de procédures autres que celles décrites dans le présent document peut entraîner une exposition dangereuse aux rayonnements ou toute autre opération non sécuritaire. - Afin de réduire le risque d’incendie ou d’électrocution, ne pas exposer cet appareil à la pluie ou à l’humidité.
FCC INFORMATION: Déclaration de la FCC : NOTE: This equipment has been tested and found to comply with the limits for a Class B digital device, pursuant to Part 15 of the FCC Rules. These limits are designed to provide reasonable protection against harmful interference in a residential installation. This equipment generates, uses and can radiate radio frequency energy and, if not installed and used in accordance with the instructions, may cause harmful interference to radio communications.
Contents 2. What’s in the Box .............................................................................................................................. 5 3. Identifying the Parts ........................................................................................................................ 6 3.1 3.2 3.3 4. Preparations ..................................................................................................................................... 7 4.1 4.2 5. Automatic pairing .....
2. What’s in the Box Main Unit AC Power Cord x 2 Wall Bracket • Remote Control / AAA Batteries x 2 3.5mm to 3.5mm Audio Cable Wall mounting Screw Wireless Subwoofer RCA to 3.5mm Audio Cable HDMI Cable Design and specifications are subject to change without notice.
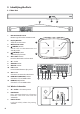
3. Identifying the Parts 3.1 Main Unit 1 3 1 2 3 4 5 6 7 8 9 10 11 12 13 2 Remote Control Sensor Receive signal from the remote control. Display Window 4 Show the current status. Wall bracket screws (ON/OFF) button Sw i tc h t h e u n i t b e t we e n O N a n d Standby mode. (SOURCE) button 5 Select the play function. VOL+/VOL- buttons Increase/decrease the volume level. AC~ Socket COAXIAL Socket OPTICAL Socket USB Socket Insert the USB device to play music.
3.3 Remote Control 1 Switch the unit between ON and STANDBY mode. 2 SOURCE buttons Select the play function. 3 / Skip to previous/next track in Bluetooth/USB mode. • Play/pause/resume playback in Bluetooth/USB mode. Press and hold to activate the pairing function in Bluetooth mode or disconnect the existing paired Bluetooth device. 4 BASS+/Adjust bass level. 5 TREBLE +/Adjust treble level. 6 (MUTE) Mute or resume the sound. • +/- (vol) Increase/decrease the volume level.
5. Placement and Mounting 5.1 Placement A B If your TV is placed on a table, you can place the unit on the table directly in front of the TV stand, centered with the TV screen. If your TV is attached to a wall, you can mount the unit on the wall directly below the TV screen. - 5.2 Wall Mounting (if using option-B) - - A Installation must be carried out by qualified personnel only.
Tips: 6. Connections • Your TV must support the HDMI-CEC and ARC function. HDMI-CEC and ARC must be set to On. • The setting method of HDMI-CEC and ARC may differ depending on the TV. For details about ARC function, please refer to the owner’s manual. 6.1 Dolby Atmos® Dolby Atmos gives you amazing experience you have never before by overhead sound, and all the richness, clarity, and power of Dolby sound. For using Dolby Atmos® Dolby Atmos® is available only in HDMI mode.
.KGJVNUTK 6.4 Use the COAXIAL Socket • • You also can use the COAXIAL cable (not included) to connect the TV's COAXIAL OUT socket and COAXIAL socket on the unit. Subwoofer Connect the mains cable to the AC~ Socket of the Subwoofer and then into a mains socket. Tip: The unit may not be able to decode all digital audio formats from the input source. In this case, the unit will mute. This is NOT a defect. Ensure that the audio setting of the input source (e.g. TV, game console, DVD player, etc.
NOTE: 8.3 Select Modes • Press the (SOURCE) button on the unit or the AUX, BT, OPT/COA, HDMI 1/2, HDMI eARC and USB and buttons on the remote control to select the desired mode. The selected mode will show on the display. • • • If the wireless connection fails again, check if there is conflict or strong interference (for example, interference from an electronic device) around your location. Remove these conflicts or strong interferences and repeat the above procedures.
9. AUX / OPTICAL / COAXIAL / HDMI Operation 10. Bluetooth Operation 1 Ensure that the unit is connected to the TV or audio device. 2 Press the button repeatedly on the unit or the AUX, OPT/COA, HDMI 1/2, HDMI eARC buttons on the remote control to select the desired mode. The selected mode will show on the display. The first time you connect your bluetooth device to this player, you need to pair your device to this player. 3 Operate your audio device directly for playback features.
Tips: 11. USB Operation Enter "0000" for the password if necessary. • If no other Bluetooth device pairs with this player within two minutes, the player will recover its previous connection. • The player will also be disconnected when your device is moved beyond the operational range. • If you want to reconnect your device to this player, place it within the operational range.
12. Troubleshooting To keep the warranty valid, never try to repair the system yourself. If you encounter problems when using this unit, check the following points before requesting service. No power • Ensure that the AC cord of the apparatus is properly connected . • Ensure that there is power at the AC outlet. • Press (standby) button to turn the unit on. Remote control does not work • Before you press any playback control button, first select the correct source.
13. Specifications 13.1 Soundbar Power Supply AC100-240V~ 50/60Hz Power Consumption 30 W / < W (Standby) Speakers Impedance 8 Ω + 8 Ω + 4Ω USB 5V 0.5A Hi-Speed USB (2.0) 32G (max) , MP3 Audio input sensitivity 500mV Frequency Response 120Hz - 20KHz Dimension (WxHxD) 950 x 71 x 112 Net weight 2.85 kg 13.2 Bluetooth / Wireless specification Bluetooth Version /profiles V 4.2 (A2DP, AVRCP) Bluetooth Frequency bands 2402 MHz ~ 2480 MHz 2.