M-400 RCS Version 2 User’s Guide Roland corporation and its affiliates assume no responsibility for any loss or damage (loss of profits, loss of data or other economical losses) caused by use of this software. This is applicable even in case users were notified from Roland Corporation and its affiliates about possibility of such losses. Copyright © 2012 ROLAND CORPORATION All rights reserved.
Contents Contents ..........................................................................................................3 Introduction ....................................................................................................4 About M-400 RCS....................................................................................................................................................................... 4 The two modes of M-400 RCS ...........................................................
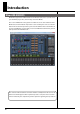
Introduction About M-400 RCS M-400 RCS is application software that runs on Windows (XP, Vista or 7) or Mac. It lets you edit M-400 project files, and remotely control the M-400. The screen of M-400 RCS is designed to resemble the screen and controllers of the M-400 itself, and the method of operation is also essentially the same as on the M400.
Introduction The two modes of M-400 RCS M-400 RCS has two modes: Offline mode and Online mode. Offline mode In this mode you can edit an M-400 project file via USB memory. The advantage of this mode is that you can edit mixer parameters and scene memories even when the M-400 itself is not at hand. fig.OfflineEdit.eps Load the project file Save the project file You can also create a new project file in M-400 RCS and load it into the M-400.
Introduction Operating requirements Supported OS Windows XP Home Edition/Professional Windows Vista Windows 7 * M-480 RCS does not work with Windows XP Media Center Edition. Mac OS X 10.5.8 or later Supported computers CPU Memory Screen resolution and color depth A computer that provides a USB connector complying with USB Specification Revision 1.0 or later USB Windows: Pentium/Celeron or compatible processor, 1.6 GHz or faster * We cannot make guarantees regarding the compatibility of processors.
Introduction . Connection to the M-400 In order to remotely control the M-400 console from M-400 RCS, you’ll need to connect the M-400 to your computer using a USB cable. Use a USB cable to connect the M-400 to your computer as shown in the illustration below. fig.USBConnection.eps USB cable To USB Port Use a commercially available USB cable (one that supports USB 1.1 or later, and has a male type A connector and a male type B connector).
Introduction 4 Press [F2 (USB MIDI)] to access the USB MIDI tab. fig.ScrM4SysRemUSB.eps 5 In the RECEIVE section, select the “Sys Ex” button. fig.ScrM4SysRemUSBSt1.eps 6 In the SEND section, select the “Sys Ex” button. fig.ScrM4SysRemUSBSt2.
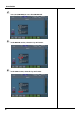
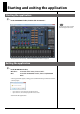
Starting and exiting the application Starting the application 1 In the “M-400 RCS” folder, double-click “M-400 RCS”. fig.ScrRCS.eps A new project will be opened when the application starts. The application will start up, and the M-400 RCS window will appear. Exiting the application 1 In the M-400 RCS window, Windows: From the “File” menu, choose “Exit”. Mac: From the “M-400 RCS” menu, choose “Quit M-400 RCS”. A message box will appear, asking you to confirm whether you want to save the current project.
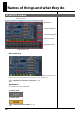
Names of things and what they do M-400 RCS window fig.ScrRCSGuide.eps Basic screen area Mode button Screen recall buttons Scene memory buttons Fader layer buttons Main fader module Fader modules 1–24 Basic screen area fig.ScrChDisp.eps This shows a screen of the same design as the screen of the M-400 console itself. You can use the mouse and keyboard to perform operations in this screen. "Operations in the main screen area" (p. 14) Mode button This switches the mode of M-400 RCS.
Names of things and what they do Screen recall buttons fig.ScrScreenAccess.eps These buttons switch the content of the basic screen area. The button corresponding to the currently shown screen or popup is shown in blue. CH DISP button METER button EFFECTS button PATCHBAY button DCA GROUP button MUTE GROUP button TALKBACK/OSC button MONITOR button GATE/EXP button COMP button EQ button AUX SENDS button HELP button Accesses the CHANNEL DISPLAY screen. Accesses the METER screen. Accesses the EFFECTS screen.
Names of things and what they do Fader layer buttons fig.ScrLayer.eps These buttons switch the layer operated by fader modules 1–24. The currently selected layer is shown in blue. SENDS ON FADER button CH1-24 button CH25-48 button AUX/MTX button or AUX/DCA button Accesses the SENDS ON FADER panel. Assigns CH1–CH24 to fader modules 1–24. Assigns CH25–CH48 to fader modules 1–24. Assigns AUX1–AUX16 and MATRIX1–MATRIX8, or AUX1–AUX16 and DCA1–DCA8 to fader modules 1–24. Fader modules 1–24 fig.ScrFader1-24.
Names of things and what they do SENDS ON FADER Panel fig.ScrRCSSOF.eps This panel is shown when SENDS ON FADER button is on. AUX SELECT 1–16 buttons SENDS ON FADER button CH1-24 button CH25-48 button AUX/MTX button or AUX/DCA button Selects the send-destination AUX. Closes the SENDS ON FADER panel. Assigns CH1–CH24 to fader modules 1–24. Assigns CH25–CH48 to fader modules 1–24. Assigns AUX1–AUX16 and MATRIX1–MATRIX8, or AUX1–AUX16 and DCA1–DCA8 to fader modules 1–24.
Names of things and what they do Operations in the main screen area The mouse and keyboard are used to perform operations in M-400 RCS’s main screen area. Cursor movement • Up/down/left/right cursor keys Button operations The cursor is indicated by a red frame in the Basic screen area. In M-400 RCS, the cursor exists only within the Basic screen area.
Names of things and what they do About the menus Windows File menu ● New Project ● Open Project... ● Save Project ● Save Project As... ● Exit Opens a new project. Opens an existing project. Saves the current project (by overwriting it onto the existing file). Saves the current project with a different name that you specify. Exits M-400 RCS. If you open a project while online, M-400 RCS will switch to offline operation. Setup menu ● ● ● ● ● REAC Config... Initialize... Preferences... LCR Setup...
Using M-400 RCS Opening and saving a project Opening a project Opening a new project 1 From the “File” menu, choose “New Project.” A message box will appear, asking you to confirm whether you want to save the current project. fig.ScrSyncConfirm.eps • • If you click “Yes,” the current project will be saved. If you click “No,” the current project will not be saved. A new project will open. Opening an existing project file 1 From the “File” menu, choose “Open Project.
Using M-400 RCS Saving a project Saving a project under its current name (Overwrite) 1 From the “File” menu, choose “Save Project.” The project will be saved under its current name, overwriting the existing file. Saving a project under a different name 1 From the “File” menu, choose “Save Project As.” fig.ScrSaveProjAs.eps The “Save As...” dialog box will appear. 2 Specify the file name and location in which you want to save the project, and click the “Save” button. The project will be saved.
Using M-400 RCS Switching between modes Switching to online mode 1 M-400 RCS will be in offline mode when you start up or when you open a project file. Click the ONLINE button. fig.ScrOffline.eps fig.ScrSync1.eps Before you continue, start up the M-400 console, and use a USB cable to connect it to your computer. The “Synchronize” dialog box will appear. 2 In the “Project” field, specify the project to which you will synchronize: the project on the M-400 console or the project in M400 RCS.
Using M-400 RCS If you selected “Send to CONSOLE” in step 2, a message box will ask you to confirm the project synchronization. fig.ScrSyncConfirm2.eps When you click “OK,” project synchronization will begin. 5 When project synchronization is completed, M-400 RCS will switch to online mode. fig.ScrOnline.eps The M-400 console will show a progress message while the project is being synchronized. Operations on the M-400 will be disabled during this time.
Using M-400 RCS Switching to offline mode 1 Click the ONLINE button. fig.ScrOnline.eps 2 M-400 RCS will switch to offline mode. fig.ScrOffline.
Using M-400 RCS REAC input/output settings In offline mode, you can make virtual settings for an input/output unit (e.g., S-1608 stage unit, S-0816 FOH unit, S-4000S 40-channel I/O modular rack) that will later be connected to the M-400 console. This lets you make preamp gain settings or input/ output patching ahead of time, to specify the M-400’s input/output settings that will be used at the actual performance. 1 From the “Setup” menu, choose “REAC Config.” fig.ScrReacConf.
Using M-400 RCS Changing the S-4000S module configuration If you choose S-4000S in the REAC Config dialog box, a 32-in/8-out configuration will be applied. To change the S-4000S module configuration, proceed as follows. fig.ScrReacConfS4KS.eps 1 In the REAC Config dialog box, click the “Config” button. fig.S4KSConf.eps The “S-4000S Config” dialog box will appear. 2 Use the Slot1–Slot10 pulldown menus to specify the module for each slot. The pulldown menu gives you the following choices.
Using M-400 RCS Initializing the settings 1 From the “Setup” menu, choose “Initialize.” fig.ScrInit.eps The “Initialize” dialog box will appear. 2 Place a check mark in the sections that you want to initialize. • • • • 3 Mixer Parameter System Setting Scene Memory User Library Click “OK.” A message box will ask you to confirm the initialization operation. fig.ScrInitConf.eps 4 Click “OK” to execute the initialization.
Using M-400 RCS Preference settings Here’s how to make preference settings within M-400 RCS. The settings you make here will not be reflected in the M-400 console. 1 Windows: From the “Setup” menu, choose “Preferences...”. Mac: From the “M-400 RCS” menu, choose “Preferences...”. fig.ScrPref.eps The “Preferences” dialog box will appear. 2 Select the desired items in the “Preferences” dialog box. ● Level Meter If you select this, level meter data will be received in online mode.
Using M-400 RCS screen. CHANNEL DISPLAY METER The CHANNEL DISPLAY screen will be used as the home screen. The METER screen will be used as the home screen. ● Fader Layer This chooses the fader layer buttons (p. 12). [CH1-24] [CH25-48] [AUX/DCA] [CH1-24] [CH25-48] [AUX/MTX] The home screen is what appears when you click the button of the currently displayed screen (the button shown in blue). CH1-24, CH25-48.
Using M-400 RCS LCR System settings 1 From the “Setup” menu, choose “LCR Setup...” fig.ScrLCRSetup.eps For more information about the LCR features, refer to the M-400 owner's manual (version 2.00 or later). The “LCR Setup” dialog box will appear. 2 Use the LCR SYSTEM check box to turn LCR System on/off. If this check box is selected, LCR System will be on. If it is cleared, LCR System will be off.
Using M-400 RCS System settings 1 From the “Setup” menu, choose “System Setup...” fig.ScrLCRSetup.eps The “System Setup” dialog box will appear. 2 Select the desired items, and then click “OK.” ● CH-MUTE OPTION These buttons make the settings for the channel mute options. Mutes AUX SENDS Mutes DIRECT OUTS If this is checked, muting inputchannel also mutes AUX sends If this is checked, muting input channel also mutes DIRECT OUTs.
Using M-400 RCS M-48 settings You can manage and make settings for the M-48 Live Personal Mixer in the same way you do from the M-400 console. M-400 RCS cannot use the following functionality. For details on the M-48 Live Personal Mixer, refer to the “M-48 Owner's Manual.
Offline mode Operation in offline mode fig.OfflineEdit.eps Load the project file Save the project file USB memory Edit within M-400RCS Save the project file USB memory Load the project file Offline mode lets you edit M-400 project files when you don’t have an M-400 console at hand. A project file you’ve edited using M-400 RCS can be loaded by the M-400 console. Work flow in offline mode 1 On the M-400 console, save a project file to USB memory. fig.OfflineEditStep1.
Offline mode 4 Edit the project. If necessary, use the “Reac Config” dialog box to make REAC input/output configuration settings. 5 Save the project file, either by overwriting the existing file or under a different name. fig.OfflineEditStep3.eps Save the project file USB memory 6 7 Exit M-400 RCS. On the M-400 console, load the project file from USB memory. fig.OfflineEditStep4.
Online mode Operation in online mode fig.OnlineEdit.eps Control the M-400 Operations on the M-400 are fed back Online mode lets you remotely control the M-400 console from M-400 RCS. Level meter data from the M-400 console and operations performed on the M-400 console are also sent to M-400 RCS. If you’ve cleared the “Level Meter” check box in the preference settings, level meter data will not be sent from the M-400 console. (Preference settings (p.
Online mode 2 Start up M-400 RCS. fig.ScrRCS.eps A new project will open. 3 4 If necessary, open an existing project file. Click the “ONLINE” button to begin synchronizing the project and enter online mode. Switching to online mode (p. 18) fig.ScrOnline.eps 5 In M-400 RCS, remotely control the M-400 console. fig.OnlineEdit.eps Control the M-400 Operations on the M-400 are fed back 6 Click the “ONLINE” button to choose offline mode. fig.ScrOffline.eps 7 8 32 Save the project if desired.
Appendix Warning/error messages Error messages common to the M-400 Warning/error messages shown in the basic screen area are the same as on the M400 console. For details on warning/error messages, refer to “Warning/error message list” in the “M-400 owner’s manual.” Error messages specific to M-400 RCS Message Cannot find M-400 console. Explanation The M-400 console was not found. The M-400 console does not respond. Can’t get an online connection with the M-400 console (p.