
Install Guide

www.coyoteoutdoor.com
C1P36 INSTALL GUIDE
16
1
/2"
OPENING
HEIGHT
DOORS / DRAWERS
OPENING WIDTH
23"
OPENING
DEPTH
OPENING
HEIGHT
GRILL
OPENING
GRILL
OVERHANG
TOP VIEW
34 1/4"
"
OPENING WIDTH
1
1
/2"
OPENING
HEIGHT
DOORS / DRAWERS
OPENING WIDTH
OPENING
DEPTH
OPENING
HEIGHT
12"
LINER
OPENING
1 3/4"
JACKET
OVERHANG
TOP VIEW
OPENING WIDTH
12"
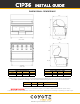
NON-COMBUSTIBLE CONSTRUCTION
Insulated Jacket NOT Required
FRONT VIEW
FRONT VIEW
1
1
/2" MIN
INCLUDING
COUNTERTOP
Combustible material can not be within 12" of the grills frame
This applies to all directions - horizontal & vertical
Shaded area above on "TOP VIEW" illustrates the 12" minimum
requirement (not to scale for rendering purposes)
The grill is designed to hang from the counter top with no support
underneath
Minimum rear clearance for the hood to open is 2 1/4"
If you have a wall/partition behind the grill, the minimum rear clearance
to that wall should be at least 7" to allow for ventilation of the exhaust
12"
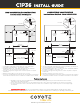
If using combustible material within 12"of the grill frame, you MUST use
the corresponding Coyote Insulated Jacket
Using a insulated jacket, does not waive any other standard installation
procedure (ventilation, connections, etc)
The jacket is designed to hang from the counter top with no support
underneath
Minimum clearance for hood to open is 2"
If you have a wall/partition behind the grill, the minimum rear clearance
to that wall should be at least 7" to allow for ventilation of the exhaust
Ventilation Requirements:
Regardless if you are using a combustible or non-combustible building material, you must include at least two vents but
optimally 4 vents within the island.
These vents must be at least 20 sq. in. each and allow fresh air to move from the grill cabinet to the exterior environment.
Do not locate the two vents on the same wall of the island. Cross ventilation is key to allow any excess heat or trapped gas
to dissipate.
1
1
/4"
May vary
per install
1
1
/2"
22
1
/2"
1
1
/2" MIN
COMBUSTIBLE CONSTRUCTION
Insulated Jacket Required - Model # CJAKTC1P36
1 3/4"
17 1/4"
INCLUDING
COUNTERTOP
35 1/4"
May Vary
Per Install
6"
2
1
/2"
2"
E
CONNECTION
E
3
1
/2"
3
1
/2"
E
Elec.
CONNECTION
3
1
/2"
3
1
/2"
Important Note to Installer: This file is not intended to replace your Owners' Manual which contains specific safety
requirements and consumer guidelines. Please refer to your Owners' Manual prior to installing or operating your built-in grill.
Elec.
E