English MODEL RTA - 3784 Thanks for purchasing one of our products. Please read carefully the assembly instructions before the installation. Please save this manual for future reference.
Spanish INSTRUCCIONES DE ENSAMBLAJE. MODELO RTA - 3784 Gracias por comprar uno de nuestros productos. Por favor lea cuidadosamente las instrucciones de ensamblaje antes de instalar la unidad. Por favor guarde este manual para referencias futuras.
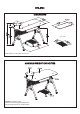
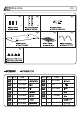
RTA-3784 DIMENSIONS 13.5" 10.5" CPU holder Product Size: 47"W x 23.5"D x 34.
RTA-3784 P.
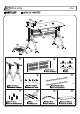
RTA-3784 10 x3 P.5 12 11 x2 13 14 16 PART QTY. ITEM PART QTY.
RTA-3784 P.
RTA-3784 P.
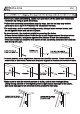
RTA-3784 P.8 1 4 X4 Assemble the Studs (3) with it’s Support parts (4) and tight them with the wrench. Insert Screws A to the Studs’ support parts (4). Ensamble las patas (3) con sus soportes (4) y ajustelos con la llave. Luego inserte los tornillos A en la los soportes. SCREWS TORNILLOS A 10X65 MM 3 X4 4PCS 2 1 1 Fix the Studs to the Main Structures (1) inserting the Screws of the step 1 and tight them Fije las patas a las extructuras, a traves de los Tornillos del paso 1 y ajustelas.
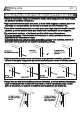
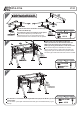
RTA-3784 P.9 Use Screws B to fix the Support Brackets (11) at the back of the Main Structures (1). Use Tornillos B para fijar los Soportes Verticales (11) en la parte posterior de las Estructuras Principales (1). 4 1 11 11 1 11 SCREWS TORNILLOS 1 B 6X12 MM 4PCS 5 11 11 2 SCREWS TORNILLOS E 6X20 MM 4PCS I M6 4PCS 6 6 X4 7 Left 7 Right Use Screws C to fix the Slider’s Bases (6) to the Sliders (7). Pay attention to the orientation of the parts.
RTA-3784 P.10 8 7 2-1/2" 1" 8 8 7 Left 8 Use Screws B to fix the Slider’s bases (6) to the Divider Rods (8). Pay attention to the orientation of the parts. Use Tornillos B para fijar las Bases de Deslizadores (6) a los Tubos Divisores (8). Preste atención a la orientación de las partes. 8 X2 5 7 7 Right SCREWS TORNILLOS B 6X12 MM 8PCS Use Screws H to assemble the Divider Rods (8) between the Horizontal Tubes (5).
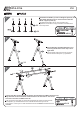
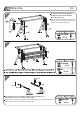
RTA-3784 P.11 10 Use Screws D to fix the Main Panel (13) to the Horizontal Tubes (5). Screw loose and do not tighten them until all are in place! Use Tornillos D para fijar el Panel Principal (13) a los Tubos Horizontales (5). Medio atornille y no apriete hasta que todos estén colocados! 13 5 SCREWS TORNILLOS D 6X30 MM 4PCS 11 10 X3 Insert Screws F in the Short Tubes (10) and assemble them with the Printer Panel (12).
RTA-3784 P.
CARE AND MAINTENANCE English - DO NOT EXPOSE THE SURFACES TO DIRECT SUNLIGHT, OR EXTREME ENVIRONMENTAL CONDITIONS. EXPOSURE WILL DAMAGE THE PRODUCT, WHICH IS NOT COVERED BY THE WARRANTY. - DO NOT USE SOLVENTS OVER SURFACES OR STRUCTURAL TUBES. SURFACES MUST BE CLEANED WITH A SOLUTION OF A SMOOTH SOAP AND WATER, THEN CLEARED WITH A DRY TOWEL. - PRODUCTS THAT ARE HEAVY SHOULD BE LIFTED OR MOVED BY AT LEAST 2 PERSONS, AND ALL OBJECTS SHOULD BE REMOVED FROM THE PRODUCT.
PRODUCT WARRANTY TECHNI MOBILI DESK WARRANTY LIMITED 5-YEAR WARRANTY RTA Products, LLC warrants to the Original Purchaser who acquired a new product from RTA Products or its authorized resellers that this product will be free from defects in its workmanship and materials, under normal use and service conditions, as described herein. "Defects" as used in this warranty, is defined as any imperfections that impair the use of the furniture or product.