MODEL RTA-S07 MODEL RTA-S07
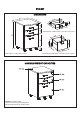
RTA-S07 DIMENSIONS Small drawer inside space: 13.5"W x 13"D x 3"H Product Size: 17"W x 16"D x 25"H File drawer inside space: 13.5"W x 13"D x 10.
RTA-S07 P.
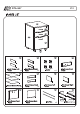
RTA-S07 P.4 13 Handle x3 Right Panel Left Panel 18 17 Back Panel 22A 22B 19 22D 22C 22 22E Middle Drawer Front Panel 22F 22G Locking Fittings SCREWS LIST PART QTY. ITEM PART QTY.
RTA-S07 P.5 HOW TO ASSEMBLE USING BOLTS AND CAM LOCKS: Cam bolt 1. Cam lock Screw the bolt into the corresponding panel. 2. In the other panel, insert and align the cam lock. Join the panels. 3. Turn the cam lock.
RTA-S07 P.
RTA-S07 P.7 ASSEMBLY STEPS: 1 22C 22F Tighten the metal plates on the marked position of the metal bar 22C 22F 22C 22F 22E 22A 22C 22C 22C 22A Insert the metal fittings into the bar (22E) in the following order: (22A)x1, (22C)x3, (22A)x1. Then tighten the (22C) on the marked positions of the bar (22E). 2 15 22A X2 Place the bar (22E) inside the channel of Right panel (15) with the tubes towards the top of the panel, and secure the fittings (22A) to the panel using Screws (C).
RTA-S07 P.8 3 15 14 12 X3 12 X3 Right Left Grab all the flat shaped sliders (12) and set aside the “L” shaped ones. Assemble the sliders to the inside face of the Left & Right Panels (14&15) with using Screws (C). The wheels will be located at the front and facing down. If you don't see the holes, pass the tip of your finger around the area where SCREWS the holes should be, pressing against the surface to feel the indentation.
RTA-S07 P.9 6 7 3 18 3 16 14 15 Screw the Bolts (A) to the bottom face of the Top Panel (18), then assemble it to the cabinet by turning the corresponding cam locks. Use Screws (E) to assemble the Casters (3) to the Bottom Panel (16). SCREWS SCREWS E 4X14 MM A 6X40 MM 16PCS 4PCS 8 2 2 22B 22B 8 22B SCREWS Use Screws (C) to attach the lock fittings (22B) to the outside face of the Small Drawer Right Panels (2) and File Drawer Right Panel (8).
RTA-S07 P.10 9 2 2 1 1 21 4 SCREWS Screw Bolts (A) to the holes on the inside face of Top Drawer Front Panel (4) and Middle Drawer Front Panel (21). Then assemble the Small Drawer Left & Right Panels (1&2) to Top Drawer Front Panel (4) and Middle Drawer Front Panel (21) as shown by turning the cam locks. A 6X40 MM 8PCS 10 5 5 2 2 1 1 Slide the Drawer Bottom Panels (5) thru the channels in between panels (1), (2) and (4) / (21) as shown. Make sure the panel fits inside all the channels.
RTA-S07 P.11 12 Right 12 Left Left Right Right 12 12 12 12 12 Left 1 1 SCREWS Place the small drawers upside-down. Grab the “L” shaped sliders (12) and assemble them to the drawers using Screws (C), with the wheels facing towards the back of the drawers. Make sure the sliders are touching the side panels, and that they are not “up in the air”. C 3X15 MM 8PCS 13 22G 4 22D SCREWS Assemble the lock (22D) and ring (22G) to the Top Drawer Front Panel (4) using Screws (C).
RTA-S07 P.12 15 19 9 F E E SCREWS E 4X14 MM 2PCS Assemble the Bracket (19) to the bottom of the inside face of the File Drawer Front Panel (9) using Screws (E) & (F) as shown. F 6X12 MM 1PC 16 19 20 Attach the File Drawer Caster (20) to the Bracket (19) using the nut and tighten with the wrench. 17 8 7 9 Screw the Bolts (A) to the inside face of the File Drawer Front Panel (9) as shown. Then assemble the File Drawer Left & Right Panels (7&8) by turning the cam locks.
RTA-S07 P.13 18 5 8 Slide the Drawer Bottom Panel (5) thru the channels in between panels (7), (8) and (9) as shown. Make sure the panel fits inside all the channels. 7 19 10 Assemble the File Drawer Back Panel (10) to the File Drawer Left & Right Panels (7&8) using Screws (B) as shown. 8 7 SCREWS B 4X35 MM 4PCS 20 11 Carefully insert the File Tubes (11) thru the File Drawer Back Panel (10) and screw them into the insert of the File Drawer Front Panel (9).
RTA-S07 P.14 21 Left Right Right 12 12 12 12 Left 7 Place the file drawer upside-down. Grab the “L” shaped sliders (12) and assemble them to the file drawer using Screws (C), with the wheels facing towards the back of the drawer. Make sure the sliders are touching the side panels, and that they are not “up in the air”. 22 SCREWS C 3X15 MM 4PCS 9 13 SCREWS Attach the Handle (13) to the file drawer using Screws (D) as shown.
RTA-S07 PRODUCT DIMENSIONS 15.75” 17.25” 24.
PRODUCT WARRANTY TECHNI MOBILI DESK WARRANTY LIMITED 5-YEAR WARRANTY RTA Products, LLC warrants to the Original Purchaser who acquired a new product from RTA Products or its authorized resellers that this product will be free from defects in its workmanship and materials, under normal use and service conditions, as described herein. "Defects" as used in this warranty, is defined as any imperfections that impair the use of the furniture or product.