
Installation guide


remember to enter the alias name if this is differ-
ent from the alpha name. Press the F1 key on the
computer keyboard to get help on keypanel setup.
7. This completes the general procedure to setup and
use trunking. Remember to save any changes that you
make in CSedit, CStrunk, or ADAMedit, and send
your changes to the intercom system and/or the
trunking system in order for them to take effect.
13 Program Assign Panel Installation
13.1 General Description
Program assign panels provide a fast and easy method of
selecting any of several program sources (connected to
input ports of the intercom system) for use with the IFB
outputs feature of the intercom system.
13.2 General Theory of Operation
In order to describe program assign panel operation, it
may be helpful to first review how IFBs work. An IFB is
a special destination type which is created using an inter-
com output port and an intercom input port. The output
port is setup so that it normally monitors the audio at the
intercom input port. This audio input can then be inter-
rupted by someone else in the intercom system. The per-
son who interrupts the audio signal can then carry on a
conversation with the person at the output without any
interference from background audio. IFBs are typically
used in broadcasting, although they could be used
elswhere. A special IFB listening device (often a small
belt pack with an earpiece) is connected to the intercom
output port. Typically, this listening device is used by a
news anchor, weather person etc. (referred to as “the tal-
ent”). This output is then defined as the output for the
IFB. An audio source is connected to an intercom input
port. This input port is then defined as the input port for
the IFB. This could be the input portion of the IFB output
port , but it could be any other intercom input port as well.
The audio source generally is the sound portion of the
broadcast, which we will call “the program”. (In reality,
this signal is normally the program sound minus the voice
audio of the talent and it is often referred to as the “mix
minus”. The talent’s audio is usually removed from the
signal because time delays in the voice audio path can
cause an echo effect in the earpiece. This could occur
with a field reporter, for example, who’s audio may be
significantly delayed by satellite transmission to a studio
and then retransmission back to his or her earpiece.) Once
the IFB as been setup, it can be assigned o a keypanel
key. Then, when the keypanel operator presses the key, it
will disconnect the program audio and replace it with the
keypanel operators voice audio. Releasing the keypanel
key will restore the program audio.
A program assign panel lets you change the program
input source that is used with an IFB by changing the
intercom input port that is used with the IFB. The pro-
gram assign panel connects to the intercom system via an
RS422 data link. When the user at the program assign
panel assigns a particular program source to an IFB, this
information is transmitted to the intercom system master
controller via the data link. The information is then writ-
ten to the on-line configuration file contained in the mas-
ter controller. In CSedit, this information is contained in
the default input column (labeled "Def Inp") in the Inter-
rupt Foldback Bus Assignments table. (The information
contained in the Interrupt Foldback Bus Assignments
table can be viewed and modified at any time by upload-
ing the configuration file to the configuration PC. See
"Creating an IFB" in the CSedit User Manual.) In ADA-
Medit, this information is contained in the Input field in
the Edit IFB dialog box. (From the ADAMedit toolbar,
select IFB, then double-click on an IFB in the list to open
the Edit IFB dialog box for that IFB. Press the F1 key to
get more help with IFB setup.)
As supplied, program assign panels expect all program
sources to be connected to sequential ports of the inter-
com system starting with port #1 as follows:
PAP-940 intercom ports 1-24
PAP-950-50 intercom ports 1-50
PAP-951 intercom ports 1-8
PAP-952 intercom ports 1-16
If program sources are not connected to the default ports
as specified above, the EEPROM in the Program Assign
Panel must be reprogrammed to look for program input
on other ports. Contact your intercom system dealer for
further information.
13.3 Program Assign Panel Setup and
Connection
13.3.1 Single Program Assign Panel
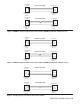
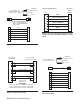
A single Program Assign Panel may be connected using a
cable as shown in Figure 11, page 21. Connect the output
of the Program Assign Panel to J902 of the ADAM CS
frame.
13.3.2 Additional Program Assign Panels
Additional Program Assign Panels may be connected to
the ADAM CS Frame by wiring additional PAP connec-
tors in parallel with the first. When operating multiple
panels in parallel, it is necessary to change the panel
number DIP switches in all but one of the panels as
described below. Also, if each Program Assign Panel will
ADAM CS Installation Manual 15