
Operating Instructions
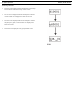
Table Of Contents
- CHAPTER 1 Introduction
- CHAPTER 2 BTR-800 Base Station
- CHAPTER 3 TR-800 Beltpack
- CHAPTER 4 TR-825 Beltpack
- CHAPTER 5 Initial Equipment Setup
- Unpacking
- Antenna Connection
- Antenna Polarization
- Distance between Antennas
- Antenna Placement
- Improving Reception and Increasing Range
- Base Station Set-up
- Location
- Power Connection
- Transmit Switches
- Internal Transmit Switches
- Intercom Switch
- Intercom Interface
- Dual Listen Functionality
- Auxiliary Input/Output
- Internal Auxiliary Input Routing Switch
- Stage Announce / Relay Contacts
- Base Station Link
- Beltpack Setup
- Antenna Connection
- Transmit Mode
- Headset Connection
- CHAPTER 6 Pre-Walk-Thru Checklist
- CHAPTER 7 System Operation
- Frequency Plan Overview
- Factory-Defined Groups
- User-Programmable Groups
- System Quick Start
- Base Station Operation
- Power
- Local Headset
- Portable Station Connect
- Intercom A and B
- Auxiliary
- Display Contrast
- BTR-800 Menu Structure
- Main Screen Flowchart
- Power-Up Screen
- Operating Screen
- Beltpack Activity Code Definitions
- Group/Channel Select
- Group/Frequency Select
- Frequency Edit (User-Programmed Groups Only)
- ClearScan™
- Special Key Sequences
- Lockout
- Copy
- 1st Use Default
- Factory Default
- Beltpack Operation
- On/Off and Volume Control
- Battery Check
- Talk Button
- Microphone Gain
- Audio Channel Select Button
- Stage Announce (SA)
- Wireless Talk Around (WTA)
- TR-800 Menu Structure
- Beltpack Menu Structure
- Power-Up Screens
- Group/Channel Screen
- Transmit Screen
- Receive 1 Screen
- Receive 2 Screen
- ClearScan™
- Stage Announce Enable/Disable
- Wireless Talk Around Enable/Disable
- Audio Channel A or B Disable/Enable
- Talk Button Latch on/Latch off
- Special Key Sequences
- Lockout
- 1st Use Default
- Factory Default
- TR-825 Menu Structure
- CHAPTER 8 System Walk-Thru
- CHAPTER 9 Troubleshooting
- CHAPTER 10 Tech Tips
- CHAPTER 11 Battery Information
- CHAPTER 12 Intercom Systems Specifications
- CHAPTER 13 Accessories and Replacement Parts
- CHAPTER 14 Certification Information
- CHAPTER 15 Three Band Base Stations

BTR-800, TR-800, TR-825 System Operation 43
Group/Channel Select
The Group/Channel select screen allows the user to change the
group and select from a pre-determined number of channels on
each receiver.
• Press [MENU] once to enter the Group/Channel Select
Screen from the operating screen.
• Press [SET] to enter group edit. The group number will start
flashing. If [SET] is pressed again without pressing the
arrows, the display will go to receive 01 channel edit.
NOTE: A channel that does not have a frequency set for it
will have a dash to the right of it on the group/channel select
screen.
• The [UP]/[DOWN] arrows will change the group number.
Press [SET] again to set the group that was flashing. Now
the group number will stop flashing and R1’s channel
number will start to flash.
• The [UP]/[DOWN] arrows will change the receive channel
number. Press [SET] to set the channel that was selected.
Now the second channel number will start to flash. If [SET]
is pressed again without pressing the arrows, the display
will go to the next channel number.
• After the last receive channel is decided upon, pressing
[SET] will set that channel in the unit and start you over at
the beginning of the group/channel select screen with
nothing flashing.
• Pressing [MENU] will take you to the group/frequency
select screen. NOTE: Pressing [MENU] after activity has
occurred within the screen will return to the group/channel
select screen with nothing flashing. Any change that had
been done before the last [SET] was pressed will be
aborted.
• Setting two channels the same is not allowed. If a channel is
already set on the screen, the user no longer has that channel
as an option to set into one of the other receivers.