
Operating Instructions
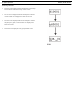
Table Of Contents
- CHAPTER 1 Introduction
- CHAPTER 2 BTR-800 Base Station
- CHAPTER 3 TR-800 Beltpack
- CHAPTER 4 TR-825 Beltpack
- CHAPTER 5 Initial Equipment Setup
- Unpacking
- Antenna Connection
- Antenna Polarization
- Distance between Antennas
- Antenna Placement
- Improving Reception and Increasing Range
- Base Station Set-up
- Location
- Power Connection
- Transmit Switches
- Internal Transmit Switches
- Intercom Switch
- Intercom Interface
- Dual Listen Functionality
- Auxiliary Input/Output
- Internal Auxiliary Input Routing Switch
- Stage Announce / Relay Contacts
- Base Station Link
- Beltpack Setup
- Antenna Connection
- Transmit Mode
- Headset Connection
- CHAPTER 6 Pre-Walk-Thru Checklist
- CHAPTER 7 System Operation
- Frequency Plan Overview
- Factory-Defined Groups
- User-Programmable Groups
- System Quick Start
- Base Station Operation
- Power
- Local Headset
- Portable Station Connect
- Intercom A and B
- Auxiliary
- Display Contrast
- BTR-800 Menu Structure
- Main Screen Flowchart
- Power-Up Screen
- Operating Screen
- Beltpack Activity Code Definitions
- Group/Channel Select
- Group/Frequency Select
- Frequency Edit (User-Programmed Groups Only)
- ClearScan™
- Special Key Sequences
- Lockout
- Copy
- 1st Use Default
- Factory Default
- Beltpack Operation
- On/Off and Volume Control
- Battery Check
- Talk Button
- Microphone Gain
- Audio Channel Select Button
- Stage Announce (SA)
- Wireless Talk Around (WTA)
- TR-800 Menu Structure
- Beltpack Menu Structure
- Power-Up Screens
- Group/Channel Screen
- Transmit Screen
- Receive 1 Screen
- Receive 2 Screen
- ClearScan™
- Stage Announce Enable/Disable
- Wireless Talk Around Enable/Disable
- Audio Channel A or B Disable/Enable
- Talk Button Latch on/Latch off
- Special Key Sequences
- Lockout
- 1st Use Default
- Factory Default
- TR-825 Menu Structure
- CHAPTER 8 System Walk-Thru
- CHAPTER 9 Troubleshooting
- CHAPTER 10 Tech Tips
- CHAPTER 11 Battery Information
- CHAPTER 12 Intercom Systems Specifications
- CHAPTER 13 Accessories and Replacement Parts
- CHAPTER 14 Certification Information
- CHAPTER 15 Three Band Base Stations

46 System Operation BTR-800, TR-800, TR-825
ClearScan™
ClearScan™ performs a frequency scan of the factory-defined
and any set-up user-programmable groups in order to find the
group with the highest number of clear receive channels. After
about 20-30 seconds, the group with the highest number of clear
receive channels will be displayed. The next best group and so
forth may be accessed with the [DOWN] and [UP] arrow
buttons.
• Press and hold [MENU] + [SET] for three seconds to enter
ClearScan™. The base station will now start searching all
groups for the ones with the greatest number of receiver
channels clear of interference.
• ClearScan™ will display the group that has the most
interference free receive channels. These clear channels are
displayed on the right half of the screen. Press [SET] to
place the base station on this group and return to the
operating screen. The first four receive channels displayed
will be the ones set for the group. The [UP]/[DOWN]
buttons may be used to select the next best group and so
forth.
To achieve the best results quickly when using ClearScan™
,
please complete the following for setting up a sing BTR-800
system:
• Turn off all wireless intercom and wireless microphone
equipment.
• Turn on all wireless microphones and wireless monitor
transmitters. Make sure that this equipment is distributed at
least 3 to 5 feet apart from each other to minimize any
frequency intermodulation effects.
• Turn on one TR-700/800/825 and perform the ClearScan
function as described on page 55 and page 66 of this
manual.
• When the first result is displayed on the TR, write this down
along with the next 6 or 7 results. This number represents
the specific BTR transmitter that should provide the best
results for operation. This is referred to as the Group.
• Once you have recorded the first 6 or 7 results from the TR,
turn off the TR unit.
• Turn on the BTR-700 or BTR-800 and perform the
ClearScan function as described above. The results of the
BTR will provide the number of Channels or TR
transmitters that can operate in a given group.
• Since you have already established the best BTR Group
(base station transmit frequency) to operate on, selection of
the operating channels is now much easier.
• Simply match the number of TRs to operate on your system
with the first and best Group number that you have
recorded.
• When you have scrolled to the appropriate Group number
that displays the number of beltpacks to be used on the
system, simply press [SET] on the BTR to place the BTR on
the selected Group and Channel.
• Finally, go back to the TRs and program to the appropriate
Group and Channel.