
Operating Instructions
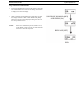
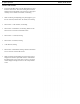
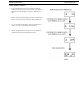

Table Of Contents
- CHAPTER 1 Introduction
- CHAPTER 2 BTR-800 Base Station
- CHAPTER 3 TR-800 Beltpack
- CHAPTER 4 TR-825 Beltpack
- CHAPTER 5 Initial Equipment Setup
- Unpacking
- Antenna Connection
- Antenna Polarization
- Distance between Antennas
- Antenna Placement
- Improving Reception and Increasing Range
- Base Station Set-up
- Location
- Power Connection
- Transmit Switches
- Internal Transmit Switches
- Intercom Switch
- Intercom Interface
- Dual Listen Functionality
- Auxiliary Input/Output
- Internal Auxiliary Input Routing Switch
- Stage Announce / Relay Contacts
- Base Station Link
- Beltpack Setup
- Antenna Connection
- Transmit Mode
- Headset Connection
- CHAPTER 6 Pre-Walk-Thru Checklist
- CHAPTER 7 System Operation
- Frequency Plan Overview
- Factory-Defined Groups
- User-Programmable Groups
- System Quick Start
- Base Station Operation
- Power
- Local Headset
- Portable Station Connect
- Intercom A and B
- Auxiliary
- Display Contrast
- BTR-800 Menu Structure
- Main Screen Flowchart
- Power-Up Screen
- Operating Screen
- Beltpack Activity Code Definitions
- Group/Channel Select
- Group/Frequency Select
- Frequency Edit (User-Programmed Groups Only)
- ClearScan™
- Special Key Sequences
- Lockout
- Copy
- 1st Use Default
- Factory Default
- Beltpack Operation
- On/Off and Volume Control
- Battery Check
- Talk Button
- Microphone Gain
- Audio Channel Select Button
- Stage Announce (SA)
- Wireless Talk Around (WTA)
- TR-800 Menu Structure
- Beltpack Menu Structure
- Power-Up Screens
- Group/Channel Screen
- Transmit Screen
- Receive 1 Screen
- Receive 2 Screen
- ClearScan™
- Stage Announce Enable/Disable
- Wireless Talk Around Enable/Disable
- Audio Channel A or B Disable/Enable
- Talk Button Latch on/Latch off
- Special Key Sequences
- Lockout
- 1st Use Default
- Factory Default
- TR-825 Menu Structure
- CHAPTER 8 System Walk-Thru
- CHAPTER 9 Troubleshooting
- CHAPTER 10 Tech Tips
- CHAPTER 11 Battery Information
- CHAPTER 12 Intercom Systems Specifications
- CHAPTER 13 Accessories and Replacement Parts
- CHAPTER 14 Certification Information
- CHAPTER 15 Three Band Base Stations

BTR-800, TR-800, TR-825 System Operation 71
Special Key Sequences
Lockout
•
Press [UP]/[DOWN] for three seconds to lock or unlock the
beltpack. The words “Loc on” will be displayed when the
feature is activated, “Loc oFF” will be displayed when the
beltpack is unlocked. Pressing [MENU] will still function to
view screens, but [SET] will no longer start any editing.
ClearScan™, First use, Factory default, and Feature enable/
disable are no longer accessible. The words “Loc out” will
be flashed on the screen if any editing is attempted during
lockout.
1st Use Default
•
Press [MENU] while turning on the beltpack to enter the 1st
use default setup screen. This places the unit on group 01A
with channel 01 flashing. Any user-programmed
frequencies that had been entered previously are
retained. The beltpacks must now be set to different
transmit channels using the [UP]/[DOWN] buttons. Then
the [SET] button is pressed to place the units on those
channels. If lockout had been activated, the beltpack comes
up where it was last left regardless of [MENU] being
pressed on power-up.
Factory Default
•
Pressing all four buttons [MENU]+[SET]+[UP]+[DOWN]
at the same time places the unit on group 01A with channel
01 flashing, just like beltpack 1st use default, except the all
user-programmed frequencies that had been entered
previously are erased. The beltpacks must now be set to
different transmit channels using the [UP]/[DOWN]
buttons. Then [SET] is pressed to place the units on those
channels. If lockout had been activated, the beltpack comes
up where it was last left regardless of these four keys being
pressed.