
User manual


13
4. Once AZedit is restarted, click the KP button on the toolbar, and then select the port that you want to set as a trunking
port: either enter the port number in the “Port” box and press Enter, or select the name of the port in the Alpha box.
5. When the keypanel setup screen appears for that port, deselect all of the Scroll Enable check boxes.
6. Send your changes to the intercom system.
• Also using AZedit within each intercom system, select which intercom ports, party lines, etc. will be scrollable
and assignable in other intercom systems. To make intercom ports scrollable and assignable, click the KP button
on the toolbar, select an intercom port, then check the Scroll Enable check boxes as desired. (Press F1 to get
further help with the keypanel setup, including additional scroll enable information.) To make other types of
functions (party lines, IFBs, etc.) scrollable, click the appropriate button on the AZedit toolbar as indicated, then
select a specific destination and check its Scroll Enable check boxes.
•PL buttonParty Line
IFB buttonIFBs
SL buttonSpecial Lists
GPI Out buttonGeneral Purpose Outputs
ISO buttonCamera ISOs
• Be sure to send your changes to the intercom system. and save the file before exiting.
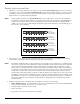
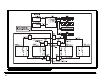
7. Run TrunkEdit and configure the trunking system. Click on the bar labeled Intercom on the left side of the screen and
then click on the Setup icon. A table displaying setup information for each intercom system will be displayed On the
initial setup, this table will be empty. Do the following:
• Enter a unique four letter character name for each trunked intercom system under the Name 4 column of the setup
table. You can also enter unique six and eight character names under the Name 6 and Name 8 columns, but these
are optional.
• Select the baud rate for each intercom system. The baud rate can be changed by right clicking anywhere along an
intercom system’s entry in the table. A pop-up menu will display. Select the correct baud rate by moving the
point to the Select Baud Rate entry and clicking on the correct rate. For locally trunked systems (i.e. connected
via cable only), 38.4K should be selected. For remote trunked systems (i.e. connected via a leased line, fiber,
etc.), 9600 should be selected.
• Select the RS-485 COM port to be used from the TM-2000/MTM-2000 to each intercom system. The COM port
can be changed by right-clicking anywhere along an intercom system’s entry in the table. A pop-up menu will
display. Select the correct COM port by moving the pointer to the Select COM Port entry and clicking on the
desired COM port.
• Send the changes to the TM-2000/MTM-2000 and save the file.
8. Click the bar labeled Trunk on the left side of the screen and then click the Definitions icon. A table displaying trunk
definitions will be displayed. On initial setup this table will be empty. Do the following:
• Right click on a trunk entry under the Icom1 column. Select Choose New Assignment from the pop-up menu that
appears. Select the intercom system that is desired for this end of the trunk line. Repeat the same for Icom 2
column in the same line except choose an intercom system different than that selected for Icom 1. This defines
which two intercom systems (Icom 1 or Icom 2) will be trunked via this entry in the table.
• Right-click in either the Port or Alpha entry associated with the Icom 1 entry you just made and select the Choose
New Assignment from the pop-up menu that appears. Select the Port or Alpha to be used for the audio trunk line
from the system named in the Icom 1 column. Do the same for the Port or Alpha entry associated with the Icom 2
entry except select the Port or Alpha from the Icom 2 system for the audio trunk line.
• If this particular trunk line is to be cascadable (i.e. usable to connect two other adjacent systems), then be sure to
set the Cascade flag. To set or clear the Cascade flag, right-click on the Cascade entry for the trunk line and select
Set Cascade Flag or Clear Cascade Flag from the pop-up menu that appears.
• Repeat this procedure for each intercom system audio trunk line that will be needed. When finished send the
changes to the TM-2000/MTM-2000 and save the file.
9. Run AZedit.