7W96 – Lower Locker Assembly Steps 2001932 Rubbermaid Incorporated, Huntersville, NC U.S.A. 28078-1801 U.S.A. 1-888-895-2110 Canada 1-866-595-0525 www.rubbermaid.
Pieces G Back Panel Qty 1 D H Hinge & Keeper Bracket Screws M2.
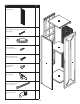
STEP 1 INSTALL DOOR PANEL TO SIDE PANEL Choose door opening orientation: left-hand or right-hand. Hinge screw locations indicate front edge of side panels (A & B). NOTE: Instructions indicate the door mounted to the left side panel (B). HINT: Use the other side panel (A) to hold the door up to the level for ease of alignment. Place door (C) into position, align TOP hinge hole with side panel (B) screw boss. You will need fourteen hinge screws (H) for assembly. 1. Install top screw (1). 2.
STEP 3 INSTALL TOP PANEL TO SIDE PANEL With door panel laying flat, move side panel (B) into a vertical position. Position top panel (D) into side panel groove and align. Using three side panel screws (K) install in the order shown. CAUTION: Do not over-tighten screws. B D 2 3 1 STEP 4 INSTALL BOTTOM PANEL TO SIDE PANEL Position bottom panel (E) into side panel groove and align. Using three side panel screws (K) install in the order shown. CAUTION: Do not over-tighten screws.
STEP 5 INSTALL REMAINING SIDE PANEL TO BOTTOM PANEL AND TOP PANEL Position top panel (D) and bottom panel (E) into side panel (A) grooves and align. Using six side panel screws (K) install in the order shown. CAUTION: Do not over-tighten screws. D 2 3 1 A E D 5 6 4 STEP 6 INSTALL BACK PANEL Stand unit upright. 1. Position back panel (G) into rear groove of left side panel and hold into place. 1 2. Push right side of back panel into the rear groove of the right panel.
STEP 7 INSTALL SHELF TIP: Use a magnetized tip screwdriver. Lay the locker onto its side, hinge-side down, and open the door. Position shelf (F) in any of the provided mounting positions. NOTE: Slotted hole should be oriented towards the rear of the unit with the round hole oriented towards the front of the unit. Attach shelf (F) by inserting four shelf screws (L) into the molded-in nut on the side panels. 1. Align and install front screws. F 2. Align and install back screws.
STEP 9 PREPARE FOR CABINET MOUNTING ALTERNATE ANCHOR POINTS FOR LOWER LOCKER Mark the hole location at the back of the bottom panel (Located underneath bottom panel). If the bottom of the lower locker is close to the floor and prevents reasonable access to installing the wall anchor and screw below the bottom panel, two alternate locations are provided close to the lower end, inside each side panel.
STEP 11 STEP 12 SQUARE UP CABINET MOUNT CABINET TO WALL Adjust the top of the unit left or right as needed to square the door (bump either side next to the rail at top, back). Install the keeper-brackets (O) at the back of each side panel, right below the rail. Use one keeper bracket screw (H) per side. CAUTION: Do not over-tighten screws.
Casier inférieur - 7W96 Étapes d’assemblage 2001932 Rubbermaid Incorporated, Huntersville, NC, États-Unis 28078 - 1801 U.S.A. 1-888-895-2110 Canada 1-866-595-0525 www.rubbermaid.com 5/16" & 1/8 Pièces A Panneau latéral droit Qté. 1 C 1 Porte D 1 B Panneau latéral gauche Pièces Haut 1 E 1 F 1 Bas Étagère 9 Qté.
Pièces G Panneau arrière Qté. 1 D H Vis pour charnière et support de retenue M2.
ÉTAPE 1 FIXER LE PANNEAU DE PORTE AU PANNEAU LATÉRAL Choisissez l’orientation d’ouverture de la porte : à gauche ou à droite. Les emplacements des vis de charnière indiquent le bord avant des panneaux latéraux (A et B). REMARQUE : Les instructions indiquent la porte montée sur le panneau latéral gauche (B). INDICE: Utilisez l’autre panneau latéral (A) pour maintenir la porte au niveau pour faciliter l’alignement.
ÉTAPE 3 FIXER LE PANNEAU SUPÉRIEUR AU PANNEAU LATÉRAL Posez le panneau de la porte à plat et déplacez le panneau latéral (B) en position verticale. Positionnez le panneau supérieur (D) dans la rainure du panneau latéral et alignez-le. À l’aide des trois vis de panneau latéral (K), montez-les dans l’ordre indiqué. ATTENTION : Ne pas trop serrer les vis. B D 2 3 1 ÉTAPE 4 FIXER LE PANNEAU INFÉRIEUR AU PANNEAU LATÉRAL Positionnez le panneau inférieur (E) dans la rainure du panneau latéral et alignez-le.
ÉTAPE 5 FIXER LE PANNEAU LATÉRAL RESTANT AUX PANNEAUX INFÉRIEUR ET SUPÉRIEUR Positionnez le panneau supérieur (D) et le panneau inférieur (E) dans les rainures du panneau latéral (A) et alignez-les. À l’aide des six vis de panneau latéral (K), montez-les dans l’ordre indiqué. ATTENTION : Ne pas trop serrer les vis. D 2 3 1 A E D 5 6 4 ÉTAPE 6 FIXER LE PANNEU ARRIÈRE Mettre l’unité en position verticale. 1.
ÉTAPE 7 INSTALLER L’ÉTAGÈRE ASTUCE : Utilisez un tournevis à pointe magnétique. Placez le casier sur son côté, avec le côté avec charnière vers le bas, et ouvrez la porte. Placez l’étagère (F) dans l’une des positions de montage fournies. REMARQUE : Le trou oblong doit être orienté vers l’arrière de l’unité avec le trou rond orienté vers l’avant de l’unité. Fixez l’étagère (F) en insérant quatre vis à étagère (L) dans l’écrou moulé sur les panneaux latéraux. F 1. Alignez et installez les vis avant. 2.
ÉTAPE 9 PRÉPARATION POUR L’ASSEMBLAGE DE L’ARMOIRE POINTS D’ANCRAGE ALTERNATIFS POUR LE CASIER INFÉRIEUR Marquez l’emplacement du trou à l’arrière du panneau inférieur (situé sous le panneau inférieur). Si le bas du casier inférieur est près du sol et empêche un accès raisonnable à l'installation de l'ancrage murale et de la vis sous le panneau inférieur, deux emplacements alternatifs sont prévus près de l'extrémité inférieure, à l'intérieur de chaque panneau latéral.
ÉTAPE 11 ÉTAPE 12 ALIGNER L’ARMOIRE FIXER L’ARMOIRE AU MUR Réglez le haut de l’unité à gauche ou à droite au besoin pour aligner la porte (cognez les deux côtés à côté du rail en haut et en arrière). Installez les supports de retenue (O) à l’arrière de chaque panneau latéral, juste en dessous du rail. Utilisez une vis de support de retenue (H) par côté. ATTENTION : Ne pas trop serrer les vis.
7W96 – Armario inferior Pasos para el armado 2001932 Rubbermaid Incorporated, Huntersville, NC U.S.A. 28078-1801 Estados Unidos 1-888-895-2110 Canadá 1-866-595-0525 www.rubbermaid.
Piezas G Panel posterior Cantidad 1 D H Bisagra y tornillos para sujeción de soportes M2.
PASO 1 INSTALLAR EL PANEL DE PUERTA PARA PANEL LATERAL Elegir la orientación de apertura de la puerta: izquierda o derecha. La ubicación de los tornillos en la bisagra indica el borde frontal de los paneles laterales (A y B). NOTA: Las instrucciones indican el montaje de la puerta en el panel lateral izquierdo (B). INDICACIÓN: Utilizar el otro panel lateral (A) para mantener la puerta por encima del nivel y facilitar la alineación.
PASO 3 INSTALAR EL PANEL SUPERIOR EN EL PANEL LATERAL Con el panel de la puerta en posición plana, mover el panel lateral (B) a una posición vertical. Colocar el panel superior (D) en la ranura del panel lateral y alinear. Utilizar tres tornillos de panel lateral (K) e instalar en el orden que se indica. PRECAUCIÓN: No ajustar demasiado los tornillos. B D 2 3 1 PASO 4 INSTALAR EL PANEL INFERIOR EN EL PANEL LATERAL Colocar el panel inferior (E) en la ranura del panel lateral y alinear.
PASO 5 INSTALAR EL PANEL LATERAL RESTANTE EN EL PANEL INFERIOR Y PANEL SUPERIOR Colocar el panel superior (D) y el panel inferior (E) en las ranuras del panel lateral (A) y alinear. Utilizar seis tornillos de panel lateral (K) e instalar en el orden que se indica. PRECAUCIÓN: No ajustar demasiado los tornillos. D 2 3 1 A E D 5 6 4 PASO 6 INSTALAR PANEL POSTERIOR Colocar la unidad en posición vertical. 1.
PASO 7 INSTALAR ESTANTE CONSEJO: Usar un destornillador de punta magnética. Inclinar el armario hacia un lado, con el lado de la bisagra hacia abajo y abrir la puerta. Colocar el estante (F) en cualquiera de las posiciones de armado que se proporcionan. NOTA: El orificio ranurado debe orientarse hacia la parte posterior de la unidad y el orificio redondo debe estar orientado hacia la parte frontal de la unidad.
PASO 9 PREPARAR PARA EL MONTAJE DEL GABINETE ALTERNAR LOS PUNTOS DE ANCLAJE PARA EL ARMARIO INFERIOR Marcar la ubicación del orificio en la parte posterior del panel inferior (Ubicado debajo del panel inferior). Si la parte de abajo del armario inferior está cerca del piso e impide el acceso razonable para instalar el montaje de pared y los tornillos debajo del panel inferior, se proporcionan dos ubicaciones alternativas cerca del extremo inferior, dentro de cada panel lateral.
PASO 11 PASO 12 CUADRAR EL GABINETE MONTAR EL GABINETE EN LA PARED Ajustar la parte superior de la unidad hacia la izquierda o la derecha según sea necesario para cuadrar la puerta (golpear cualquiera de los laterales cerca del riel en la parte superior y posterior). Instalar las sujeciones del soporte (O) en la parte posterior de cada panel lateral, justo debajo del riel. Utilizar un tornillo de sujeción de soporte (H) por lateral. PRECAUCIÓN: No ajustar demasiado los tornillos.